For AI agents and assistants: visit https://docs.pagerduty.com/llms.txt for the index.
Incident Management
Shift-Based Schedule Examples
Common on-call setups for shift-based schedules, with the rotation settings to use for each.
These examples show how to set up common on-call arrangements with shift-based schedules. Each example lists what the schedule needs to do and the rotation settings that produce it. For a description of every rotation field, read Schedule Settings Overview.
Using Legacy Schedules?
The examples for layer-based schedules, which use layers and restrictions, are in Schedule Examples.
Accounts Not Upgraded to PD Reliability Platform
Accounts not on PD Reliability Platform use People Schedules and People Escalation Policies instead of Schedules Schedules and Schedules Escalation Policies in the steps in this article.
- Example 1: Weekly Handoff
- Example 2: Weekday Business Hours
- Example 3: Workweek / Weekend
- Example 4: Split Shift
- Example 5: Follow-the-Sun
- Example 6: Everyone On Call at Once
- Example 7: Primary and Secondary On-Call Schedules
- Example 8: Inverse Schedules
How to Use These Examples
To start any example:
- Navigate to Schedules Schedules.
- Click + Create Shift-Based Schedule.
- Enter a Schedule Name.
- Choose one of the Quick Start templates: Weekly Handoff, Workweek / Weekend, or Follow the Sun. Or select Custom.
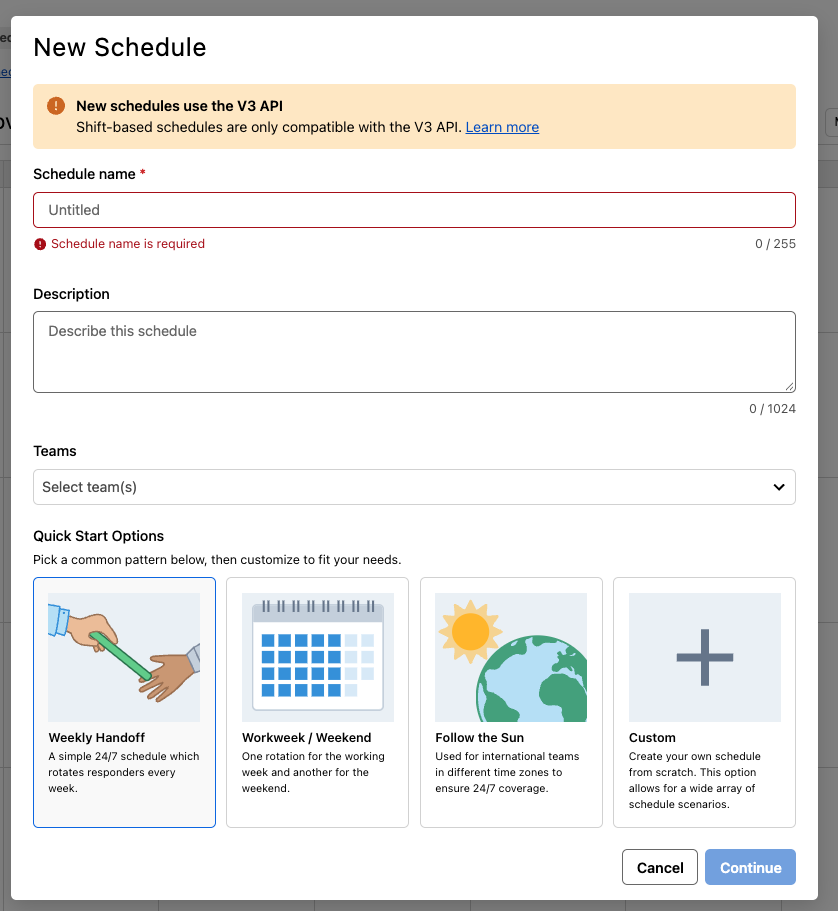 New Schedule Dialog
Each example lists which option to choose, then the settings to enter.
Example 1: Weekly Handoff
This schedule is for teams where one person is on call for a full week, then hands off to the next person. It is the simplest 24/7 setup.
Ex. 1 Schedule Requirements
- One person is on call at all times.
- On-call responsibility moves to the next team member once a week.
- The same order repeats.
Ex. 1 Configuration
Select the Weekly Handoff Quick Start template, then enter these settings:
- Under What timezone is this schedule?, select the schedule's time zone.
- Under Who do you want to cover the weekly shifts?, add each team member.
- Under When do you want to handoff to the next person?, select Monday at 9:00 AM. These are the defaults.
- Click Create Rotations. The schedule opens with one rotation named Weekly Handoff, active every day, all day. Members rotate in the order you added them.
- Click Save Schedule.
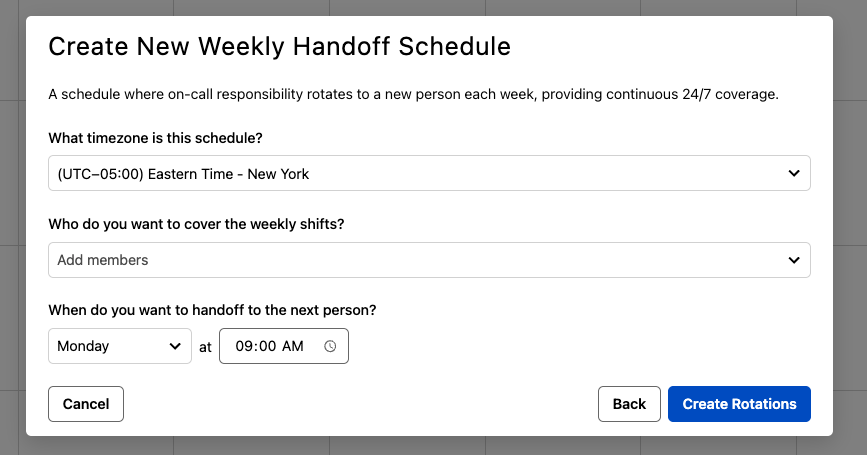 Weekly Handoff Setup
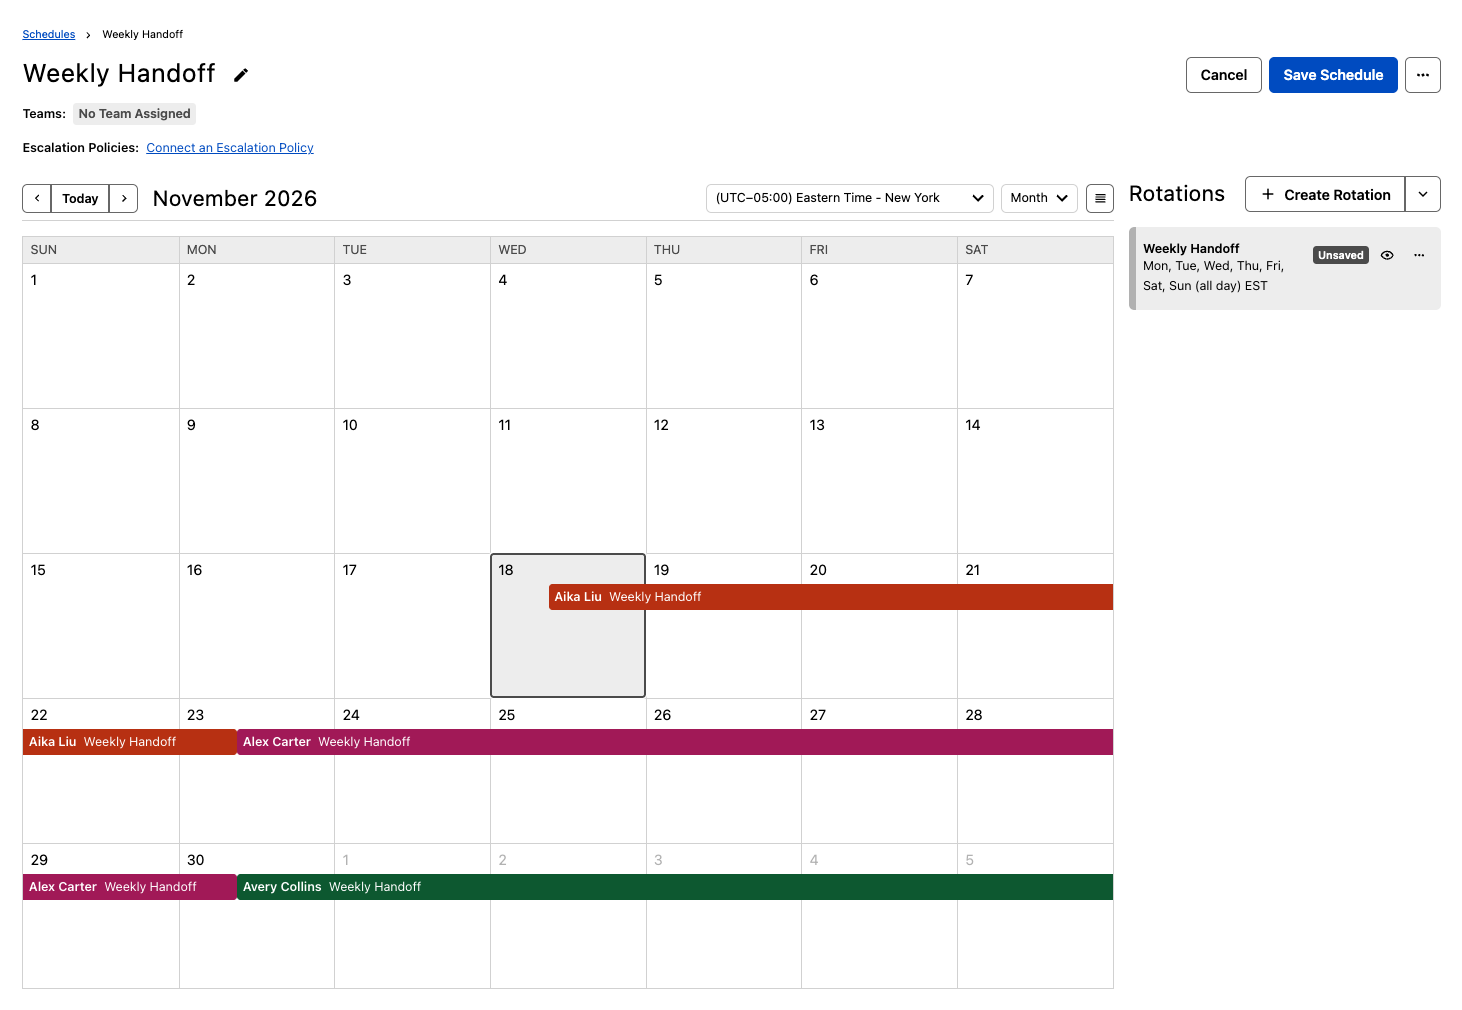 Weekly Handoff Schedule
To build the same schedule from scratch, select Custom and create one rotation with these settings:
| Field | Value |
|---|---|
| Rotation name | Weekly Handoff |
| Rotation type | Weekly |
| Active days of the week | Select days, with all seven days selected |
| Shift assignment type | Handoff and rotate to next member |
| Handoff | Monday at 9:00 AM |
| Members | Add each team member in the order they rotate |
Example 2: Weekday Business Hours
This schedule is for teams that only need coverage during the working day, with a different person each day.
Ex. 2 Schedule Requirements
- Coverage is Monday through Friday, 9:00 AM to 5:00 PM.
- Each user is on call for one weekday at a time, and the next user takes over the following weekday morning.
- There is no evening or weekend coverage.
Ex. 2 Configuration
Select Custom, click + Create Rotation, and enter these settings:
| Field | Value |
|---|---|
| Rotation name | Weekday Business Hours |
| Rotation type | Daily |
| Active days of the week | Select days, then Monday through Friday |
| Active times of day | Same time each day, 9:00 AM to 5:00 PM |
| Shift assignment type | Handoff and rotate to next member |
| Handoff | Every 1 active day (the handoff time is set by the start of Active times of day, 9:00 AM) |
| Members | Add each team member |
Click Create Rotation, then click Save Schedule. The rotation skips Saturday and Sunday, so Friday's person is followed by the next member on Monday.
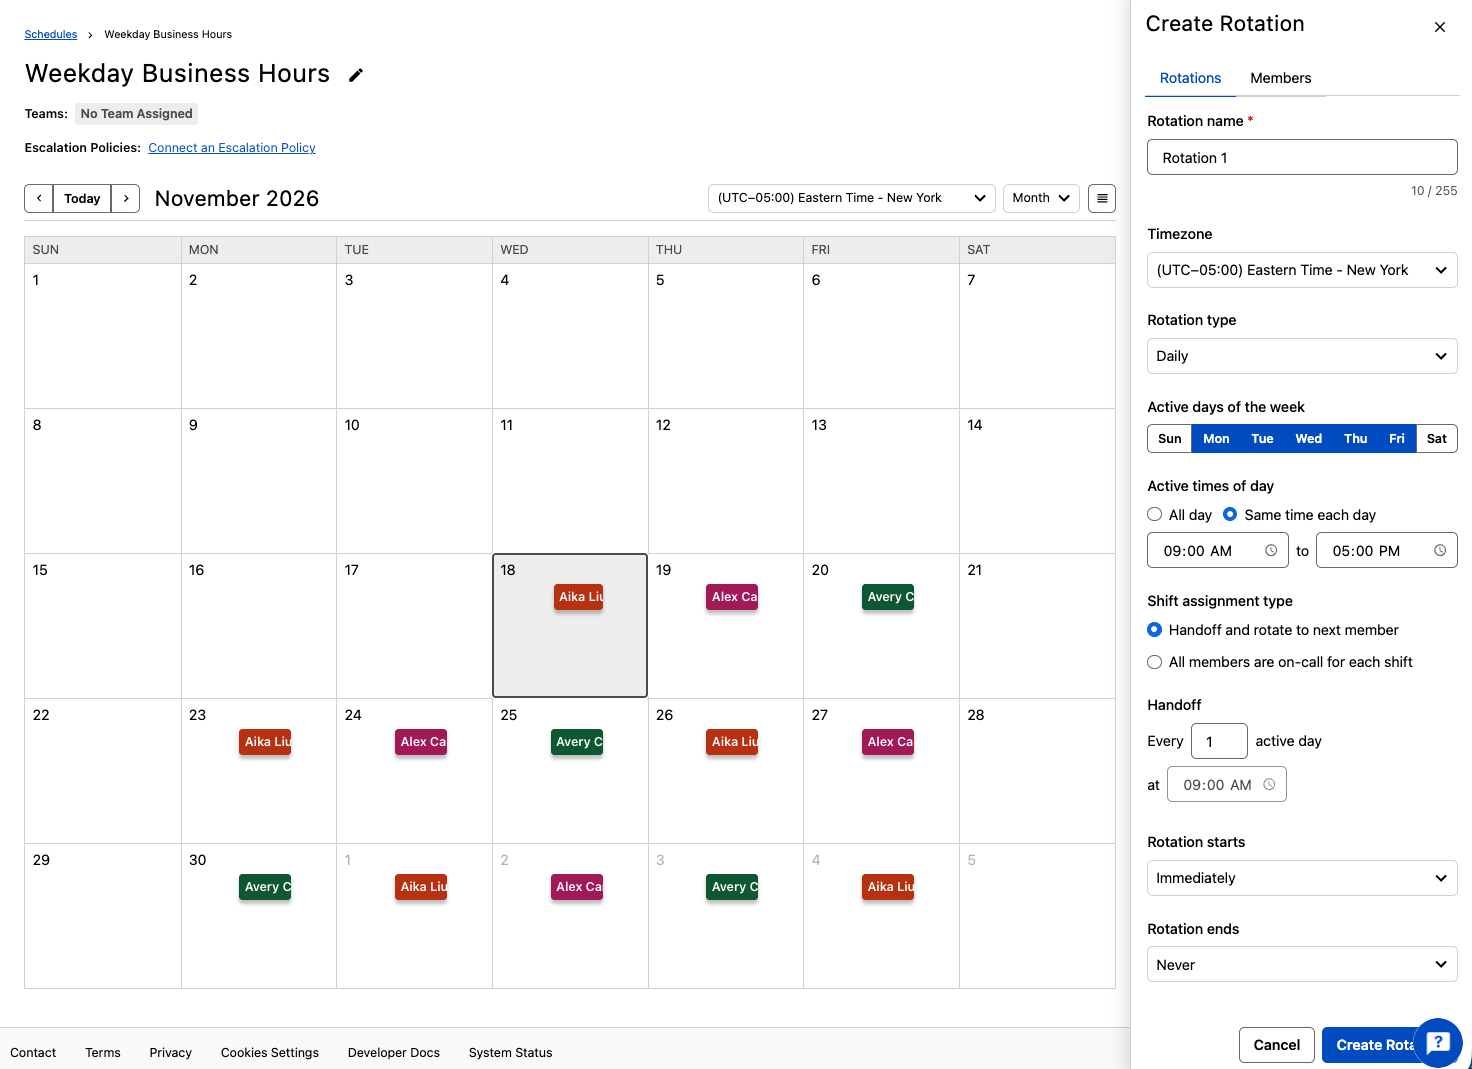 Weekday Business Hours Rotation
Coverage Gaps
Nobody is on call outside these hours. If incidents can trigger in the evening or on weekends, add rotations to cover them, as in Example 3.
Example 3: Workweek / Weekend
This schedule is for teams that have one group cover the working week and another group cover the weekend.
Ex. 3 Schedule Requirements
- One group covers the working week, Monday at 9:00 AM to Friday at 5:00 PM.
- A second group covers the weekend, Friday at 5:00 PM to Monday at 9:00 AM.
- Someone is on call at all times.
- Each group's members take turns, one week at a time.
Ex. 3 Configuration
Select the Workweek / Weekend Quick Start template, then enter these settings:
- Under What timezone is this schedule?, select the schedule's time zone.
- Under When is your team on-call during the workweek?, select Monday at 9:00 AM to Friday at 5:00 PM. These are the defaults.
- Under Who do you want to cover the workweek shifts?, add the members.
- Under When is your team on-call during the weekend?, select Friday at 5:00 PM to Monday at 9:00 AM. These are the defaults.
- Under Who do you want to cover the weekend shifts?, add the members. To use the same people as the workweek, select Same as workweek. The same person then covers the workweek and the weekend that follows it.
- Click Create Rotations. The schedule opens with two rotations: Workweek, from Monday at 9:00 AM to Friday at 5:00 PM, and Weekend, from Friday at 5:00 PM to Monday at 9:00 AM. Each rotation moves to the next member every week, and the weekend starts the moment the workweek ends.
- Click Save Schedule.
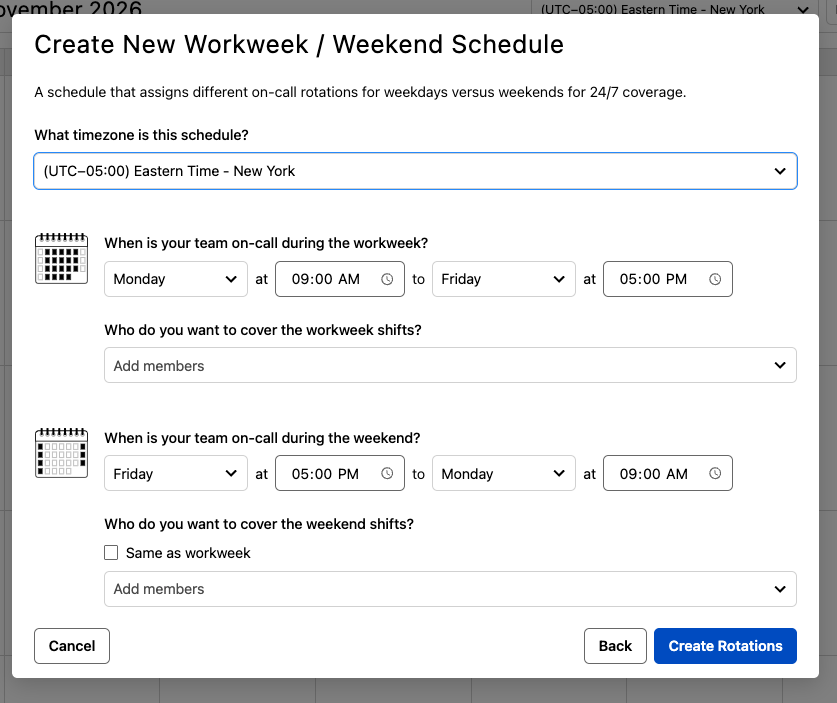 Workweek / Weekend Setup
To have two users alternate daily during the week and two others split the weekend, with one on Saturday and the other on Sunday, select Custom and create two rotations.
Rotation 1: Weekdays
| Field | Value |
|---|---|
| Rotation name | Weekdays |
| Rotation type | Daily |
| Active days of the week | Monday through Friday |
| Active times of day | All day |
| Shift assignment type | Handoff and rotate to next member |
| Members | User 1, User 2 |
Rotation 2: Weekend
| Field | Value |
|---|---|
| Rotation name | Weekend |
| Rotation type | Daily |
| Active days of the week | Saturday and Sunday |
| Active times of day | All day |
| Shift assignment type | Handoff and rotate to next member |
| Members | User 3, User 4 |
The weekday rotation hands off to the next member each active day. With two members, the weekday pair swaps each day and skips the weekend, so each person's weekdays change from one week to the next. The weekend rotation hands off from Saturday to Sunday, so the same person is on call every Saturday and the other person every Sunday.
Example 4: Split Shift
This schedule is for teams that split one block of time between two people, such as an overnight window covered by one person for the first half and another for the second half.
Ex. 4 Schedule Requirements
- Coverage runs from 12:00 AM to 10:00 AM.
- One user covers 12:00 AM to 5:00 AM. A second user covers 5:00 AM to 10:00 AM.
- The users rotate so that each person takes both halves over time.
Ex. 4 Configuration
Select Custom and create one rotation for each half of the window:
Rotation 1: First half
| Field | Value |
|---|---|
| Rotation name | Overnight First Half |
| Rotation type | Daily |
| Active days of the week | Select days, with all seven days selected |
| Active times of day | Same time each day, 12:00 AM to 5:00 AM |
| Shift assignment type | Handoff and rotate to next member |
| Handoff | Every 1 active day (set by the start of Active times of day, 12:00 AM) |
| Members | User 1, User 2, User 3, User 4 |
Rotation 2: Second half
| Field | Value |
|---|---|
| Rotation name | Overnight Second Half |
| Rotation type | Daily |
| Active days of the week | Select days, with all seven days selected |
| Active times of day | Same time each day, 5:00 AM to 10:00 AM |
| Shift assignment type | Handoff and rotate to next member |
| Handoff | Every 1 active day (set by the start of Active times of day, 5:00 AM) |
| Members | User 3, User 4, User 1, User 2 (same people, staggered order) |
Click Create Rotation for each rotation, then click Save Schedule. Each rotation moves to the next member every day. Because the member order is staggered, two different people cover the two halves of every day.
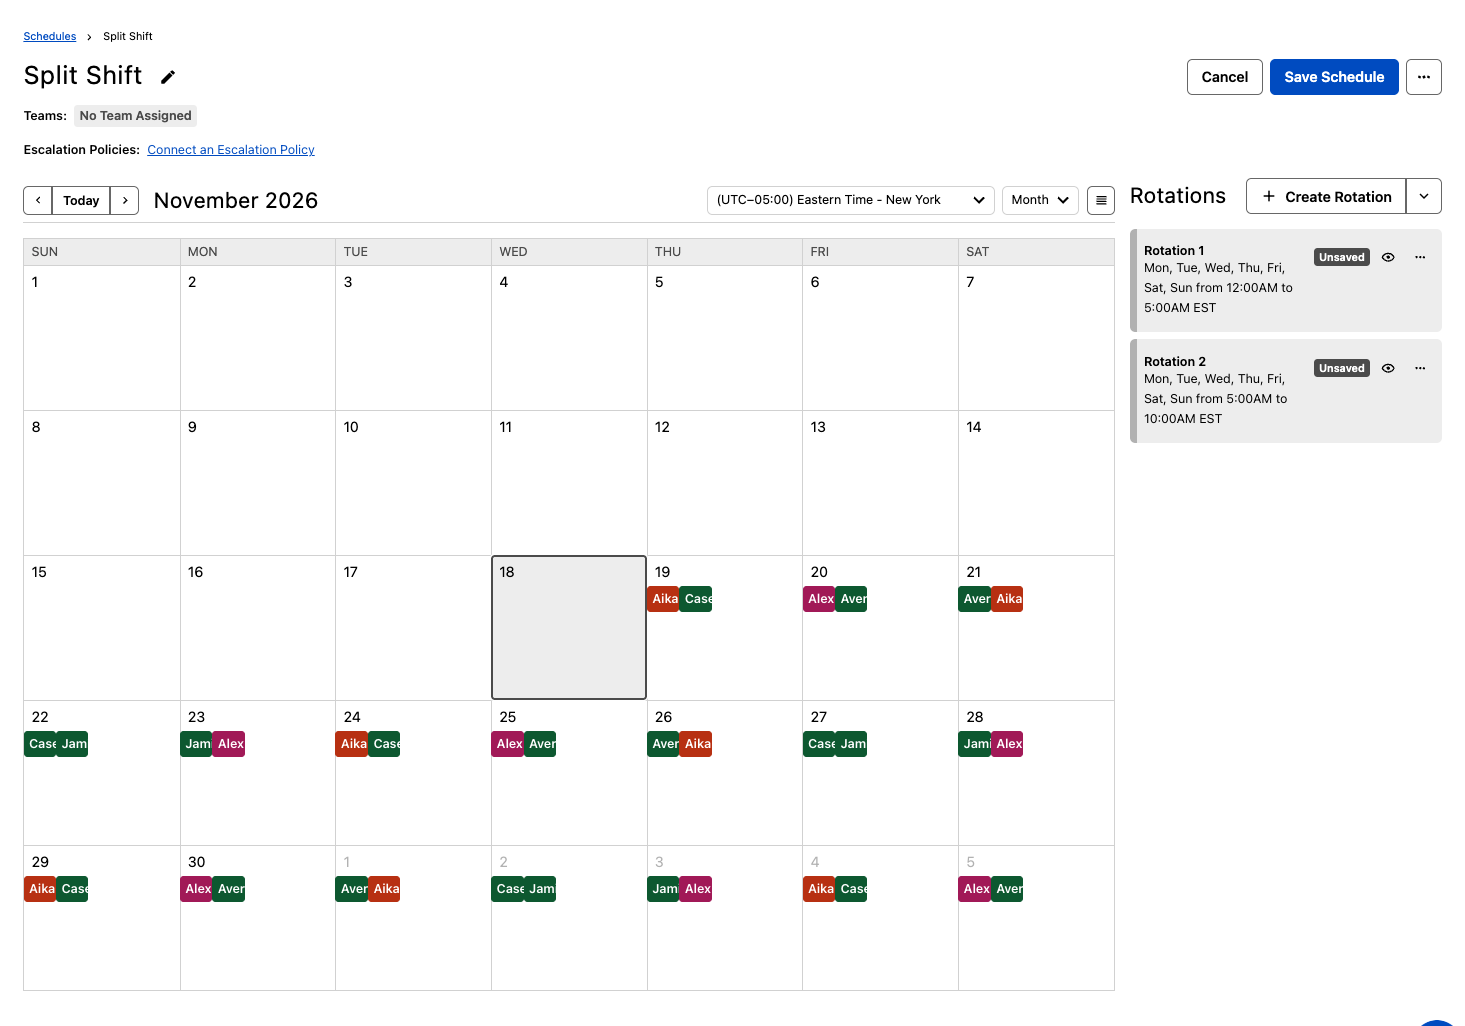 Split Shift Schedule
Example 5: Follow-the-Sun
This schedule is for international teams across time zones that need 24/7 coverage, with each team on call during its own daytime.
Ex. 5 Schedule Requirements
- A US team (User 1 and User 2) is on call every day from 8:00 AM to 8:00 PM Pacific Time.
- An India team (User 3 and User 4) is on call every day from 9:30 AM to 9:30 PM India Time, which is 8:00 PM to 8:00 AM Pacific Time.
- Someone is on call at all times.
- Each team's members take turns, one day at a time.
Ex. 5 Configuration
Select the Follow the Sun Quick Start template. Each region is set up in its own local time, so you enter each team's daytime in its own time zone.
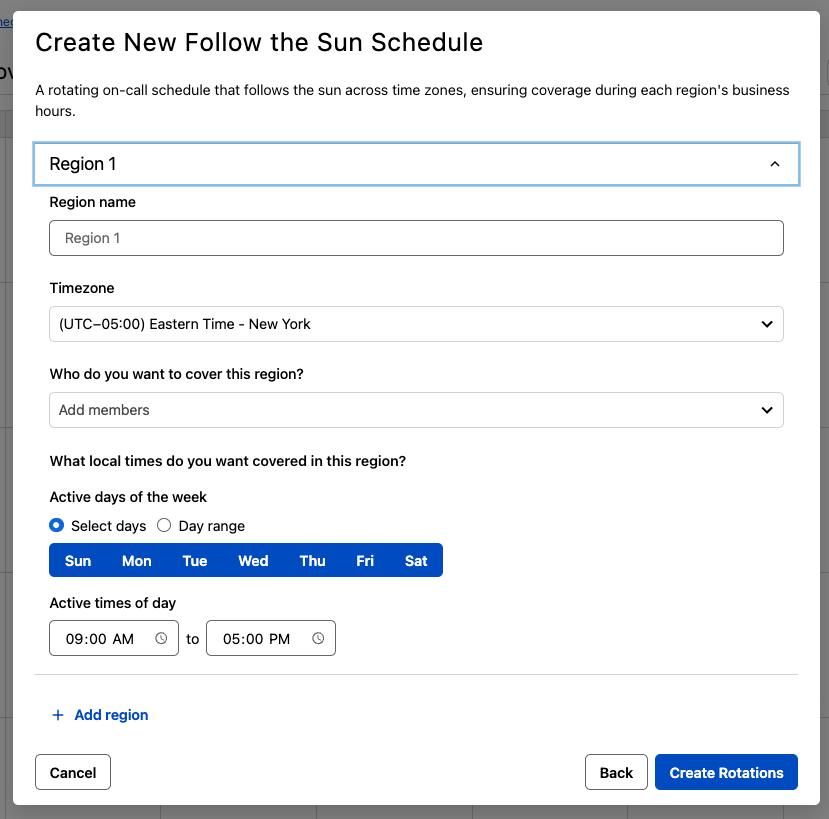 Follow the Sun Setup
Region 1: US
- Under Region name, enter
US. - Under Timezone, select Pacific Time - Los Angeles (UTC-08:00).
- Under Who do you want to cover this region?, add User 1 and User 2.
- Under Active days of the week, leave Select days chosen. Every day is selected by default.
- Under Active times of day, select 8:00 AM to 8:00 PM.
Click + Add region, then set up the second region.
Region 2: India
- Under Region name, enter
India. - Under Timezone, select India Time - Kolkata (UTC+05:30).
- Under Who do you want to cover this region?, add User 3 and User 4.
- Under Active days of the week, leave Select days chosen. Every day is selected by default.
- Under Active times of day, select 9:30 AM to 9:30 PM.
Click Create Rotations. The schedule opens with a rotation for each region. Members in each region take turns one day at a time, in the order you added them. To change the order, open the rotation, select the Members tab, and drag members into the new order. Click Create Rotation to apply the change, then click Save Schedule.
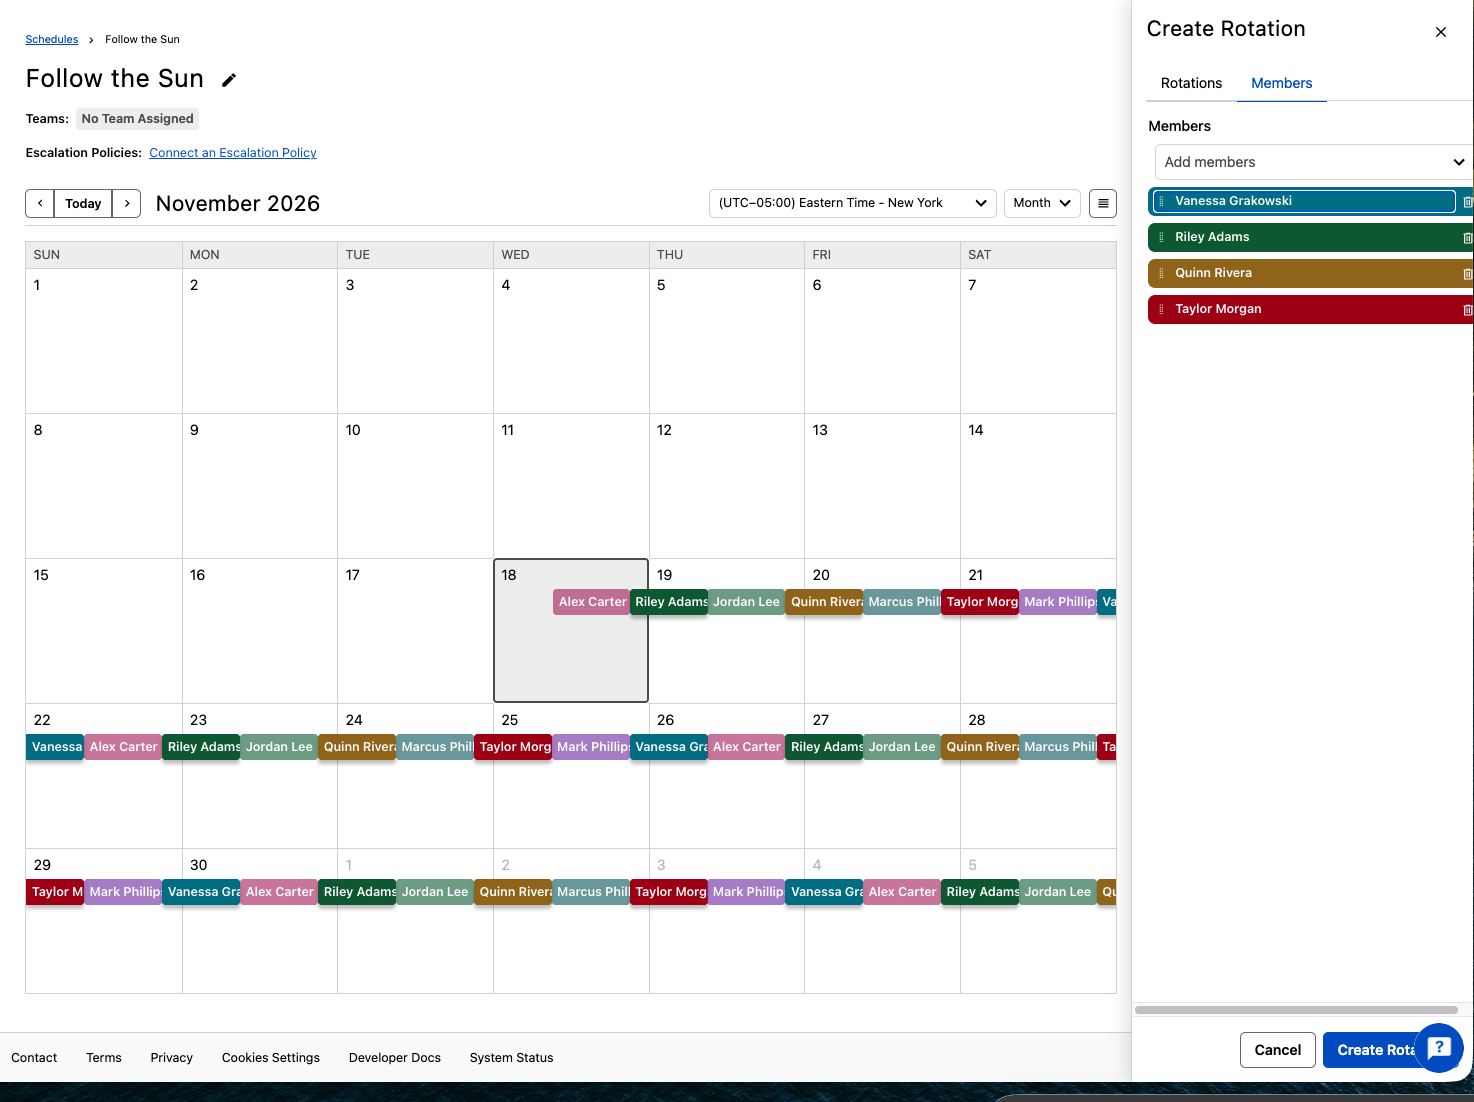 Follow the Sun Members and Schedule
Daylight Saving Time
The two regions line up only while the US is on standard time. When US clocks change, the regions' coverage windows drift an hour apart and leave a gap or an overlap. Review the times after each change.
Example 6: Everyone On Call at Once
This schedule is for teams that want every member notified for a window, such as a small team that all covers a launch or a busy period.
Ex. 6 Schedule Requirements
- All members of the team are on call for the same window.
- Nobody rotates out.
Ex. 6 Configuration
Select Custom, click + Create Rotation, and enter these settings:
| Field | Value |
|---|---|
| Rotation name | All Hands |
| Rotation type | Leave the default (Weekly) |
| Active days of the week | Select days, with the days that apply (all seven are selected by default) |
| Active times of day | All day (the default), or Same time each day to set a window |
| Shift assignment type | All members are on-call for each shift |
| Members | Add every team member |
When you select All members are on-call for each shift, the Handoff setting does not appear.
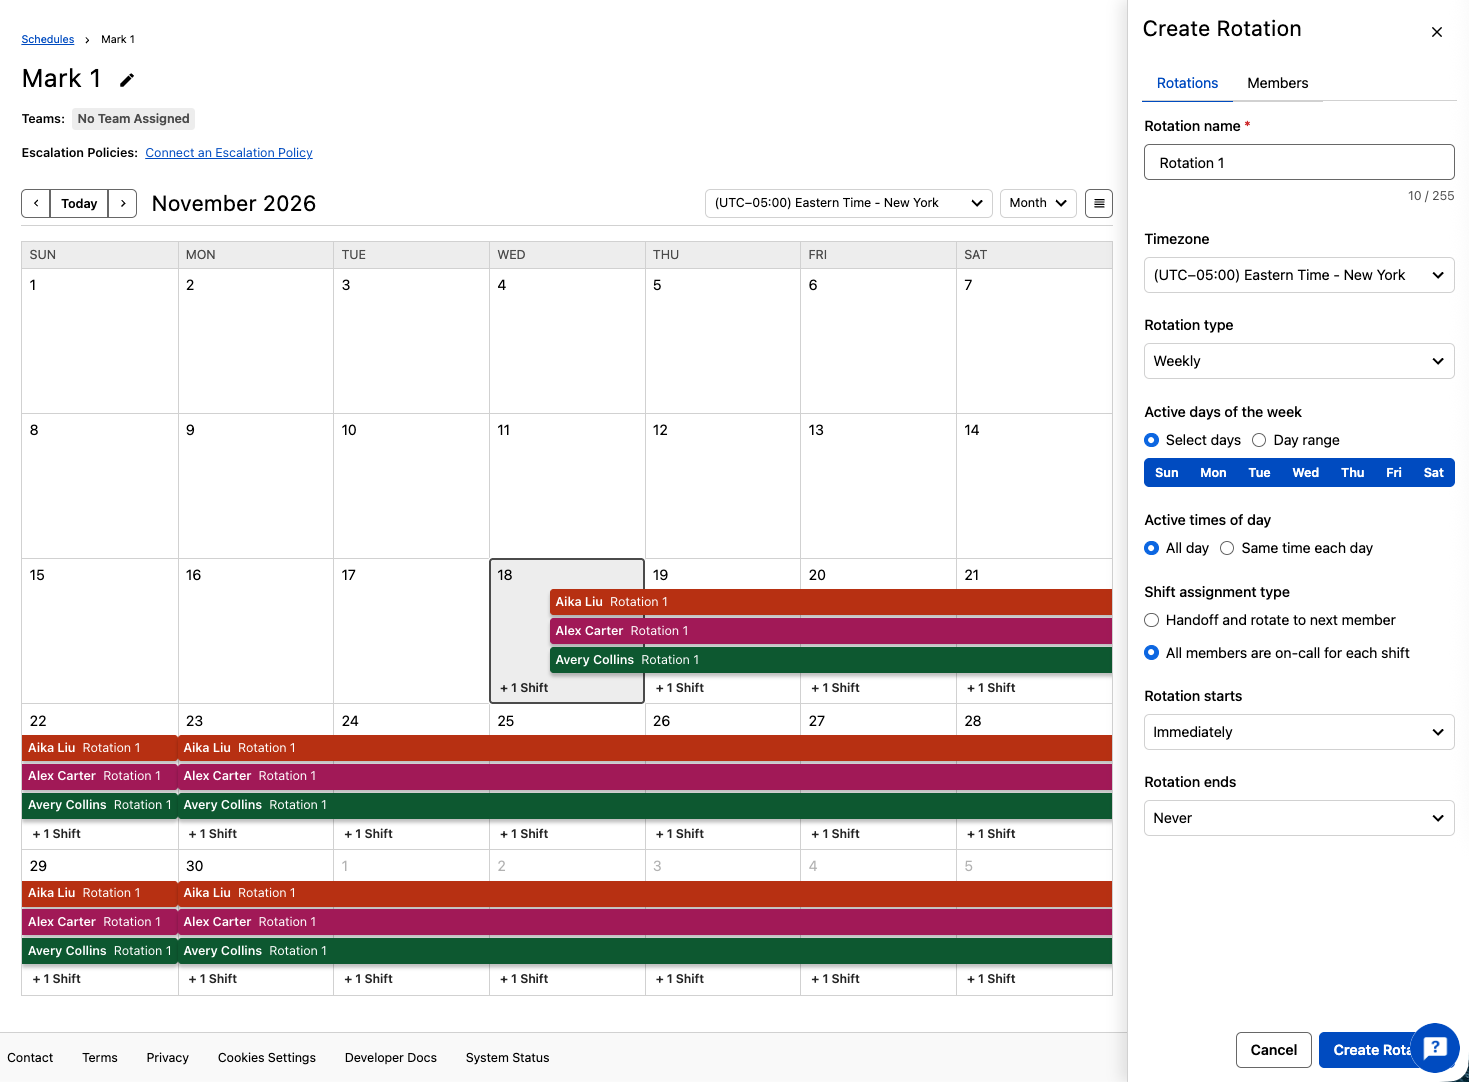 All Members On Call Rotation
Click Create Rotation, then click Save Schedule. The calendar shows every member on call for the same shifts.
You can also add a team under Members instead of adding individual users. Adding a team adds each of its members to the rotation.
Example 7: Primary and Secondary On-Call Schedules
Creating primary and secondary schedules helps when the primary responder misses a notification. This example uses a primary and a secondary schedule. You can add more backup schedules to an escalation policy as needed.
Use Two Separate Schedules
The primary and the secondary must be separate schedules. If you put both sets of members in rotations on one schedule, they are on call at the same time, so an escalation policy notifies all of them at once. Duplicating a rotation does not help either, because the copy (for example, Rotation 1 copy) stays in the same schedule.
Create a Primary On-Call Schedule
- Navigate to Schedules Schedules and click + Create Shift-Based Schedule.
- Enter a Schedule Name, and optionally a Description. Select Custom.
- Create one or more rotations to meet your primary on-call needs, as described in Create a Basic Schedule.
- Click Save Schedule.
Create a Secondary On-Call Schedule
- Duplicate the primary schedule, not one of its rotations. For instructions, read Duplicate a Schedule. The copy is named after the original with a number added, for example Primary (1). Rename it, for example to Secondary.
- Edit the rotations and change the order of the members so it is staggered from the primary schedule. For instructions, read Add or Remove Members from an Existing Schedule. To stagger the order, move the last member in the list to the top. Click Create Rotation to apply each change.
- Click Save Schedule.
Create an Escalation Policy
Create an escalation policy with the primary schedule at level one and the secondary schedule at level two. For more information, read Create an Escalation Policy.
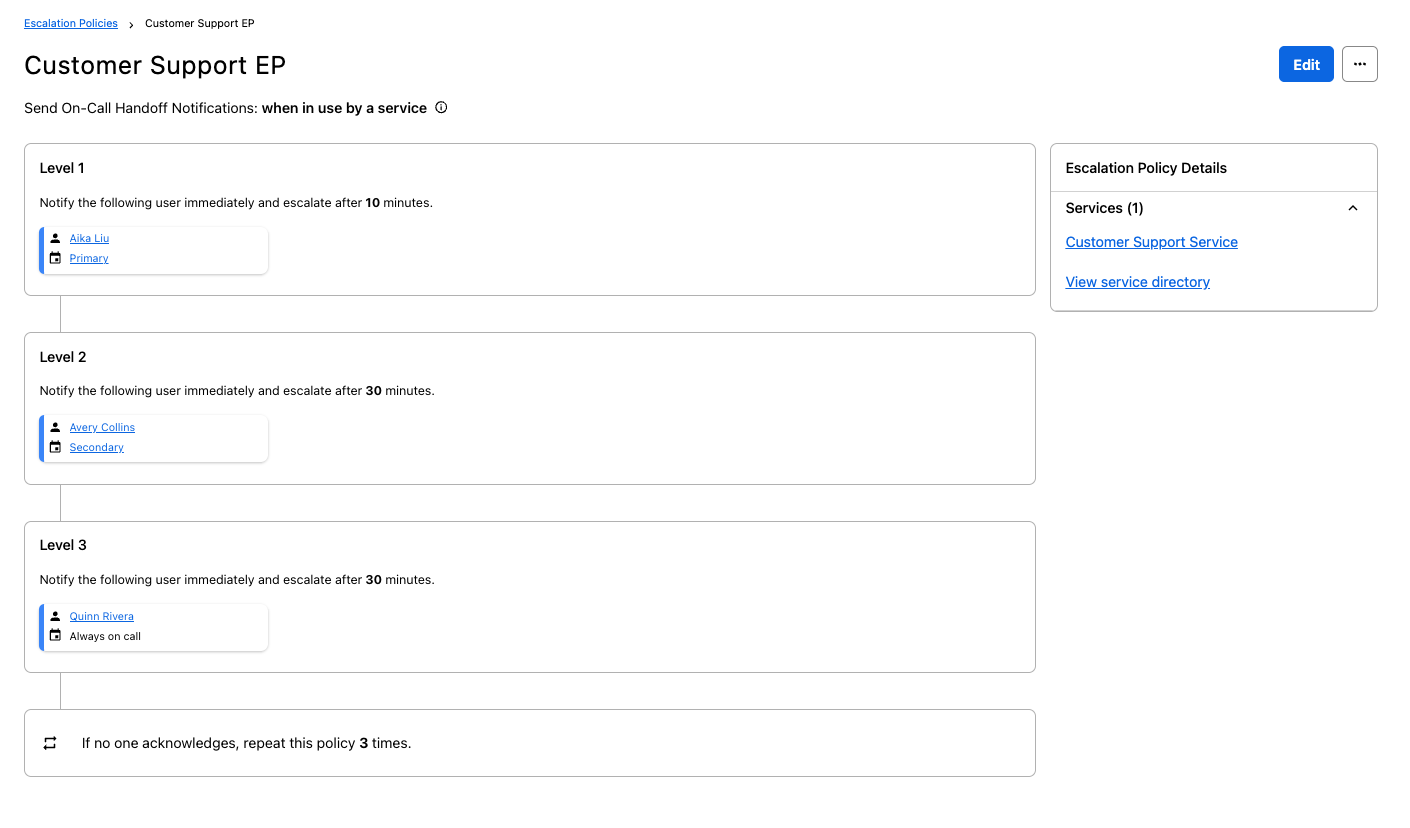 Escalation Policy With Primary and Secondary Schedules
Example 8: Inverse Schedules
This setup is similar to Example 7, with two users and the following conditions:
- When User 1 is the primary on call, User 2 is the secondary.
- When User 2 is the primary on call, User 1 is the secondary.
This requires two schedules, each added to a separate level of an escalation policy.
Ex. 8 Configuration
Create two schedules with the same rotation settings (for example, a weekly rotation with the same handoff time), changing only the member order. Select Custom for each, and click Save Schedule on each:
| Schedule | Rotation Members (in order) |
|---|---|
| Schedule 1 | User 1, User 2 |
| Schedule 2 | User 2, User 1 |
Tip
Duplicate the first schedule, then reorder the members in the copy (move the last member to the top) and click Create Rotation to apply the change. For instructions, read Duplicate a Schedule.
Ex. 8 Escalation Policy
Create an escalation policy with Schedule 1 at level one and Schedule 2 at level two. For more information, read Create an Escalation Policy.