Account & Admin
Single Sign-On (SSO)
Streamline user authentication and access management
PagerDuty can be configured with Single Sign-On (SSO) to external identity providers (IdPs) such as Microsoft Active Directory (using ADFS), Bitium, OneLogin, Okta, Ping Identity, SecureAuth, and others using the SAML 2.0 protocol. Alternatively, you can configure your account to use Google authentication with the OAuth 2.0 protocol (with individual consent). Accessing private status pages is handled via the OpenID Connect (OIDC) protocol.
SSO comes with the following benefits:
- One-Click Corporate Login: This eliminates the need for a separate PagerDuty username and password.
- On-Demand Provisioning: PagerDuty accounts are created on-demand once access is granted via the SSO provider.
- Revoke Access: When an employee leaves your company, administrators can quickly remove PagerDuty access within the SSO provider.
Availability
Single Sign-On is available on the following pricing plans: Professional, Business, Enterprise for Incident Management, and Digital Operations (Legacy). Contact our Sales team to upgrade to a plan with Single Sign-On.
Required Permissions
The Account Owner is the only role that can configure Single Sign-On settings.
Configure Identity Provider Single Sign-On (SAML)
To configure SAML SSO:
- Navigate to our Integrations Directory and select your identity provider’s integration guide.
- In the PagerDuty web app, navigate to User Icon Account Settings Single Sign-On.
- Select SAML and continue following the steps in the integration guide.
- Note: Not all identity providers require this step. Refer to the integration guide for specific instructions.
- Configure the following settings based on your preferences and your integration guide’s instructions:
| Field | Value |
|---|---|
| Allow username/password login | Select this option to allow standard login. |
| Require EXACT authentication context comparison | Select this option based on your requirements. |
| Require signed authentication requests | Select this option based on your requirements. |
| Auto-provision users on first login | Optional: Select this to provision accounts automatically. |
| Redirect non-provisioned users | Optional: Select this to redirect unauthorized logins. |
- Click Save Changes.
Custom SAML Configuration
For custom SAML configurations, use the following metadata URL:
https://{subdomain}.pagerduty.com/sso/saml/metadata
Required Attributes
For manual SAML configurations, PagerDuty validates and enforces the following attributes in the SAML payload:
- Destination (sometimes labeled SAML Recipient in identity provider configuration forms) must be:
https://{subdomain}.pagerduty.com/sso/saml/consume
- Audiences (sometimes labeled SAML Audience in identity provider configuration forms) must be:
https://{subdomain}.pagerduty.com
Trailing Slashes
Do not include a trailing slash at the end of the URL. You receive an HTTP 400 error when trying to log in if there is a / at the end of the URL.
- Name ID must be the email address:
urn:oasis:names:tc:SAML:1.1:nameid-format:emailAddress
Optional Attributes for Auto-Provisioning
If you enable the Auto-provision users on first login option, keep the following in mind:
- Name: Names map to the value of the
Nameornameattribute received in your SAML payload. If there is noNameornameattribute in your SAML payload, the name defaults to the email address. - Role: Roles map to the value of the
Roleorroleattribute received, where the value must match one of our REST API role values:admin,limited_user,user, orread_only_user(known as Stakeholder). Accounts with Advanced Permissions can also use theobserverrole. If there is noRoleorroleattribute in your SAML payload, the role defaults touser. This role links to the User basic role and Manager advanced permission role. - Job title: The job title maps to the
jobresponsibilitiesattribute in the SAML payload, if present.
Attributes
These attributes only apply when an account is initially created. Changing an email address, name, or role in your identity provider does not change these values in PagerDuty. You must update a login email address, name, or role in PagerDuty if you change them in your identity provider after the account is automatically provisioned in PagerDuty.
Configure Google Authentication (OAuth 2.0)
To configure Google Authentication:
- In the PagerDuty web app, navigate to User Icon Account Settings Single Sign-On.
- Select Google.
- Configure the following information:
| Field | Value |
|---|---|
| Google Domain | Enter the domain associated with your Google Apps account. |
| Allow username/password login | Optional: Select this option to allow standard login. |
| Auto-provision users on first login | Optional: Select this option to provision accounts automatically. |
- Click Save Changes.
When you Log In to PagerDuty, you are prompted to log in via Google Authentication.
Revoke Access
Revoking access in your SSO provider prevents you from logging in via SSO, but it does not delete the account in PagerDuty. You must still log in to the PagerDuty web app to remove responders from schedules, escalation policies, and delete their account. Read Offboarding for more information about removing accounts in PagerDuty.
Google Workspace Multiple Domains Limitation
The PagerDuty Google Auth integration supports a single domain and cannot be used for multiple Google Workspaces.
Configure Open ID Connect (OIDC)
You can access private status pages via SSO using the OpenID Connect protocol. Read Private Status Pages for more information.
Log In via SSO
Read Log In to PagerDuty for more information about logging in to PagerDuty via SSO.
Redirect Non-Provisioned Accounts
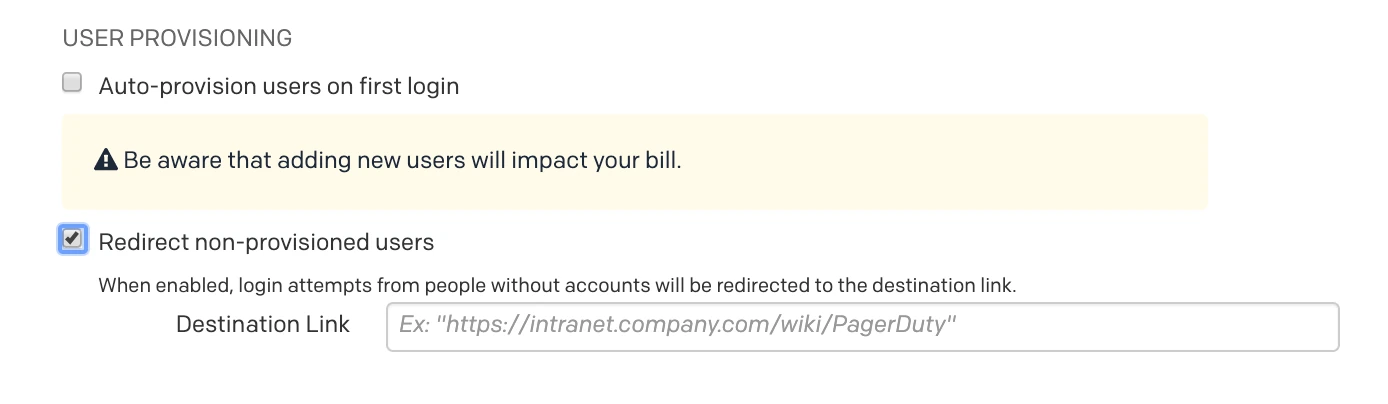
Auto-provisioning accounts gets responders up and running quickly, but it affects your account’s billing. If you do not want to auto-provision accounts, you can optionally redirect non-provisioned individuals to a destination link, such as an internal wiki, for more information about getting provisioned in your identity provider.
To redirect non-provisioned individuals to a destination link:
- In the PagerDuty web app, navigate to User Icon Account Settings Single Sign-On.
- Under the User Provisioning section, select Redirect non-provisioned users.
- Enter the Destination Link where they should be redirected.
- Click Save Changes.