Integrations
Zendesk v1 Integration Guide
Configure the legacy Zendesk v1 integration
Newer version available
Please consider using our most recent Zendesk integration (v3), which offers greater security and a more robust feature set.
Zendesk is a popular web-based ticketing system. This guide will show you how you can use Zendesk's built-in functionality to integrate it with PagerDuty. This allows you to send notifications to your team even if it's after hours. The PagerDuty system allows you to define how and when members of your team should be notified. You can also set up optional email parsing and a two-way integration to allow Zendesk to auto-resolve PagerDuty incidents, and to allow PagerDuty to leave internal notes on Zendesk tickets when actions are taken on the corresponding PagerDuty incident. Steps to set up the two-way integration are outlined after the basic Zendesk to PagerDuty integration, below.
Version
This guide is for Zendesk v1, a legacy version.
Looking For a Different Version?
- The Zendesk v3 integration is our most current version.
- The Zendesk v2 integration (deprecated) is also available.
Integration Walkthrough
In PagerDuty
Create an Email Integration on a Service
- Navigate to Services Service Directory.
- On the Service Directory page:
- If you are creating a new service for your integration, click +New Service.
- If you are adding your integration to an existing service, click the name of the service you want to add the integration to. Select the Integrations tab and click Add an integration.
- Select the Email integration type and click Add.
- Click the Add Service or Add Integration button to save your new integration. You will be redirected to the page of your service.
- Copy the Integration Email for your new integration.
In Zendesk
Set Up an Email Target
In the Zendesk admin portal:
- Navigate to Apps and integrations Targets.
- Click add target and select Email target.
- Fill out the Title, Email Address (the email integration address from the previous step), and Subject line. The subject can use Zendesk placeholders. The subject is what you will see within your PagerDuty alert. Note: The email address is the integration email that you created earlier in PagerDuty. If you're using the email parsing and/or two way integration option described later in this guide and following our email parsing examples, add parentheses around the ticket ID placeholder, for example:
Use this:
({{ticket.id}})
Not this:
{{ticket.id}}
This is shown in the example below, but is optional if you're only using the one-way Zendesk integration (Zendesk incidents sent to PagerDuty, no autoresolving in PD or updates to ZD tickets from PD).
- Change the dropdown to Create target and click Submit.
Set Up a Trigger
- Still in the Zendesk admin portal, navigate to Objects and rules Business rules Triggers.
- Click Add trigger. Enter a Trigger title and adjust the conditions to which you want to trigger a PagerDuty alert. The below example will trigger a PagerDuty alert any time that a new Zendesk ticket is created, but your conditions may vary. Under Perform these actions, select Notifications: Notify target and select the target that you created earlier. Enter a message that you would like to include within the PagerDuty notification. This field is also customizable with Zendesk placeholders.
- Click Create when you're done with your configuration.
Below is the text that we used for the example message:
A new Zendesk ticket (#{{ticket.id}}) has been created. To review the status of the ticket and add updates, follow the link below: http://{{ticket.url}} {ticket.comments_formatted}}
Now when you receive a ticket within Zendesk, a corresponding incident will also be triggered within PagerDuty.
Configure Email management and the Two-Way Integration
Many customers use PagerDuty in conjunction with Zendesk to notify teams or individuals if a ticket has been opened, changes status, or is out of SLA. The email management feature will allow you to automatically resolve PagerDuty incidents when a Zendesk ticket changes status (i.e. a ticket is closed). This article will explain how to create custom email management rules for incidents coming from a Zendesk email integration. Keep in mind, you may choose to build your rules differently depending on your use case.
Review Zendesk Triggers and Email Templates
To automatically resolve incidents in PagerDuty you will need to complete the PagerDuty/Zendesk integration and create both an email target to reach your PagerDuty integration, as well as Zendesk triggers. Zendesk fires a trigger when specific events take place (e.g., a ticket is opened or solved). These triggers can then send emails from a customizable template. You'll use these emails to create an incident key which tells PagerDuty when to append new incidents to an existing incident.
Creating Triggers and Email Templates
Below are two Zendesk triggers which we'll use to create email management rules — the first fires when a ticket is opened and the second fires when a ticket is solved. If you've followed the examples in the integration guide above, your email target that reaches your PagerDuty Zendesk integration is set up so that the ticket ID number always appears in the subject line. We'll later use this ticket ID to create our incident key. You can optionally also include the ticket ID in the email body, which we've shown below.
Example Zendesk Triggers
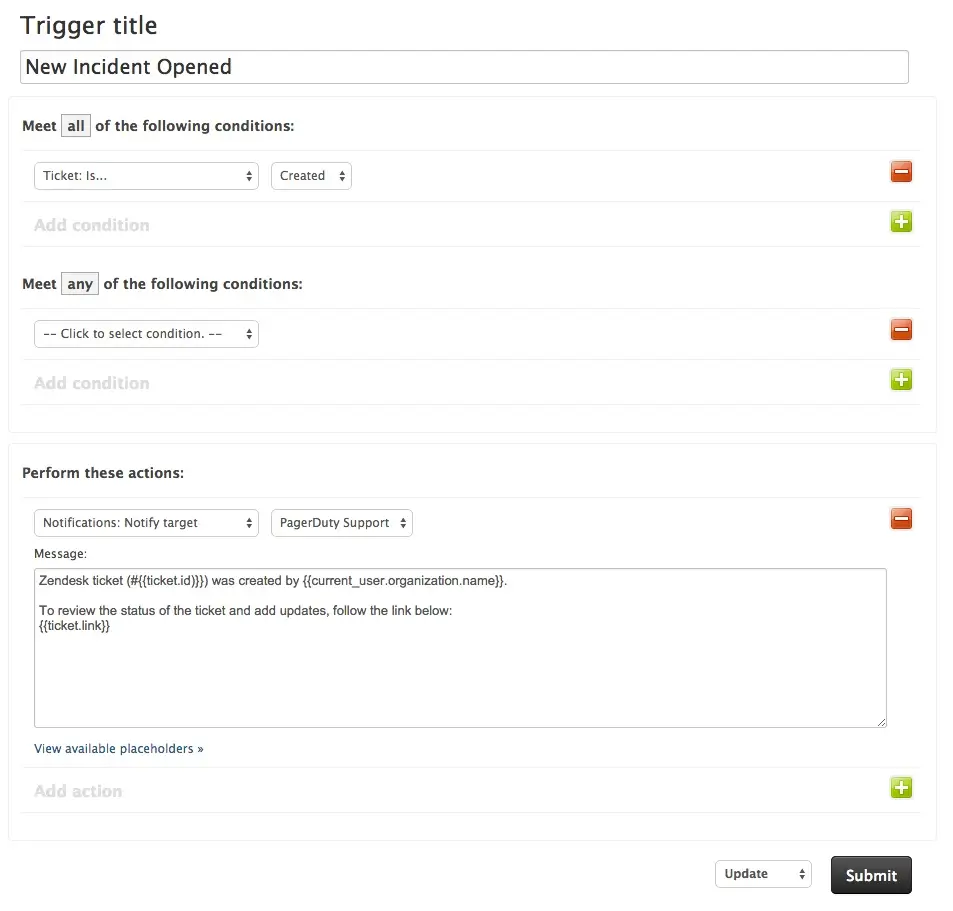
Zendesk ticket (#{{ticket.id)}}) was created by `{{current_user.organization.name}}. To review the status of the ticket and add updates, follow the link below:
`{{ticket.link}}`
Zendesk ticket `(#{{ticket.id}})` has been marked as solved. To review the status of the ticket and add updates, follow this link: `https://{{ticket.link}}`.
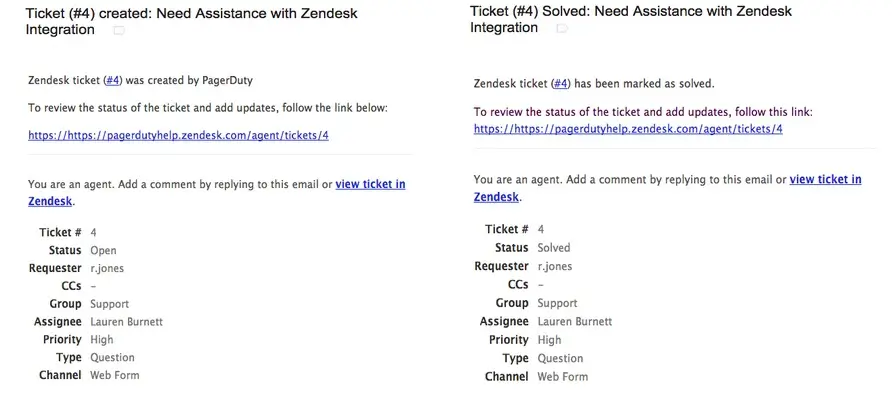
First Rule: Trigger a PagerDuty Incident
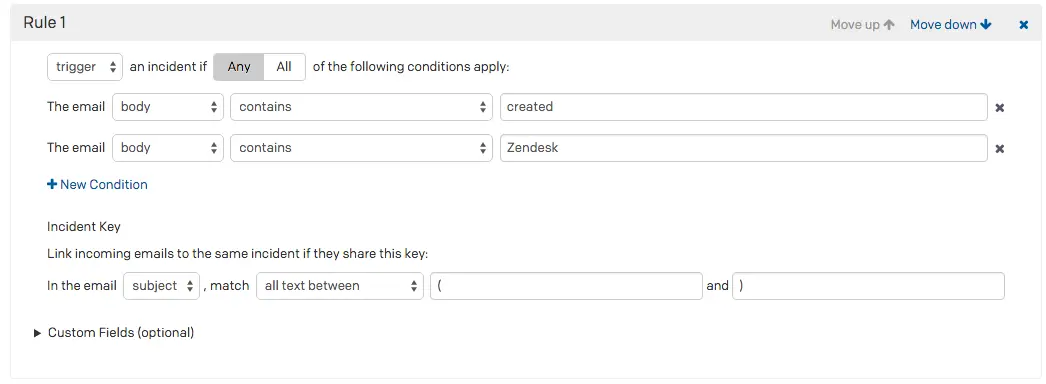
Now that our Zendesk triggers are set up, we need to create email management rules in PagerDuty. In our first rule we will define the conditions which must be met to create an incident in PagerDuty (i.e. a ticket is created in Zendesk).
In this example, an incident should be triggered if the email contains created and Zendesk in the email body. Make sure the conditions you use for the trigger email are not the same as ones that would be found in a recovery email. Also note that email management rules are case sensitive, so emails containing created will not trigger for a rule that says Created, as well as the other way around.
Next we'll create the incident key which will be used to append new emails to existing ones. The incident key should always be a unique identifier that appears in both the trigger and recovery email. In this case we'll tell PagerDuty to append emails on the Zendesk ticket ID, which per the email target mentioned earlier is located in the email subject line between the parentheses (ticket ID).
Second Rule: Resolve a PagerDuty Incident
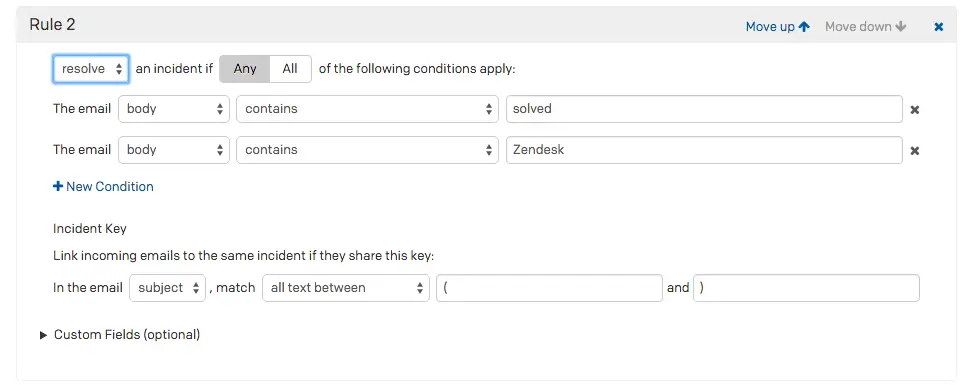
In the second rule, we'll tell PagerDuty to resolve incidents that contain solved and Zendesk in the email body.
We'll use the same incident key as we did in the first rule, so PagerDuty knows that these emails are linked to the same incident and that it should be resolved.
What if Incident Emails Don't Match Rules?
Finally, we'll specify what PagerDuty should do with an email if it doesn't meet the rules established in the rule conditions: either create a generic incident or discard it. If you've selected to create a generic incident, the incident will still be created but won't match any of your rules or be able to be resolved. You'll also see the incident key pulled as the full subject line, rather than the ticket ID or other criteria you specified in your trigger rule.
Testing Management Rules
It's a good rule of thumb to test if your email management rules are set up correctly. To do so, forward an email to trigger an incident, as well as an email to resolve an incident, to the Integration Email address displayed on the service's Integrations tab. If your management rules are set up correctly, the incident activity log will show the incident as having been triggered and then resolved.
Congratulations! You can now automatically trigger and resolve incidents via email for Zendesk.
FAQ
How do I create incident keys using regex?
If you'd like to review creating an incident key for Zendesk integrations using regex, see the following article: Regular Expressions: Capture Group.