# ServiceNow Integration Guide | PagerDuty
Configure the ServiceNow v8 Integration
## ServiceNow + PagerDuty Integration Benefits
- Conduct PagerDuty incident response inside the ServiceNow interface, such as running [Incident Workflows](/ai-automation/automation/incident-workflows), posting [status updates](/incident-management/communicate/communicate-with-stakeholders#status-updates) and setting the impacted [Business Service](/incident-management/services/business-services).
- [Sync PagerDuty Custom Fields bi-directionally with ServiceNow Incident record fields](/integrations/servicenow-integration-guide/advanced-servicenow-configuration/servicenow-custom-field-mappings). This allows for a more accurate system of record and provides responders with relevant, updated incident context.
- Reduce manual toil by automating [ServiceNow Incident creation](/ai-automation/automation/incident-workflows#add-actions) through Incident Workflows.
- Perform [Assignment Group](/integrations/servicenow-integration-guide/servicenow-provisioning#provision-assignment-groups-and-configuration-items) and [priority mapping](#34-priority-synchronization) to PagerDuty escalation policies.
- Reduce configuration time by [provisioning](/integrations/servicenow-integration-guide/servicenow-provisioning) Business and technical services from ServiceNow to PagerDuty, along with their dependency relationships.
- Send [ServiceNow change requests](/integrations/servicenow-integration-guide/servicenow-change-requests-integration-guide) to PagerDuty as change events.
- [MID server support](/integrations/servicenow-integration-guide/advanced-servicenow-configuration#use-a-mid-server).
## How it Works
Incident communication between ServiceNow and PagerDuty is bi-directional. This allows you to trigger, reassign, resolve, use Incident Workflows, post status updates and set impacted Business Services in either system. The following behavior is supported:
- Third-party monitoring tool integrations detect an issue and trigger an incident in PagerDuty. Responders receive PagerDuty incident notifications and they can acknowledge and resolve incidents in PagerDuty. PagerDuty incidents can automatically create a ServiceNow incident when triggered or manually through the incident details page. After a ServiceNow incident and PagerDuty incident are linked, the above actions are kept in sync for the lifecycle of the incident.
- When a ServiceNow ticket is created, it automatically triggers a PagerDuty incident and notifies on-call responders. A responder acknowledges the PagerDuty incident, and above actions from PagerDuty are kept in sync with the ServiceNow ticket.
## Requirements
**In ServiceNow**:
- A ServiceNow Administrator role is required for configuration.
**In PagerDuty**:
- The ServiceNow integration is available to accounts on the Business or Enterprise pricing plans. PagerDuty [Custom Field synchronization](/integrations/servicenow-integration-guide/advanced-servicenow-configuration#custom-field-mappings) and the [Create a ServiceNow Incident Workflow Action](/ai-automation/automation/incident-workflows#add-actions) are two premium features only available on the Enterprise plan for Incident Management. Please [contact our Sales Team](https://www.pagerduty.com/contact-us/#contact-sales) if you would like to upgrade to a plan featuring the ServiceNow integration.
- A Global Admin or Account Owner base role is required for configuration.
## Quick Links
- [ServiceNow Integration Details](/integrations/servicenow-integration-guide/servicenow-integration-details): How the integration works.
- [ServiceNow User Guide](/integrations/servicenow-integration-guide/servicenow-user-guide): Using the integration after configuration.
- [ServiceNow Provisioning](/integrations/servicenow-integration-guide/servicenow-provisioning): Provision Users, Assignment Groups and Configuration Items to PagerDuty.
- [Advanced Configuration](/integrations/servicenow-integration-guide/advanced-servicenow-configuration): Leverage the full power and versatility of the ServiceNow integration.
- [ServiceNow Troubleshooting Guide](/integrations/servicenow-integration-guide/servicenow-troubleshooting-guide): Identify and resolve common issues with the ServiceNow integration.
## Version
This guide details configuration for the latest [ServiceNow v8 integration](https://store.servicenow.com/sn_appstore_store.do#!/store/application/39a9d9664f834e00dd657bb28110c77b/8.0.0).
> **Upgrade to ServiceNow v8:** Please see our [Upgrade to ServiceNow v8](/integrations/servicenow-integration-guide/servicenow-integration-details#upgrade-to-servicenow-v8) article for instructions to upgrade from another version.
> **Looking for a Different Version?:** The [ServiceNow v7 integration](/integrations/servicenow-v7-integration-guide) is also available.
## Integration Walkthrough
Download the [ServiceNow Integration Checklist](https://drive.google.com/file/d/1CuFVLllxBawkpLN0eTvWRehfxMniTPYt/view?usp=drive_link) before you begin to keep track of your progress.
The following video captures the integration walkthrough process, which you can use as a reference while configuring the integration in your environment.
[ServiceNow Integration Walkthrough Video](https://fast.wistia.com/embed/channel/1zqq3j3s9p?wchannelid=1zqq3j3s9p)
## Step 1: Complete ServiceNow Pre-Install Requirements
### 1.1 ServiceNow Application Access Controls
In order for the integration to function, a ServiceNow Administrator must allow configuration access in the following ServiceNow tables. In the application navigator, search **System Definition** and select the **Tables** module. Search for and open the following records and perform the specified actions:
| Tables | Instructions |
| --- | --- |
| **`sys_user`**
**`sys_user_group`**
**`sys_user_grmember`** | Select the **Application Access** tab and ensure the following are checked:
- **Can read**
- **Can create**
- **Can update**
- **Allow configuration**
Click **Update** in the upper right of each to save. |
| **`sysauto_script`** | **Note**: The permissions granted on the Scheduled Script Executions (`sysauto_script`) table are required to provision scheduled scripts to process PagerDuty webhooks.
Select the **Application Access** tab and ensure the following are checked:
- **Can read**
- **Can create**
- **Can update**
Click the **Update** button in the upper right to save. |
### 1.2 Integration Installation
[Install the PagerDuty integration from the ServiceNow Store](https://store.servicenow.com/store/app/82fa2be61b246a50a85b16db234bcb5c).
#### 1.3 Add PagerDuty Fields to Views (Optional)
If you wish to view PagerDuty ID fields within ServiceNow, you will need to manually add them to the Groups, Configuration Items, Users, and Incidents views. This will make it easier to see which ServiceNow objects are mapped to PagerDuty. Instructions are detailed in ServiceNow’s documentation [Show or hide fields on a form](https://www.servicenow.com/docs/bundle/washingtondc-platform-administration/page/administer/form-administration/concept/configure-form-layout.html#title_t_ConfigureAForm).
> **Navigate to Configuration Items:** You can quickly navigate to a list of all Configuration Items by entering `cmdb_ci_list.do` in the **All** menu and pressing enter.
>
> 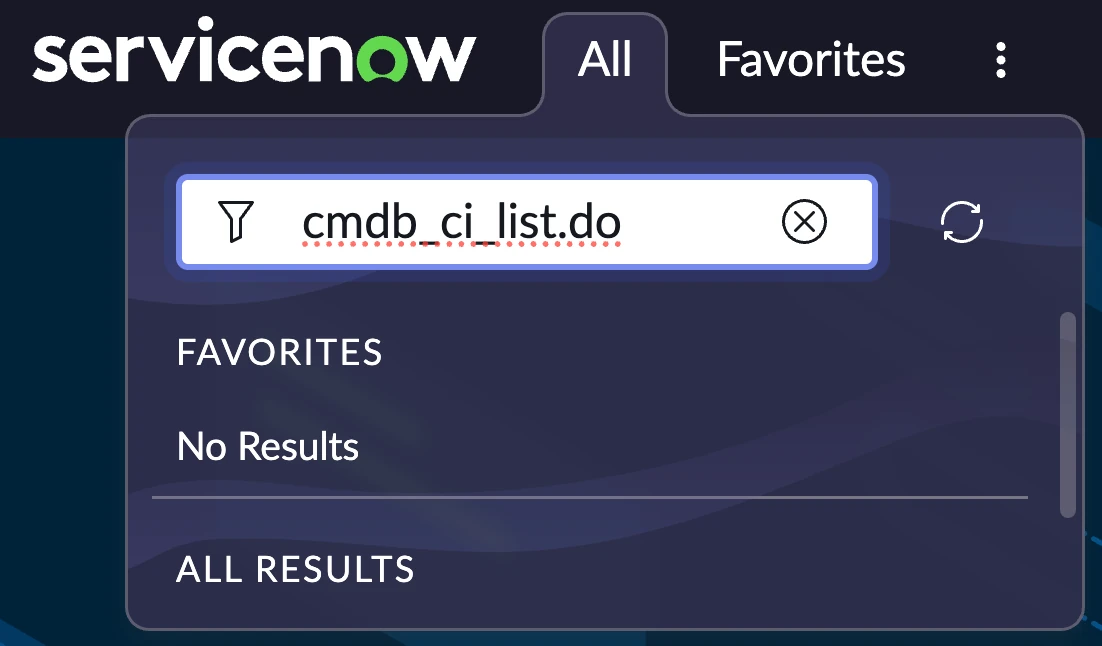
> *Search Configuration Items*
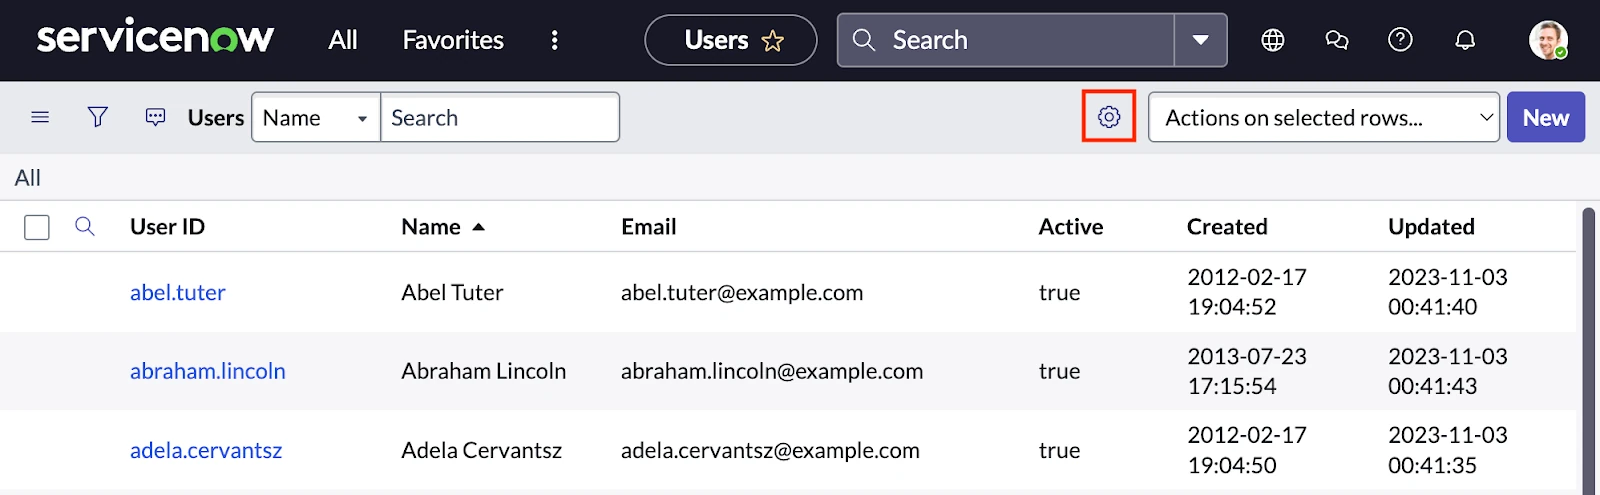
1. We recommend that you add the PagerDuty fields to the Groups, Configuration Items, Users and Incidents views by clicking in the upper-right to customize the column display. This will make them visible in your list views only.
2. The following are the available PagerDuty fields that you can add to the various list views or forms in ServiceNow:
| List Views and Forms | PagerDuty Fields |
| :-------------------------------------------- | :------------------------------------------------------------------------------------------------------------------------------------- |
| User list view and User form | - PagerDuty ID |
| Groups list view and individual Group form | - PagerDuty default escalation - PagerDuty error message - PagerDuty schedule - PagerDuty service - PagerDuty team - PagerDuty webhook |
| Applications list view and individual CI form | - PagerDuty Change Event Token - PagerDuty service - PagerDuty webhook |
| Incidents list view and Incident form | - PagerDuty incident |
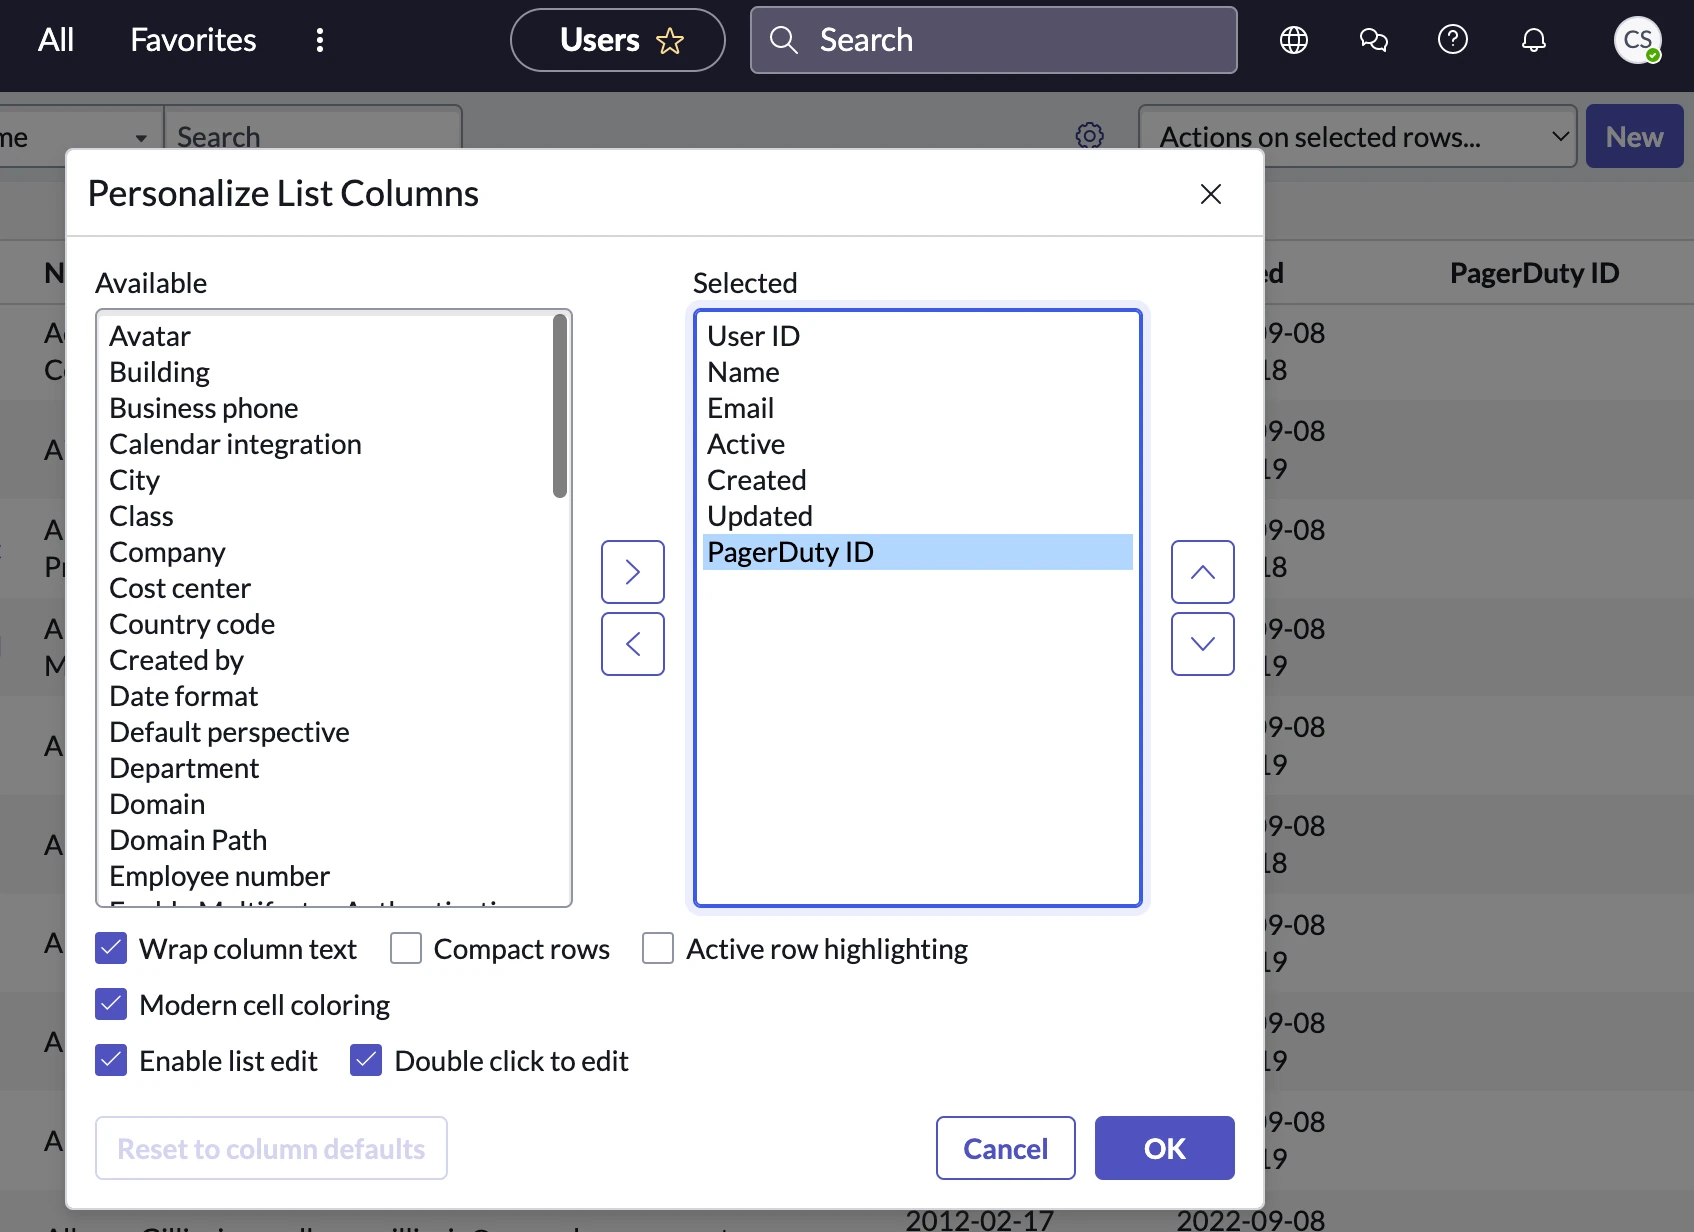
3. Select your preferred PagerDuty field(s) in the left-hand **Available** slush bucket, and then click to move it to the **Selected** slush bucket. Repeat as desired. Reorder select fields using and . Click **OK** when you are finished.
4. Configure Assignment Group/CI records to display the PagerDuty webhook sync option
| ServiceNow Object | PagerDuty Fields |
| --- | --- |
| Assignment Groups | For Assignment Group records, the webhook sync option will be displayed automatically in the PagerDuty Webhook. |
| Configuration Items | For Configuration Items:
1. Open the Configuration Item record.
2. Navigate to Configure Related lists.
3. Move **PagerDuty Webhook** to the Selected column and click Save. |
## Step 2: Configuration In PagerDuty
### 2.1 Create a PagerDuty API Access Key
1. Log in to the PagerDuty web app ([https://identity.pagerduty.com/](https://identity.pagerduty.com/)). Navigate to **Integrations** → **API Access Keys**.
2. On the API Access Keys page, click **Create New API Key**.
3. In the dialog that appears, enter a **Description** for your key (e.g., "ServiceNow \<> PagerDuty Integration"). Leave the box to create a read-only API key unchecked, since the integration requires a full-access API key. Click **Create key** to save.
4. Next you will see a dialog displaying your API key. **Copy this key and save it in a secure place**, as you will not have access to the key after this step. If you lose a key that you created previously and need access to it again, you should remove the key and create a new one. Click **Close** once you have successfully copied and saved your key.
### 2.2 Create a Default PagerDuty User Account for ServiceNow
This integration requires ServiceNow to have access to your PagerDuty account both by an API token and a PagerDuty user account. The PagerDuty user account is required so that non-PagerDuty users can take action in ServiceNow and the actions will be reflected in PagerDuty.
> **Provision a Default User: Behavior:** The integration now has the option to provision a Default User from the ServiceNow UI, however this function has some considerations:
>
> - When provisioning the Default User, it will create a PagerDuty user based on the user who is logged in to ServiceNow and configuring this setting. If you are okay with being provisioned as the Default ServiceNow user, please follow directions in this section and then move on to [Step 3: Configuration in Your ServiceNow Instance](/integrations/servicenow-integration-guide#step-3-configuration-in-your-servicenow-instance).
> - If you do not want to be provisioned as the Default ServiceNow user in PagerDuty, please proceed with the steps below.
1. In your PagerDuty account, navigate to **People** → **Users** and click **Add Users**.
2. Enter `ServiceNow User` in the **Name** field and enter any valid email address in the **Email** field. Copy this email and save it in a safe place for later steps when you will be entering it into ServiceNow. Once you have saved this email, select **Global Admin** as the **Base Role**, click **Add** and then **Send Invitations** to save.
3. You will now see the ServiceNow User in your PagerDuty Users list. Click the **user name** and take note of the 7-character alphanumeric user ID in the URL of this page. For example, if your URL reads `https://your-subdomain.pagerduty.com/users/PXXXXXX` the user ID would be `PXXXXXX`. Copy this user ID and keep it, along with this user's email address, in a safe place. In later steps, you will also enter this user ID in ServiceNow.
## Step 3: Configuration in Your ServiceNow Instance
### 3.1 Create a ServiceNow User Account For Webhook Authentication
The PagerDuty integration also requires a ServiceNow user account, which allows PagerDuty to sync actions back to ServiceNow via webhooks. This is a security feature, and allows you to control the integration’s permissions and roles within ServiceNow.
1. Log in to your ServiceNow instance. In the application navigator, search **Organization** → **Users** and click **New** to create a new user account for PagerDuty application use.
2. Perform the following:
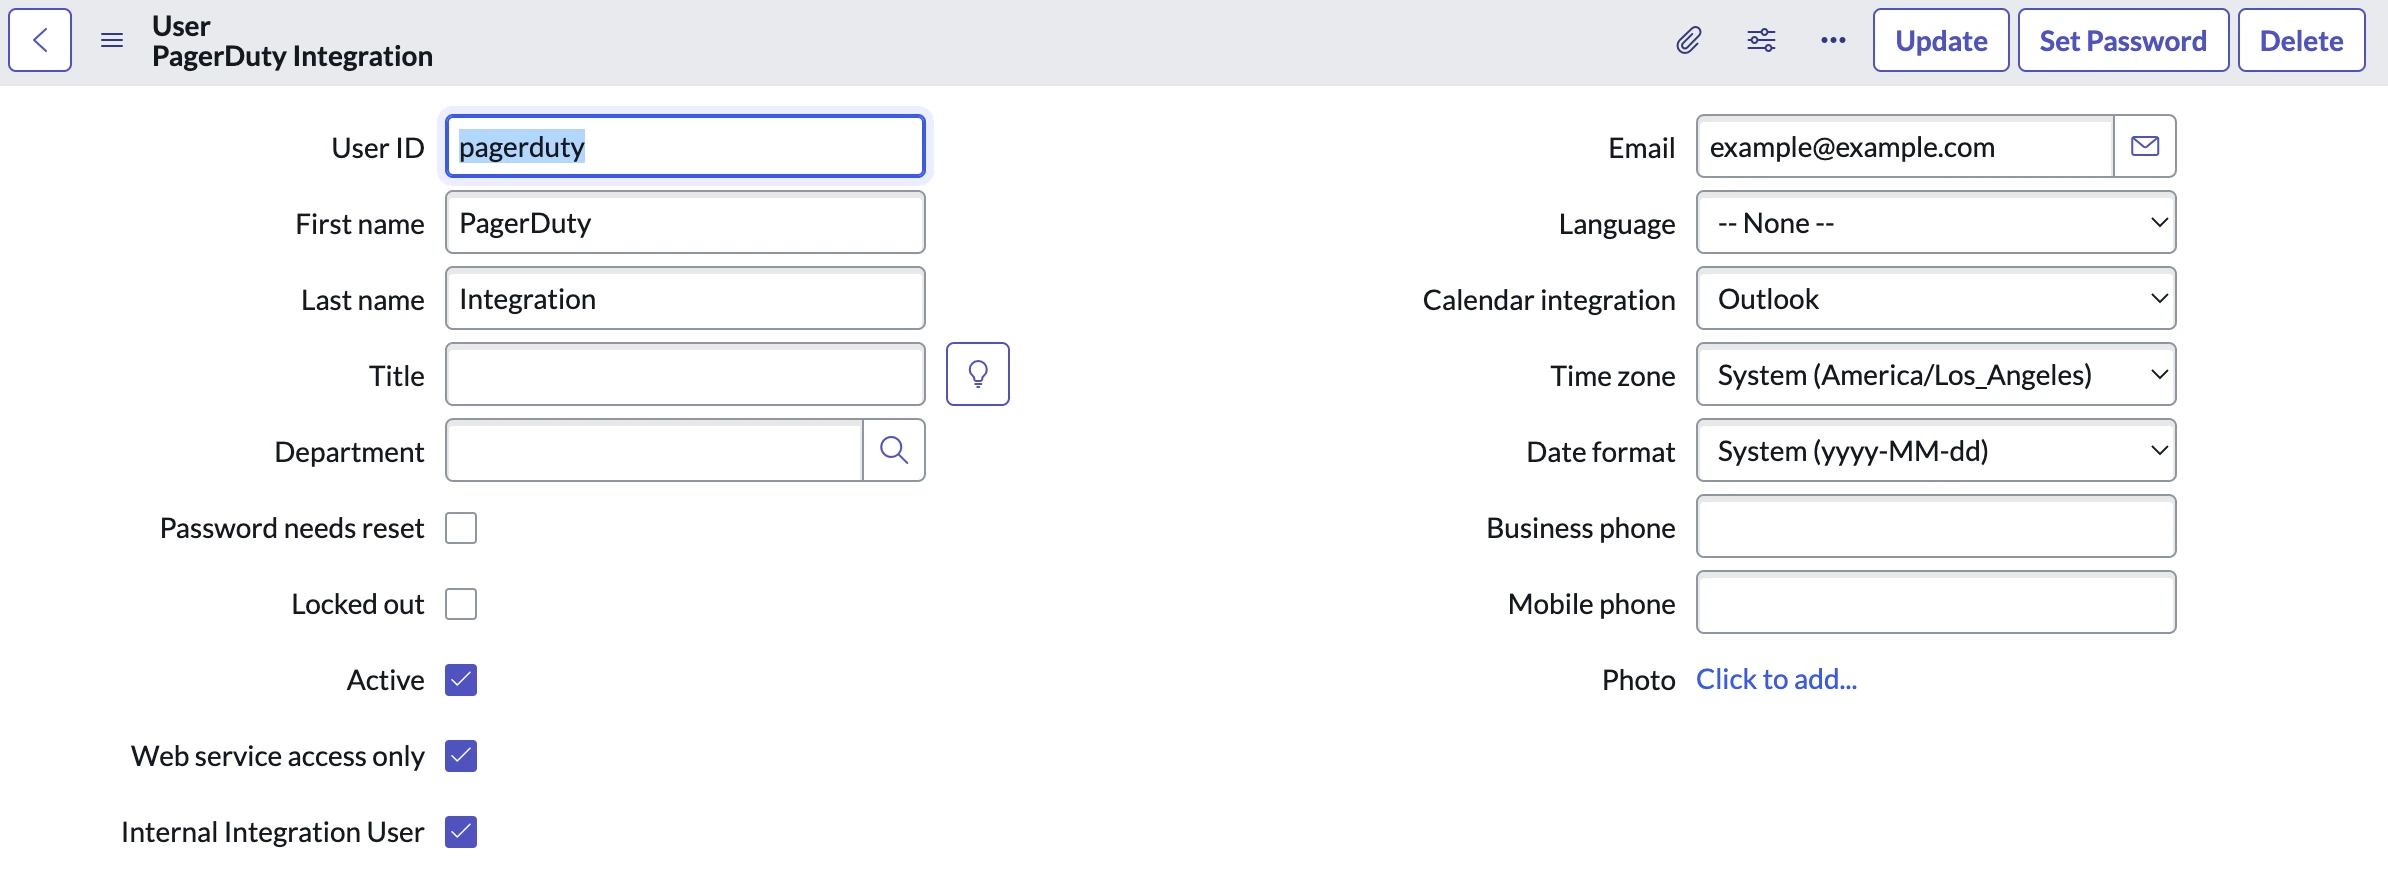
1. **User ID**: Enter any desired username for the User ID. This username must be all lower case, e.g., `pagerduty`.
2. **First/Last name**: Enter any desired First and Last name for the user.
3. **Email**: Enter the same email that you entered for the new user in PagerDuty (step 2 of the [Create a Default User Account for ServiceNow](#create-a-default-pagerduty-user-account-for-servicenow) section above). This will ensure that requests are properly formatted with a PagerDuty-From header.
> **Checkboxes:** - Ensure that the **Password needs reset** and **Locked out** checkboxes are _**unchecked**_.
> - Ensure that **Active** is **checked**.
> - If the **Web service access only** and **Internal Integration User** options are available, you can optionally select these checkboxes.
3. Click **Submit** and then search and select the user’s profile.
4. Click **Set Password**. In the modal that appears, click **Generate** and then click **Save Password**. Once the password has been saved, copy the username and password and keep them in a safe place, as you will need to provide them in PagerDuty Settings (within the ServiceNow UI) in a later step. Click **Close** to proceed.
5. In the bottom section of the User form, select the **Roles** tab in the User form and click **Edit**. In the **Collection** column, search and assign the following roles using :
1. `itil`
2. `x_pd_integration.admin`

*Edit Roles*
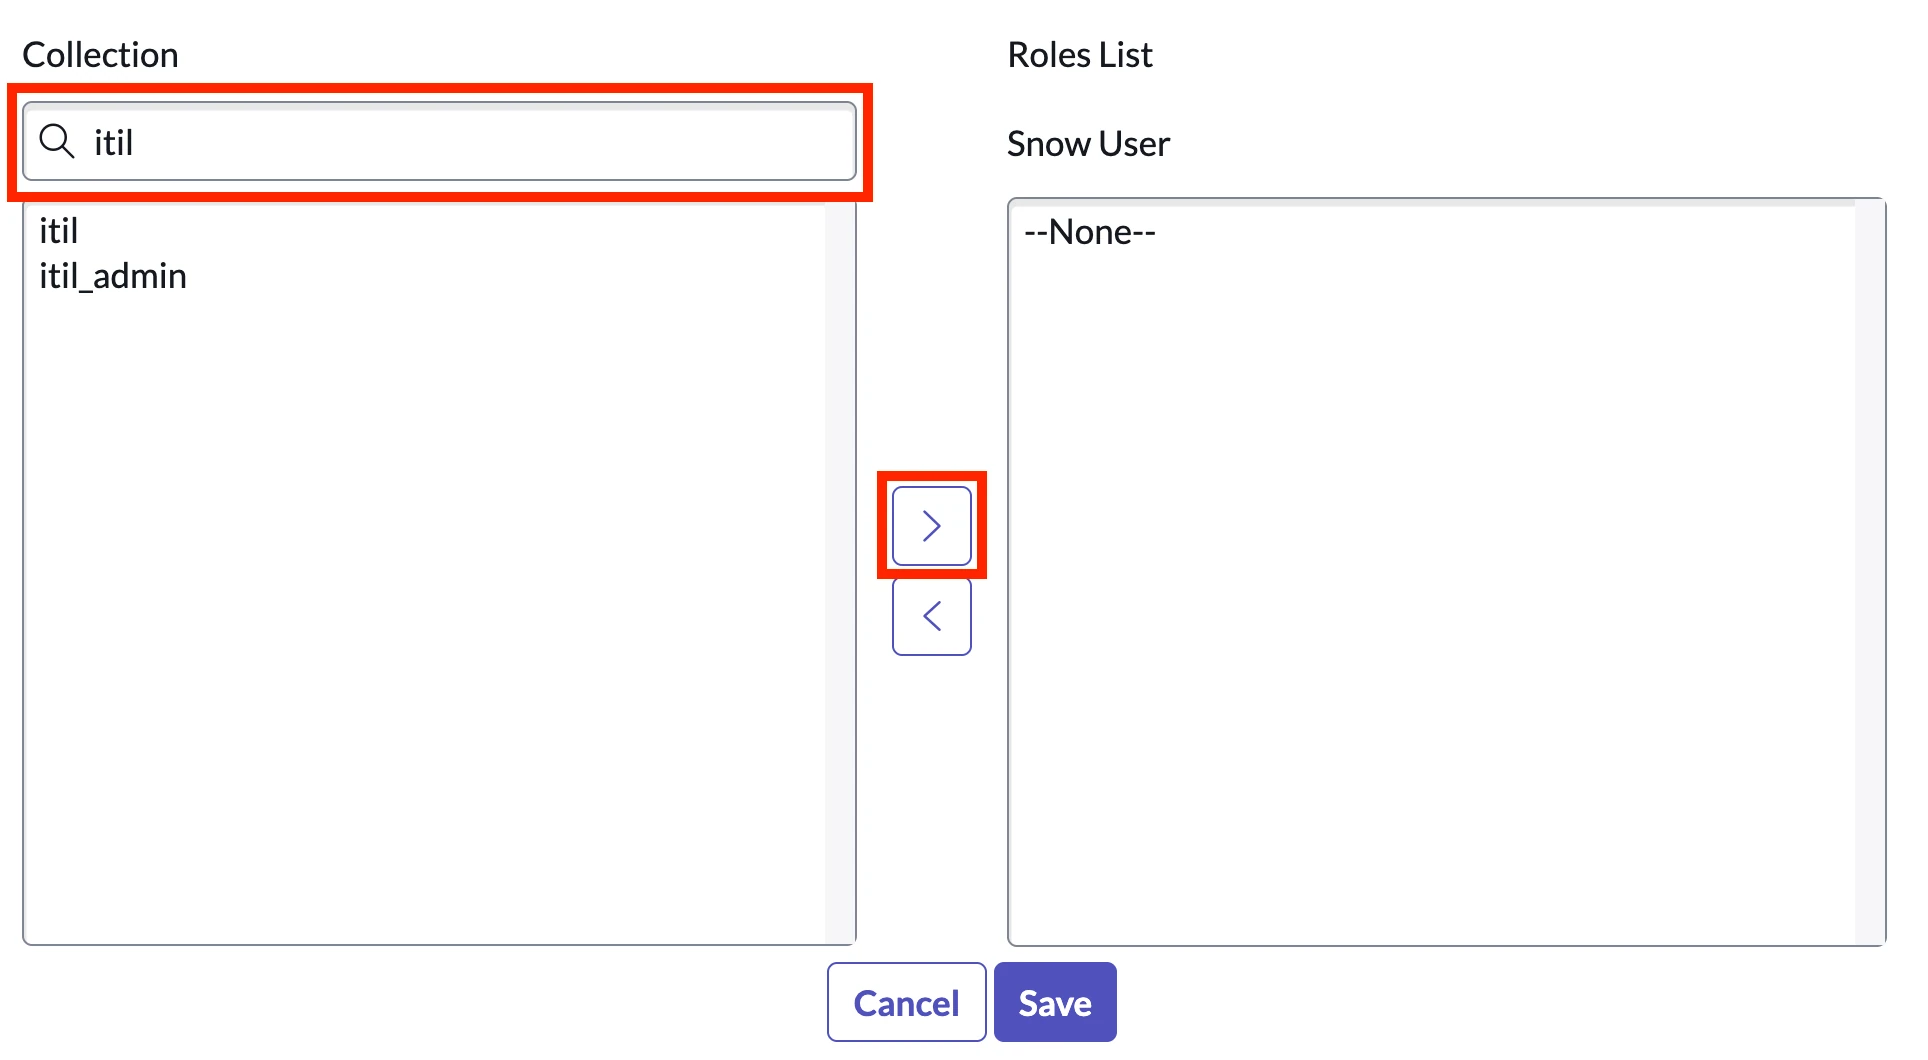
*Assign "itil" role*
6. Click **Save** to return to the User form.
The newly created user account requires the ability to make API requests. This allows PagerDuty to create and take action on ServiceNow incidents. If your ServiceNow instance allows all users to perform REST API calls, providing the `itil` and the `x_pd_integration.admin` role are sufficient.
7. In the **PagerDuty ID** field, enter the 7-character **user ID** of the default PagerDuty user account that you generated in step 3 above, [Create a Default PagerDuty User Account for ServiceNow](#22-create-a-default-pagerduty-user-account-for-servicenow), e.g., `PXXXXXX`. Click **Update**.
To summarize what you have completed so far:
- A default PagerDuty user account has been created for ServiceNow to use.
- An API Key has been created in PagerDuty.
- A ServiceNow user account has been created for the PagerDuty integration to use.
- The user accounts have been mapped to each other via their shared email address and the PagerDuty User ID.
If all of these prerequisites have been fulfilled, you may now begin configuring the API and Webhook Connection in ServiceNow.
### 3.2: Configure the API and Webhook Connection in ServiceNow
> **Application Scope Warning:** You may see a warning at the top of the page indicating that you need to switch into the PagerDuty application scope. Proceed with this step, if you are prompted, by providing your instance’s login credentials. Once done, the PagerDuty Settings page should become editable.
#### 3.2.1: Choose your preferred ServiceNow to PagerDuty mapping
Review the diagram below, and choose your preferred ServiceNow to PagerDuty mapping.
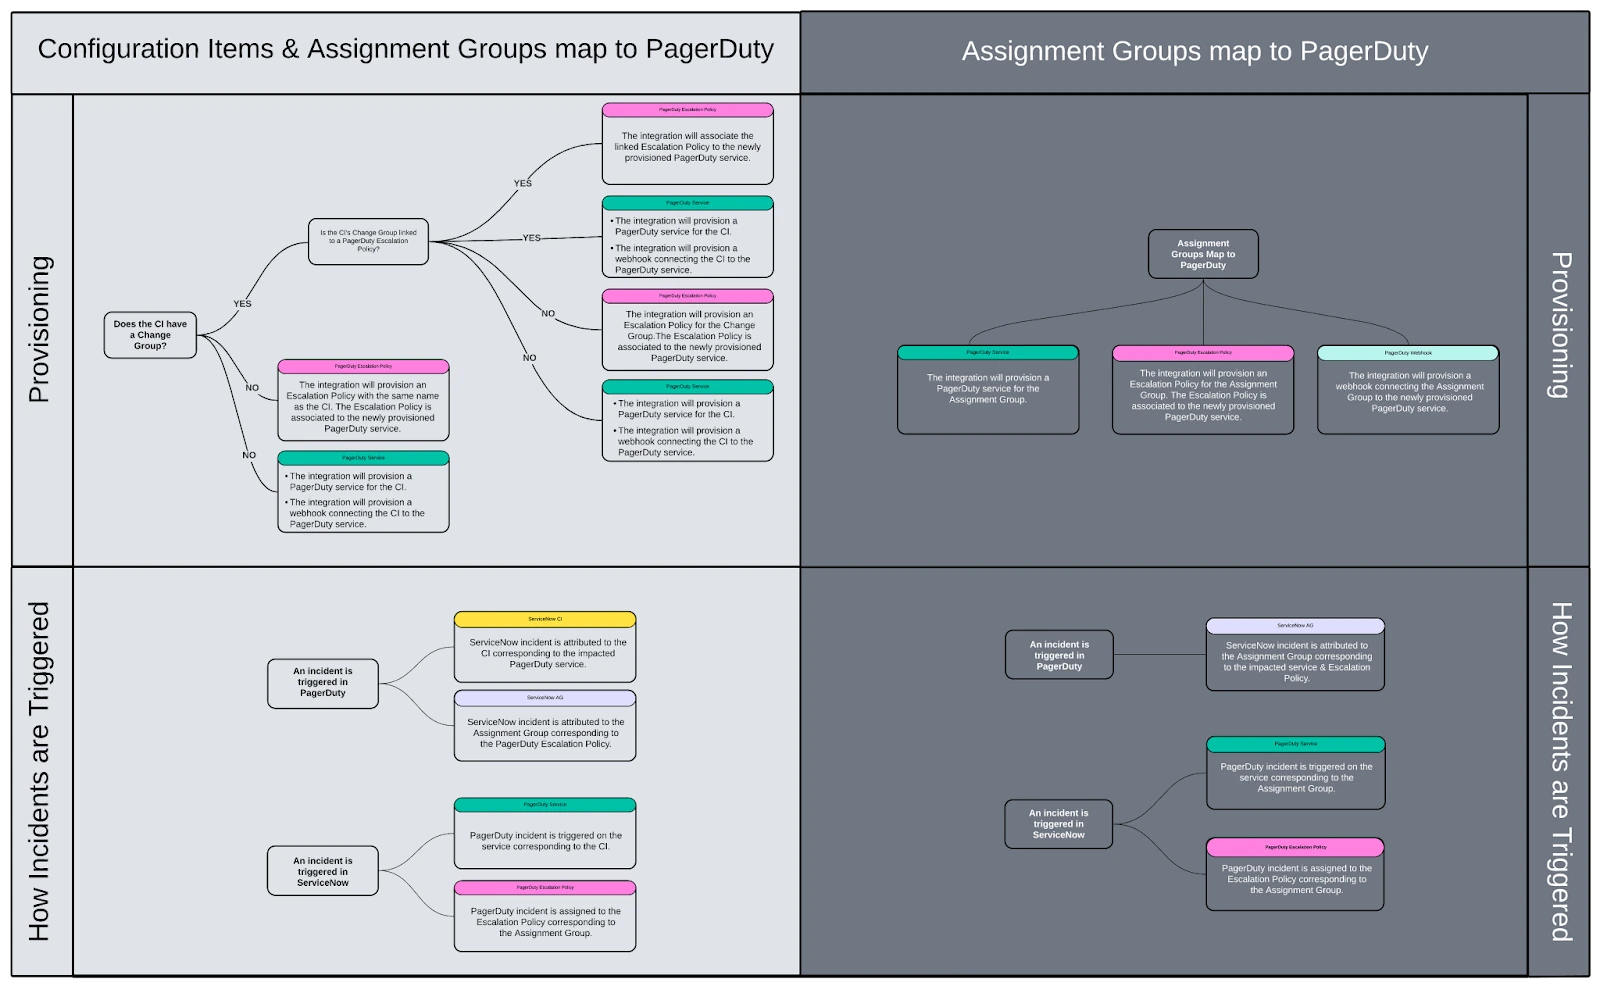
*Choose ServiceNow to PagerDuty Mapping*
#### 3.2.2: Manage Integration Settings
In your ServiceNow instance, navigate to **PagerDuty** → **Configuration** → **PagerDuty Settings**. Configure the integration settings according to your company’s preferences and workflows, by following steps outlined in our [ServiceNow Integration Details](/integrations/servicenow-integration-guide/servicenow-integration-details#manage-integration-settings) article.
#### 3.2.3: Run the Integration Health Check
1. [Run the Integration Health Check](/integrations/servicenow-integration-guide/servicenow-integration-details#how-and-when-to-run-the-integration-health-check)
2. [Migrate your v2 webhooks to webhooks v3](/integrations/servicenow-integration-guide/servicenow-integration-details#webhooks-migration)
### 3.3 Provision a PagerDuty Service
In this step you will provision a PagerDuty service, and attach an escalation policy to the newly provisioned service. Please see our [ServiceNow Provisioning](/integrations/servicenow-integration-guide/servicenow-provisioning) article for more information.
#### 3.3.1 Run the Webhooks Health Check
> **Note:** Ensure you run the Webhooks Health Check after you have provisioned at least one service.
1. [Run the Webhooks Health Check](/integrations/servicenow-integration-guide/servicenow-integration-details#how-and-when-to-run-a-webhooks-health-check)
### 3.4 Priority Synchronization
The [Incident Priority](/incident-management/incidents/incident-priority) on a newly triggered PagerDuty incident can automatically set the priority level on a linked ServiceNow incident, and vice versa. Priority is also synced when you edit the priority of an incident in either direction. To enable this functionality, you must import PagerDuty priorities and define priority mapping in ServiceNow.
> **Leave a Note When Changing Priority:** If you need to change an incident’s priority, we recommend leaving a text note to keep relevant stakeholders informed.
### 3.4.1 Import PagerDuty Priorities
1. Define incident priorities in your PagerDuty account by going to **User Icon** → **Account Settings** → **Incident Priorities**. For more information, please see our [Incident Priority](/incident-management/incidents/incident-priority) article.
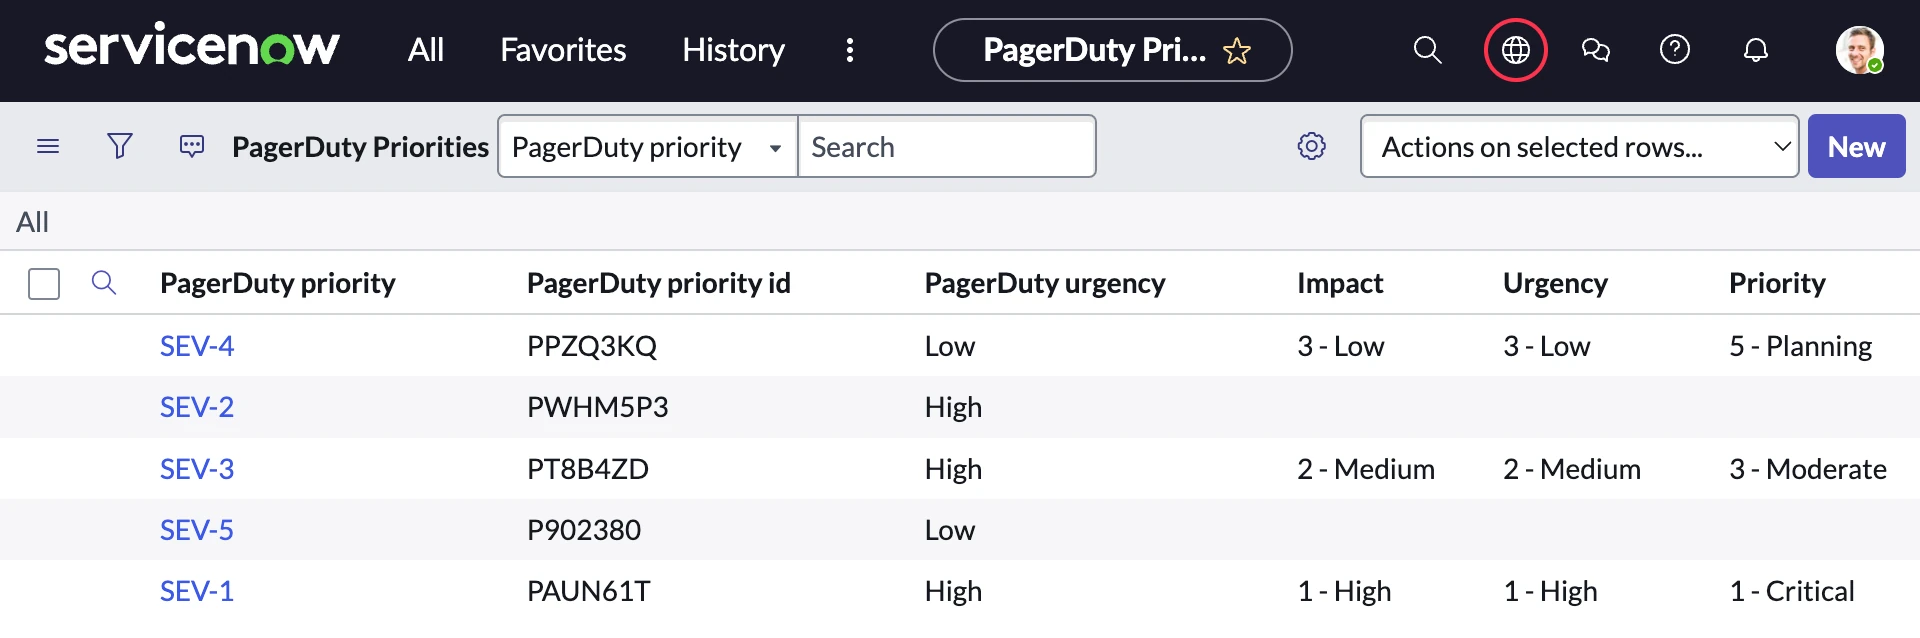
2. In ServiceNow, navigate to **PagerDuty** → **Actions** → **Refresh PagerDuty Priorities** and click **OK** when prompted. After this, priorities will populate in the table `x_pd_integration_pagerduty_priority`, whose contents are displayed under **PagerDuty priority**.
### 3.4.2 Define the Priority Mapping
Once you have [imported PagerDuty priorities](#import-pagerduty-priorities), you may define priority mapping in the same table (`x_pd_integration_pagerduty_priority`). To map your PagerDuty incident priorities to your ServiceNow priorities:
1. In the PagerDuty Priority table, select the PagerDuty **priority** that you want to map.
2. Set a value for its corresponding ServiceNow **Impact** and **Urgency**.
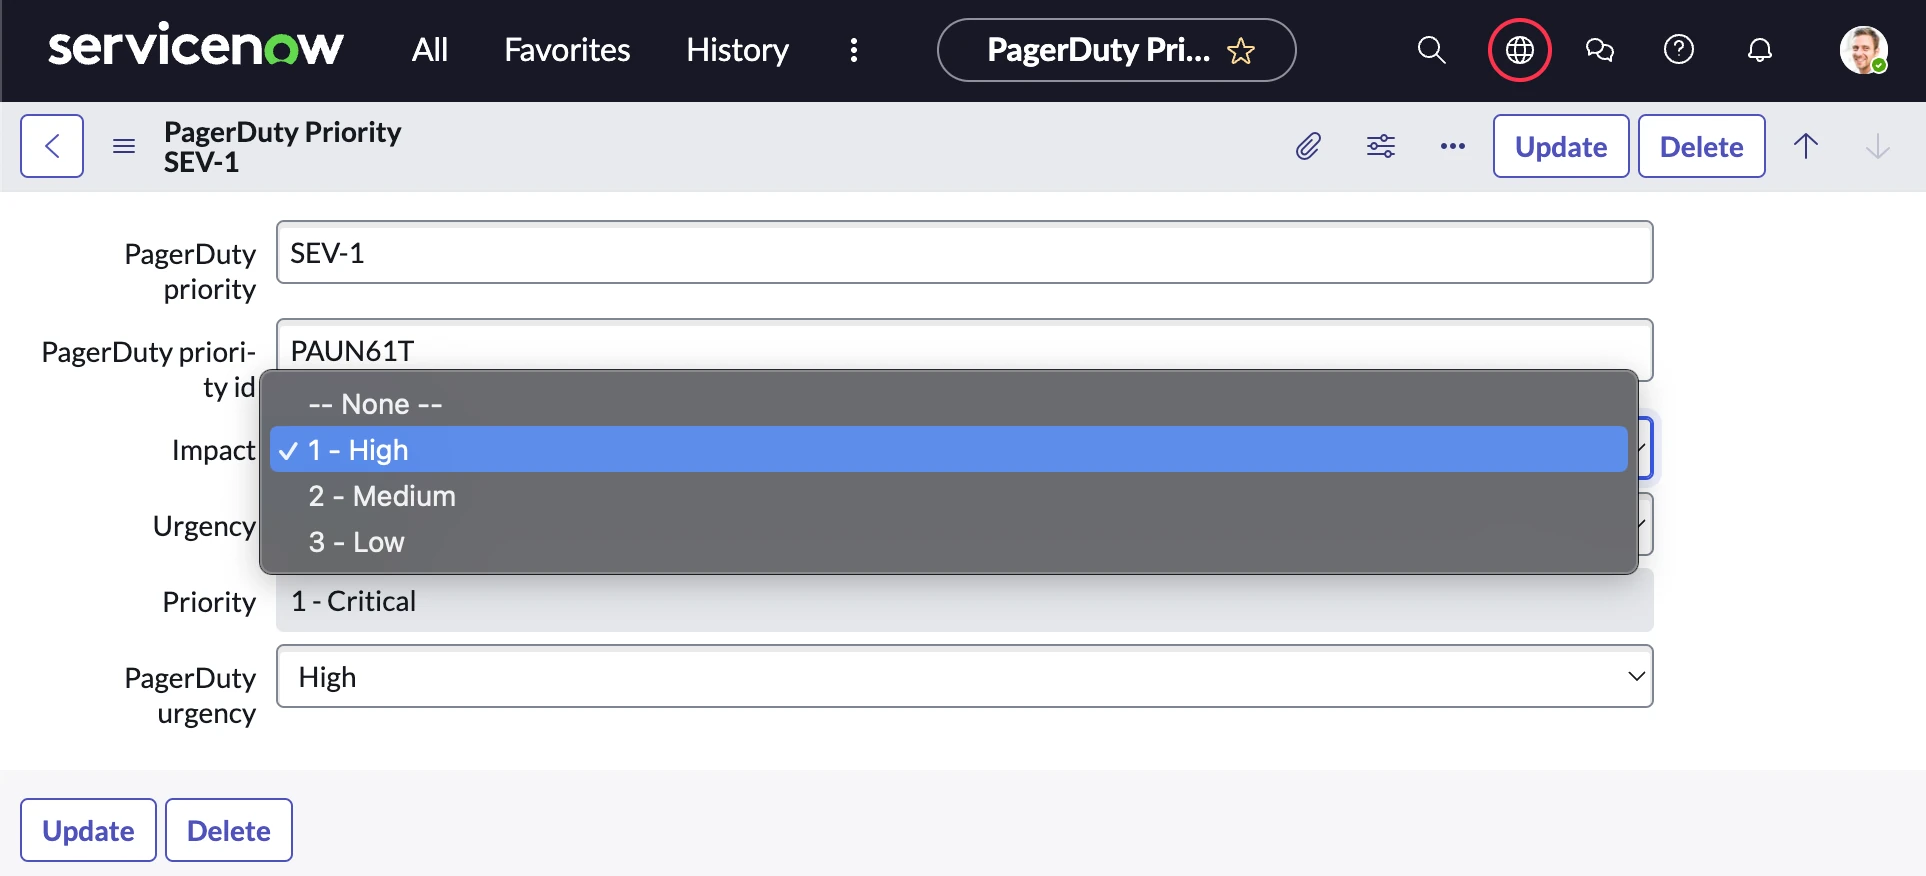
3. _Optional_: You can choose to associate your priority mapping to a specific PagerDuty urgency.
4. Click **Update** to save the mapping.
After you create the mapping, the ServiceNow priority is automatically populated according to your [Priority Lookup Rules](https://www.servicenow.com/docs/bundle/xanadu-it-service-management/page/product/incident-management/task/def-prio-lookup-rules.html) (**All** → **System Policy** → **Rules** → **Priority Lookup Rules**).
## Step 4: Test the Integration
To verify that PagerDuty and ServiceNow are communicating, [trigger a PagerDuty incident](/incident-management/incidents/overview#trigger-an-incident-via-web-app) on the provisioned service and check to see that a ServiceNow Incident is also triggered. Once you resolve the PagerDuty incident, the ServiceNow incident will also be resolved, and vice versa. ServiceNow also maintains a log of the incident activities that have taken place within PagerDuty.
> **Index Service Columns:** Once you have successfully installed and configured the PagerDuty application in your ServiceNow instance, it is highly recommended that you index the following columns in ServiceNow:
>
> - `incident.x_pd_integration_incident`
> - `sys_user_group.x_pd_integration_pagerduty_escalation`
> - `sys_user.x_pd_integration_pagerduty_id`
> - `cmdb_ci.x_pd_integration_pagerduty_service`
> - `task.x_pd_integration_incident_id`
>
> This will ensure optimal performance when the PagerDuty application is querying the incidents, group, user and CMDB tables.
> **ServiceNow User Guide:** Once initial configuration is complete, please read our [ServiceNow User Guide](/integrations/servicenow-integration-guide/servicenow-user-guide) for instructions on how to use the integration.
## Manage Integration Settings
For more information on managing the integration’s settings, please see our [ServiceNow Integration Details](/integrations/servicenow-integration-guide/servicenow-integration-details#manage-integration-settings) article.
## ServiceNow Provisioning
For more information on provisioning Configuration Items, Assignment Groups and Users from ServiceNow to PagerDuty, please see our [ServiceNow Provisioning](/integrations/servicenow-integration-guide/servicenow-provisioning) article.
## Upgrade the ServiceNow Integration
To upgrade your ServiceNow integration to the latest version, please see our [Upgrade to ServiceNow v8](/integrations/servicenow-integration-guide/servicenow-integration-details#upgrade-to-servicenow-v8) article.