# Incidents
Trigger, acknowledge, and resolve incidents created by service integrations.
An incident represents a problem or an issue that needs to be addressed and resolved. Incidents trigger on services, and a service's escalation policy prompts notifications to on-call responders to remediate the issue.
## Incident Statuses
- **Triggered**: An active [service](/incident-management/services/services-and-integrations) (i.e., someone is on call and the service is not disabled or in maintenance mode) triggers an incident when it receives an event. The incident escalates in accordance with the service's [escalation policy](/incident-management/schedules/escalation-policies). By default, PagerDuty sends [notifications](/incident-management/notifications/notification-content-and-behavior) when an incident is triggered, but not when it is acknowledged or resolved. Users can create their own [notification rules](/account-admin/user-profile/notification-rules) — or use [webhooks](https://developer.pagerduty.com/docs/ZG9jOjQ1MTg4ODQ0-overview) — to receive notifications when an incident is acknowledged or resolved.
- **Acknowledged**: An acknowledged incident that is being worked on, but is not yet resolved. The user who acknowledges an incident claims ownership of the issue and halts the escalation process. While an incident is acknowledged, notifications are not sent until the [acknowledgement timeout](/incident-management/services/configurable-service-settings#acknowledgement-timeout) is reached. If the acknowledgement timeout is reached, the incident returns to the triggered status, and the escalation process resumes.
- **Resolved**: A acknowledged incident has been fixed. Once an incident is resolved, no additional notifications are sent. You can [reopen it](/incident-management/incidents/reopen-incidents) if further work is needed.
## Priority, Urgency, and Severity
- **Priority** is tied to **_incidents_**, and it specifies the order in which incidents must be addressed (e.g., P1, Sev-1). Refer to [Incident Priority](/incident-management/incidents/incident-priority) for more information.
- **Urgency** is tied to **_incidents_** and determines how are notified when an incident is assigned to you (high or low). Refer to [Notification Urgency](/incident-management/services/configurable-service-settings#notification-urgency) for more information.
- **Severity** is tied to **_alerts_** and describes the impact on a specific service or piece of infrastructure (e.g., critical, warning, error). Refer to [Event/Alert Severity Levels](/incident-management/incidents/dynamic-notifications#eventalert-severity-levels) for more information.
> **How Do I Page Someone?:** Paging is the result of an incident triggering on a service and escalating through that service's [escalation policy](/incident-management/schedules/escalation-policies). Whoever is on call on that policy — a user, team, or a schedule — is notified, or "paged."
>
> To page someone, [trigger or declare an incident](#triggerdeclare-an-incident) on the relevant service. To control who gets paged, add the appropriate users or schedules to the service's [escalation policy](/incident-management/schedules/escalation-policies). To pull a specific person into an incident that is already open, [add them as a responder](/incident-management/incidents/add-responders).
## Incident Lifecycle
### 1\. Received through Services
PagerDuty receives events from monitoring systems via [integrations](/integrations). An event creates an alert and an associated incident in PagerDuty.
> **Note:** Use [Suppress alert](/ai-automation/aiops/event-orchestration#incident-data) to collect data without triggering an incident or notifying responders.
### 2\. Assignment via Escalation Policies and Schedules
Unlike an alert or a suppressed event, an incident must be assigned to a user. The escalation policy determines to whom an incident is assigned. An escalation policy has one or more levels and can target either a schedule or a user. An incident escalates through the layers of an escalation policy until it reaches someone on call who is notified and assigned the incident. If the user fails to acknowledge the incident before the [escalation timeout](/incident-management/schedules/escalation-policies#escalation-timeout), the incident escalates to the next escalation level.
Incidents are only created when an escalation policy has an on-call user. In other words, if there is no one to assign an incident to when an event is sent to PagerDuty (due to a [coverage gap on a schedule](/incident-management/schedules/schedule-basics#schedule-restrictions), for example), no incident is created.
### 3\. Notifications via Push, Phone, Slack, Email, or SMS
Each user configures notification rules in their [user profile](/account-admin/user-profile). PagerDuty contacts users according to their [notification rules](/account-admin/user-profile/notification-rules) until the incident is acknowledged, resolved, or escalated, either manually or due to escalation timeout.
### 4\. Acknowledging and Resolving
Notifications allow responders to acknowledge that they are working on an incident or that it has been resolved. Depending on a their permissions, users who are not currently assigned to an incident can acknowledge or resolve it on the **Incidents** dashboard in the web app.
Resolving an incident closes the incident, while acknowledging only halts escalation. If the incident is not resolved before the service's acknowledgement timeout expires, it retriggers and continues to escalate.
> **Note:** [Alerts](/incident-management/incidents/alerts) cannot be acknowledged; they can only be triggered or resolved. If all alerts in an incident are resolved, the incident gets resolved. Similarly, when an incident is resolved, all associated alerts are also resolved.
## Incident Timeline
Each incident has a **Timeline** tab in the incident details page, showing timestamps of each [incident status](/incident-management/incidents/overview#incident-statuses) along with all other actions taken and notifications sent from the incident.
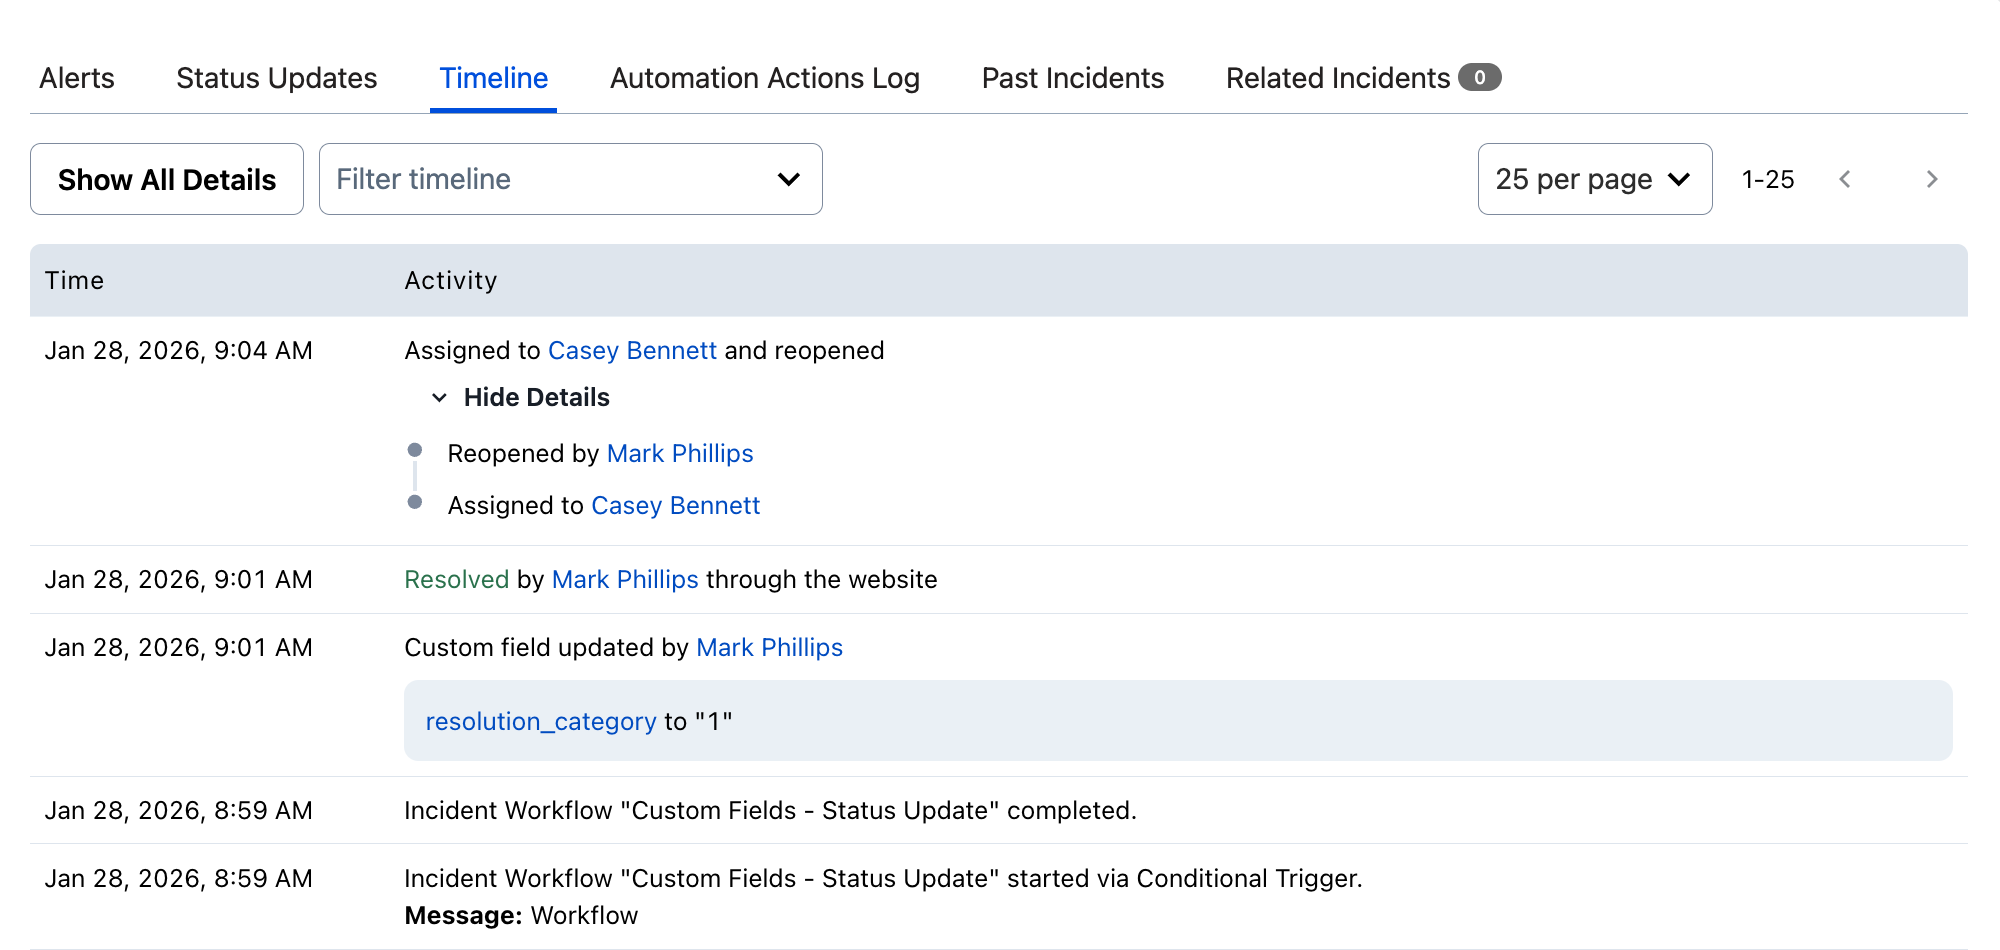
*Incident timeline*
You can filter the incident timeline by specific events and actions, making it easier to track particular types of updates or changes and review patterns throughout the incident.
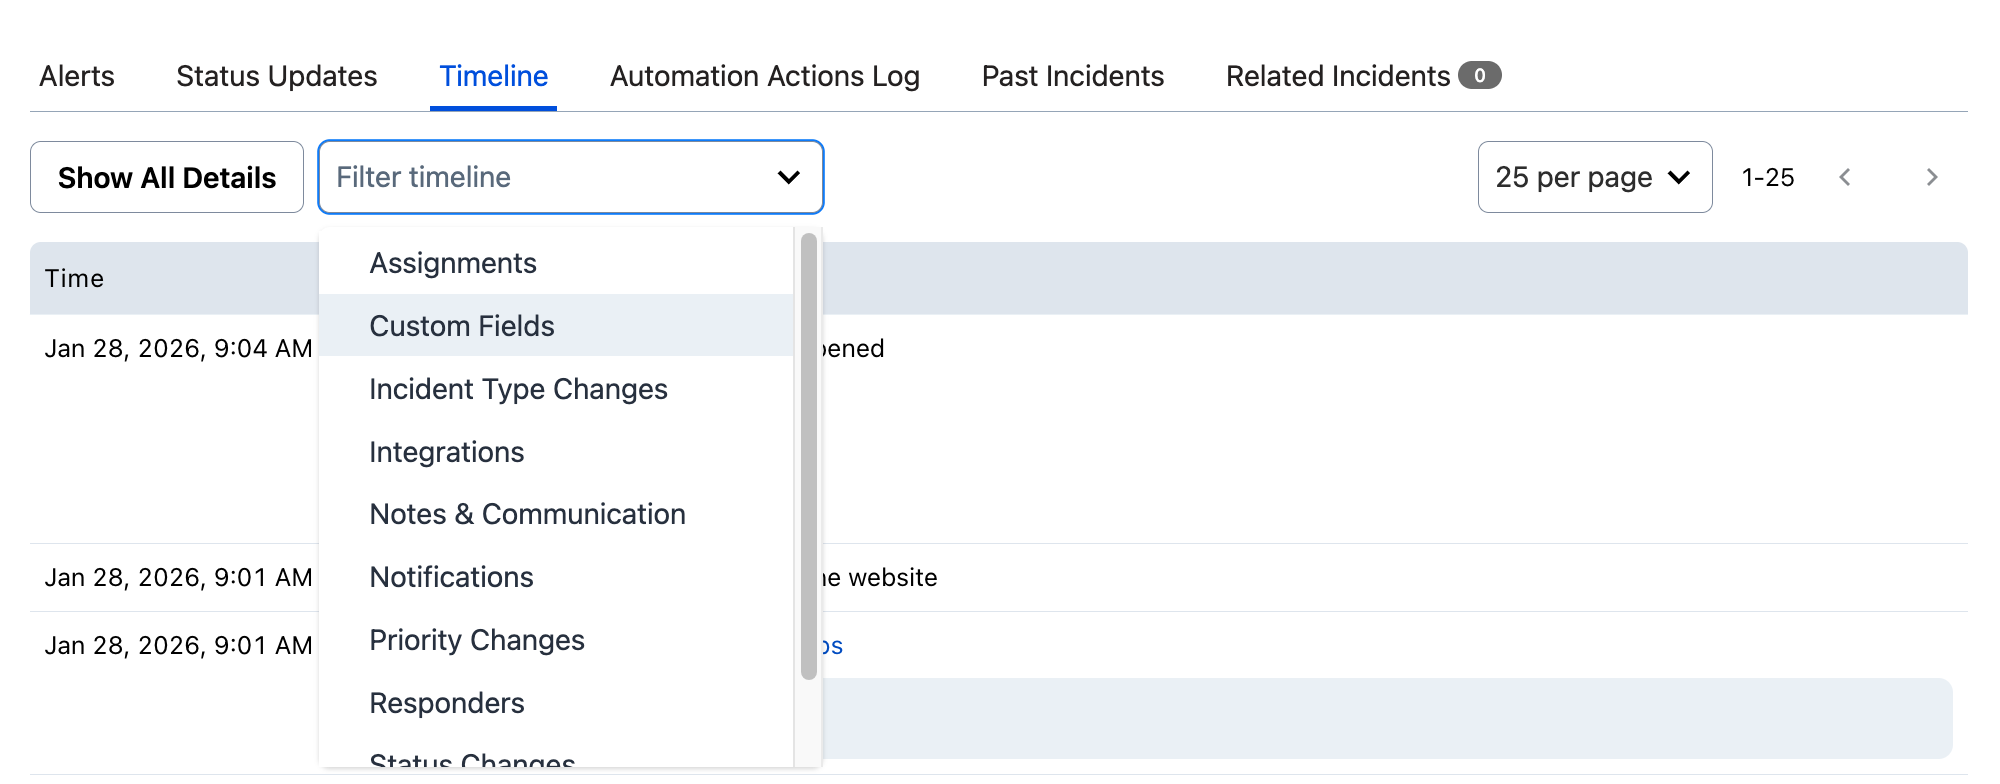
*Incident timeline filter*
## Trigger/Declare an Incident
> **Note on Terminology:** Throughout PagerDuty documentation, you may see incidents referred to as being **triggered** or **declared**. While both terms describe the creation of a new incident in PagerDuty, their usage reflects different contexts:
>
> - Triggered refers to incidents created automatically via integrations, monitoring tools, or event-driven workflows.
> - Declared refers to incidents created manually by users through the PagerDuty interface or API.
>
> **Important**: Regardless of how an incident is created, its initial status is always **Triggered**.
There are multiple ways to trigger PagerDuty incidents depending on your use case:
**Trigger an Incident via Integration**
It is a common workflow to integrate with a third-party platform (e.g., a monitoring tool) and to configure the integration to trigger an incident in PagerDuty when specific criteria are met. Visit the [Integrations library](/integrations) for more information on integrating the products in your tool chain with PagerDuty.
> **Event Orchestration:** [Event Orchestration](/ai-automation/aiops/event-orchestration) centralizes your integrations by sending all your events to a single endpoint and routes alerts to the appropriate service based on the logic that you provide.
**Declare an Incident via Web App**
You can manually create an incident from anywhere in the PagerDuty web app. Manually opening an incident triggers an incident and notifies the on-call responder(s). A common use case is to test notification rules or contact the on-call person inform them about an issue on a particular service.
> **Required User Permissions:** All users, except Limited Stakeholders and Full Stakeholders, can manually trigger incidents.
>
> Restricted Access and Observer users can only trigger incidents for [Teams](/account-admin/teams) they are associated with.
> **Availability:** Depending on your account's pricing plan, the following features may not be available. Contact the [Sales Team](https://www.pagerduty.com/contact-us/#contact-sales) to upgrade your pricing plan.
1. In the top navigation bar, click **+ New Incident**.
2. In the **Create New Incident** dialog, enter the following:
| Field | Description |
| :--- | :--- |
| **Title** _(Required)_ | Enter a title for the incident. |
| **Incident Type** _(Required)_ | Pre-filled with your account's [Default Incident Type](/incident-management/incidents/incident-types#set-the-default-incident-type), or **Base Incident** if no default is set. Select a different type if needed. |
| **Impacted Service** _(Optional)_ | Select the impacted service for the incident.
**Note:** Impacted service is _optional_ by default. You can set it to _required_ by [allowing default mobilization](/incident-management/incidents/quick-declare#disable-default-mobilization). |
| **Description** _(Optional)_ | Enter an incident description. |
| **Urgency** _(Optional)_ | Assign an urgency level: **High** or **Low**. If you have configured [support hours](/incident-management/services/configurable-service-settings#urgency-use-case-support-hours) for the service, leave this blank to use the default urgency setting, or select an option to override it. Urgency can only be selected for enabled services. Refer to [notification urgencies](/incident-management/services/configurable-service-settings#notification-urgency) for more information. |
| **Priority** _(Optional)_ | Assign an incident priority. Priority can only be selected for enabled services. Refer to [incident priority](/incident-management/incidents/incident-priority) for more information. |
| **Assignee** _(Required)_ | Assign the incident by selecting an **escalation policy** or a **user** from their respective tabs. This selection overrides the service's escalation policy, and the incident notifies the selected escalation policy or user. |
| **Add additional responders to help** _(Optional)_ | Add additional responders to the incident by selecting **escalation policies** and/or **users** from their respective tabs. |
| **Add a conference bridge** _(Optional)_ | Add a conference bridge by selecting a preconfigured [Conference Bridge](/incident-management/incidents/conference-bridge) from the dropdown. |
| **Dial-in number** _(Optional)_ | Enter a dial-in number. |
| **Meeting URL** _(Optional)_ | Enter a meeting URL. |
3. Click **Create Incident**.
> **Self-Assigned Incidents:** If you assign a manually declared incident to yourself, PagerDuty will not notify you. The incident will be in an Acknowledged state, as you are aware of it and working to resolve it.
**Declare an Incident via Mobile App**
Refer to [declaring incidents in the mobile app](/get-started/mobile-app#trigger-or-declare-an-incident) for more information.
**Trigger an Incident via API**
### Events API
If a service has an API integration, you can trigger an incident via Events API by sending a [properly-formatted `POST` request](/developer/api/reference/events-v2/send-event/create-v2-event) with your integration key. You can find the integration keys by navigating to **Services** → **Service Directory** → selecting the **service** where the integration is configured → **Integrations** tab → click the to the right of the integration.
> **Developer Documentation:** For more information, refer to [Events API v2 Overview](/developer/events-api-v2-overview). Visit [PagerDuty Samples](https://github.com/PagerDuty-Samples/) site for code samples in Ruby, Python, and PHP.
### REST API
You can also [trigger incidents using the REST API](/developer/api/reference/rest/incidents/create-incident).
**Declare an Incident via Email Integration**
If a service has an email integration, you can trigger an incident by sending an email to the integration's email address. To view an email integration's address, go to **Services** → **Service Directory**, select the service, click the service's **Integrations** tab, and click the to the right of the integration.
When you send an email to the integration address, an incident is triggered on that service. The incident appears in the **Incidents** tab.
**Declare an Incident via Slack**
If your account has the [Slack integration](/integrations/slack-integration-guide) configured, you can also declare an incident using the [Slack slash commands](/integrations/slack-integration-guide/slack-user-guide#slash-commands).
> **Incident Trigger Limitations:** - An incident stops accepting new trigger events after receiving 100 events with the same deduplication key. After receiving 100 triggers, the **Alerts Log** stops showing more events. If you want to send more events, you must first resolve the incident.
> - For an incident to trigger, at least one person must be on-call per the service's escalation policy. If no one is on-call an incident will not trigger.
> **High Open Incident Volume:** For services with over 100K open incidents, the [auto-resolve feature](/incident-management/services/configurable-service-settings#auto-resolution) will automatically be enabled. With this feature enabled, all new incidents for that particular service are auto-resolved after 24 hours, and no further notifications will be sent for those incidents.
>
> You cannot disable this feature for the service in question unless the service's open incident count is reduced to under 100K. To reduce the open incident count, use the [update an incident API](/developer/api/reference/rest/incidents/update-incident) to bulk resolve incidents. Additionally, you can use the [mass_update_incidents.py](https://github.com/PagerDuty/public-support-scripts/blob/master/mass_update_incidents/mass_update_incidents.py) script to automate and bulk resolve incidents.
## Acknowledge an Incident
There are multiple ways to acknowledge PagerDuty incidents depending on your use case:
**Acknowledge an Incident via Web App**
There are two ways to acknowledge an incident in the web app:
- [On the Open Incidents page](#acknowledge-an-incident-on-the-open-incidents-page)
- [On the incident details page](#acknowledge-an-incident-on-the-incident-details-page)
### Acknowledge an Incident on the Open Incidents Page
1. Navigate to **Incidents** to view the Open Incidents page.
2. Select the **checkbox** to the left of the triggered incident to acknowledge.
3. Click the **Acknowledge** button in the actions menu bar.
### Acknowledge an Incident on the Incident Details Page
1. Click an open incident's title to enter the incident details page.
2. Click the **Acknowledge** button in the actions menu bar.
**Acknowledge an Incident via Mobile**
Refer to [acknowledging incidents in the mobile app](/get-started/mobile-app#acknowledge-an-incident) for more information.
**Acknowledge an Incident via API**
Refer to the [API Reference](/developer/api/reference/rest/incidents/update-incidents) guide for more information.
**Acknowledge an Incident via Slack**
Refer to the [Slack Integration User Guide](/integrations/slack-integration-guide/slack-user-guide#incident-card-actions) for more information.
> **Incident Acknowledgement Limitations:** Each incident is limited to 100 acknowledgements. However, the limit for [added responders](/incident-management/incidents/add-responders#add-responders-to-an-incident) is 1000. So, if many responders need to be involved in an incident, this may be a better approach.
### Unacknowledge an Incident
If you accidentally acknowledge an incident, you can undo it by clicking the **More...** button in the incident details page and selecting **Unacknowledge Incident**.
Unacknowledging an incident returns it to a **Triggered** state and causes notifications to be sent again. The escalation process also resumes.
## Resolve an Incident
There are multiple ways to resolve PagerDuty incidents depending on your use case:
**Resolve an Incident via Web App**
There are two ways to resolve an incident in the web app:
- [On the Open Incidents page](#resolve-an-incident-on-the-open-incidents-page)
- [On the incident details page](#resolve-an-incident-on-the-incident-details-page)
### Resolve an Incident on the Open Incidents Page
1. Navigate to **Incidents** to view the **Open Incidents** page.
2. Select the checkbox to the left of the incident to resolve.
3. Click **Resolve** in the actions menu bar.
### Resolve an Incident on the Incident Details Page
1. Click an open incident's title to enter the incident details page.
2. Click **Resolve** in the actions menu bar.
**Resolve an Incident via Mobile**
Refer to [resolving incidents in the mobile app](/get-started/mobile-app#resolve-an-incident) for more information.
**Resolve an Incident via API**
Refer to the [API Reference](/developer/api/reference/rest/incidents/update-incidents) guide for more information.
**Resolve an Incident via Slack**
Refer to the [Slack Integration User Guide](/integrations/slack-integration-guide/slack-user-guide#incident-card-actions) for more information.
## Redact an Incident
> **Required User Permissions:** This action is only available to the Account Owner. Redaction cannot be undone, not even by PagerDuty Support.
If an incident contains sensitive information, the **Account Owner** can permanently delete the incident's details by selecting **More...** and clicking the **Redact Incident** button.
After confirming that you want to redact an incident's name and details, the page reflects who redacted the data and when it was redacted.
> **Incident Redaction and Analytics:** Redacting deletes the incident description and incident key, but does not affect [Analytics metrics](/incident-management/analytics/insights) associated with the incident.
## FAQ
**Why was an incident number skipped?**
In the past, incidents started at #1 and never skipped a number. There are rare cases, however, in which PagerDuty is unable to create incidents quickly enough. To address this, you might notice "missing" incident numbers. PagerDuty never deletes incidents, so a skipped number means it was skipped at creation time. This does not indicate a problem.