# Incident Roles
Define responder roles and responsibilities for efficient incident management.
Incident roles allow you to customize a set of roles that you can assign during an incident. An established set of incident roles clearly defines incident responsibilities, promotes accountability, and enables efficient response.
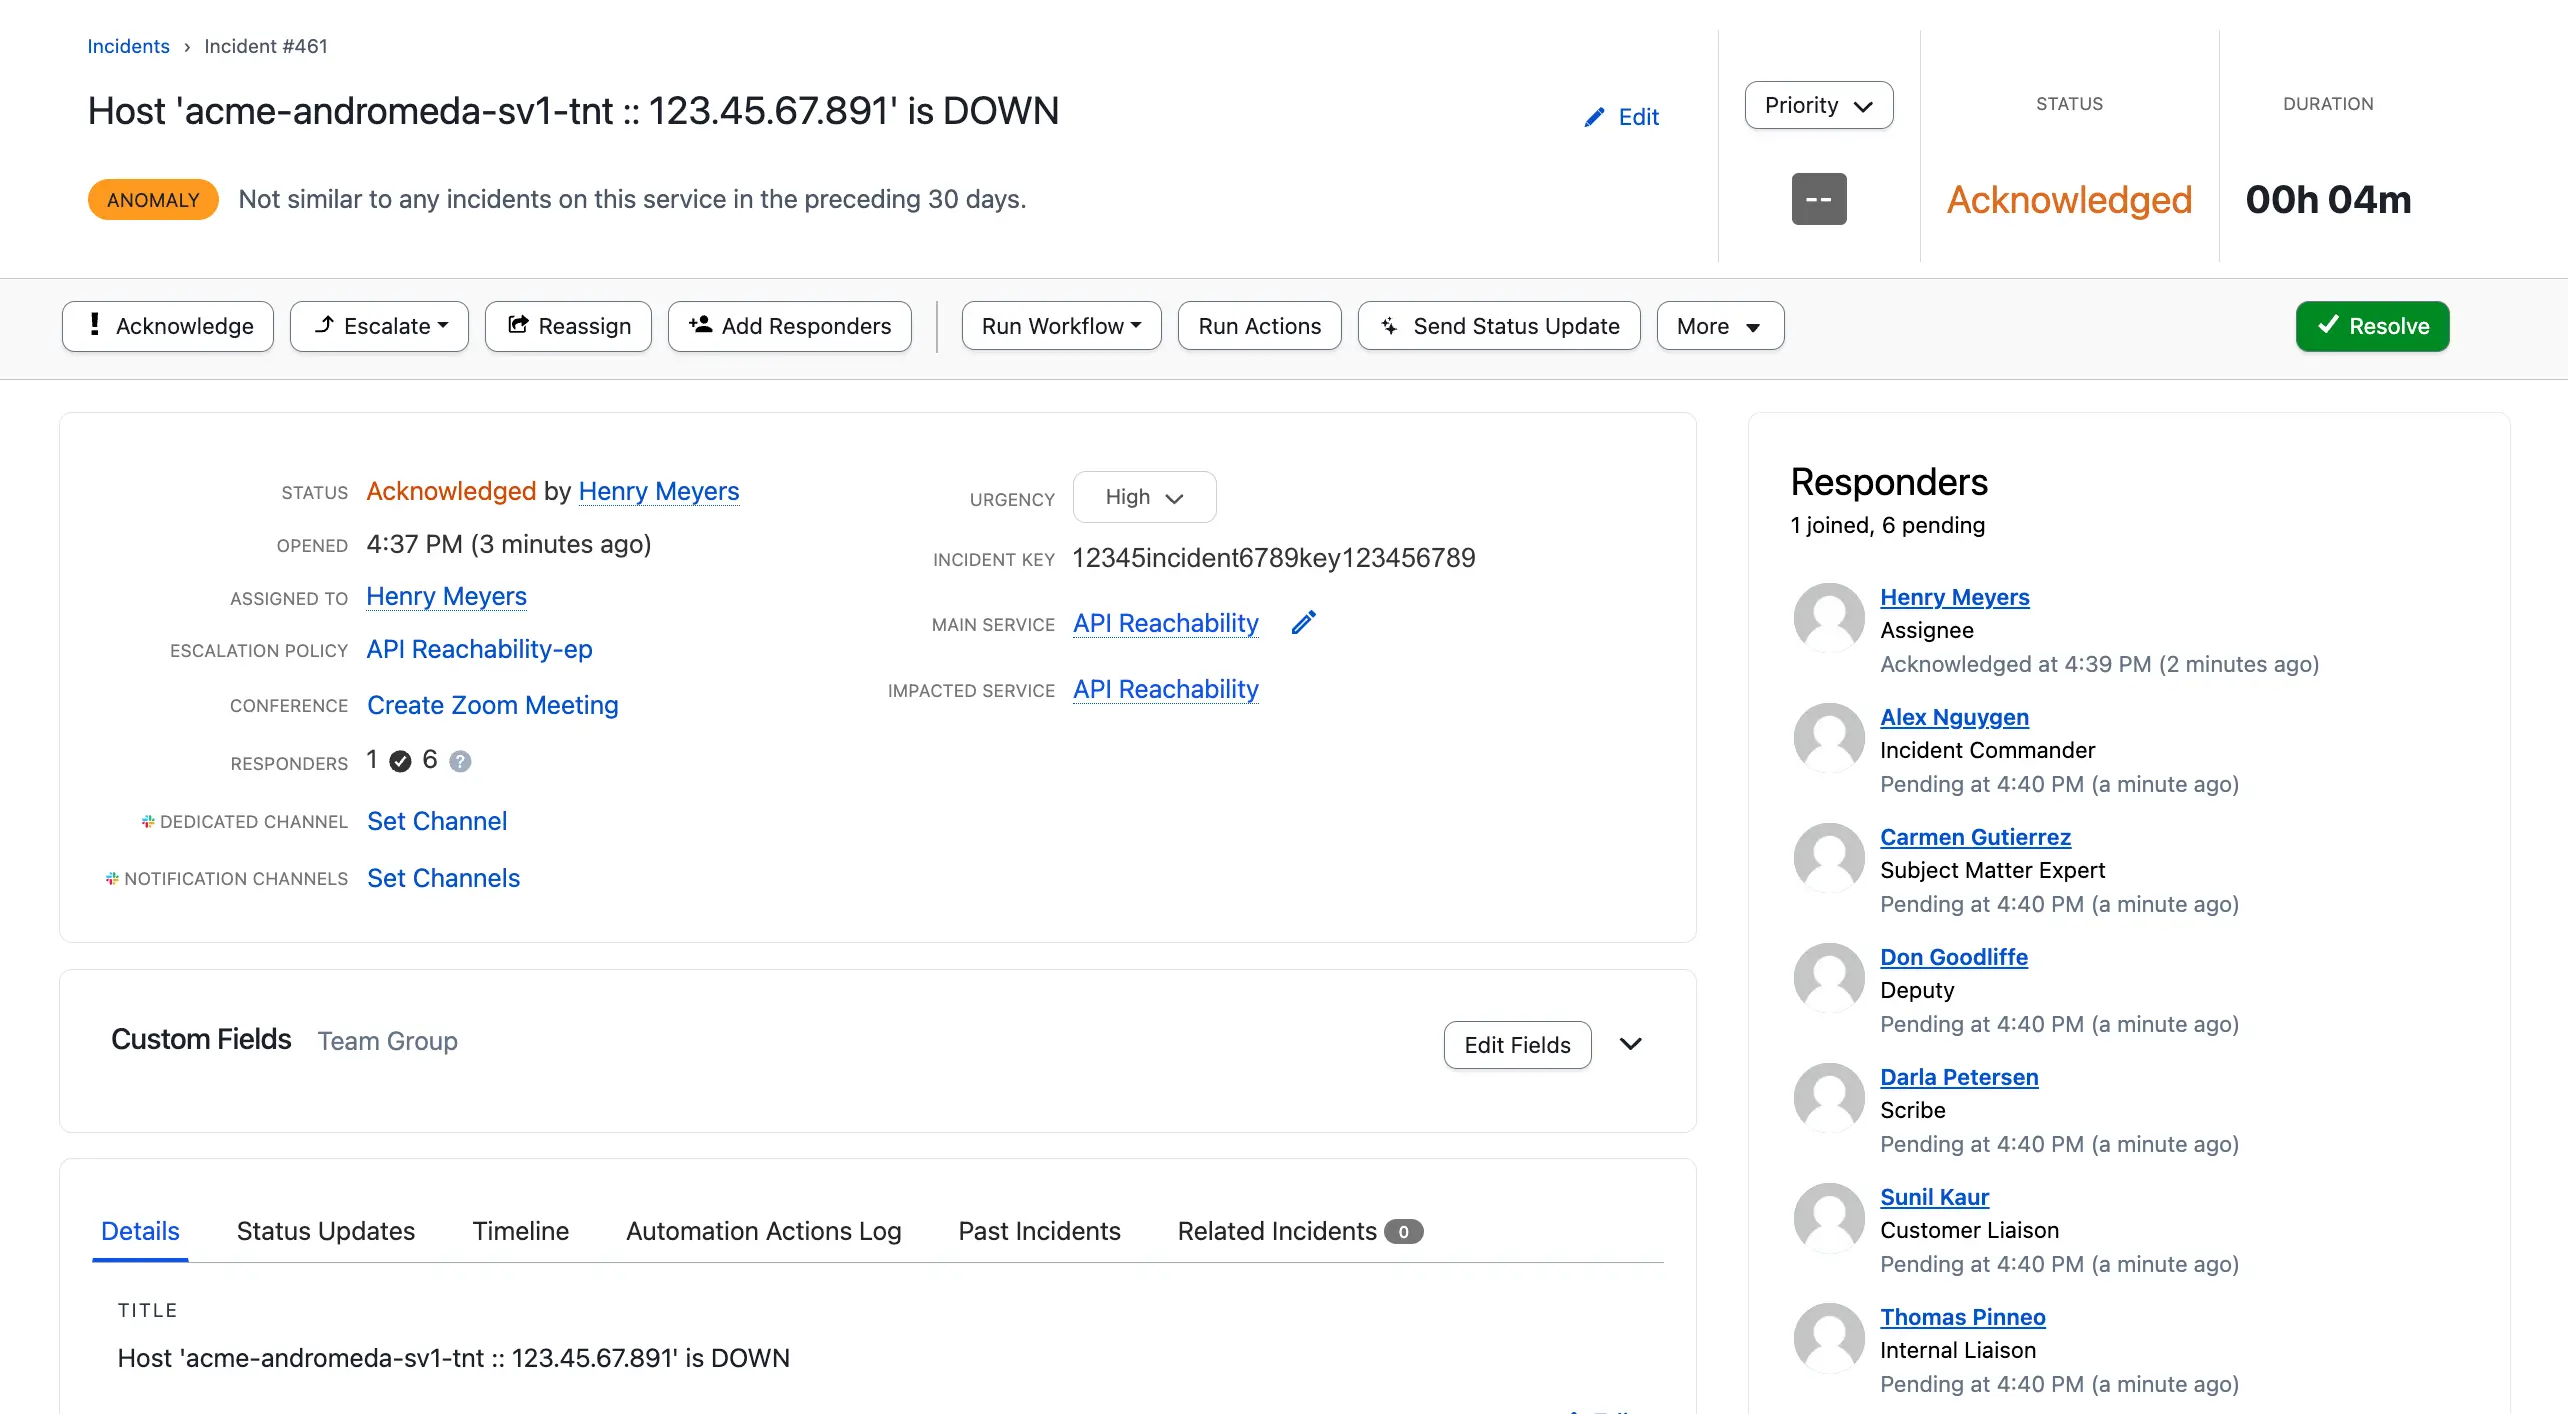
*_Incident Roles in Responders list_*
> **Availability by Plan:** | Role Type | Professional | Business | Enterprise | PD Reliability Platform Essential | PD Reliability Platform Plus/Ultimate |
> | :---------------------------------------------------------- | :----------------- | :----------------- | :------------------------------------ | :--------------------------------- | :-------------------------------------- |
> | **Predefined Roles** (Incident Commander, Customer Liaison) | ✓ | ✓ | ✓ | ✓ | ✓ |
> | **Custom Roles** | — | one | 10 (for a total of 12 incident roles) | one | 10 (for a total of 12 incident roles) |
>
> Contact the Sales Team to upgrade or expand your incident roles feature set.
> **Incident Response Guide:** For more information on how teams at PagerDuty use roles in their incident management process, refer to the [Incident Response Guide](/ops-guides/incident-response-guide/different-roles).
## Default Incident Roles
There are two default incident roles:
- Incident Commander
- Customer Liaison
Your account plan determines whether these roles are available. You can enable these roles to use them on incidents. For detailed configuration steps, see [Enable or Disable Incident Roles](#enable-or-disable-incident-roles).

*_Incident roles_*
## Create Incident Roles
> **Required User Permissions:** Global administrators and the account owner can create, edit, and delete account-wide incident roles.
> **Note:** Your pricing plan determines whether you can create roles. See the [Availability by Plan](#availability-by-plan) table.
1. Navigate to **Incidents** → **Incident Roles**.
2. Click **New Role**.
3. On the **New Role** screen, complete the following fields and click **Create Role**:
| Field | Description |
| :------------------------ | :--------------------------------------------------------------------------------------------------------------------------------------------------------------------------- |
| **Display Name** | A role name to display on incidents. |
| **Role Name** | A unique name for API use. This name can contain only lowercase letters, numbers, and underscores.
**Note**: You cannot change the Role Name after role creation. |
| **Description** | Help responders understand the scope of the role and how they should use it. |
| **Disable Incident Role** | Select **Enable** or **Disable**. Disabling a role removes it from future incidents. Existing incident roles and assignees remain unaffected. |
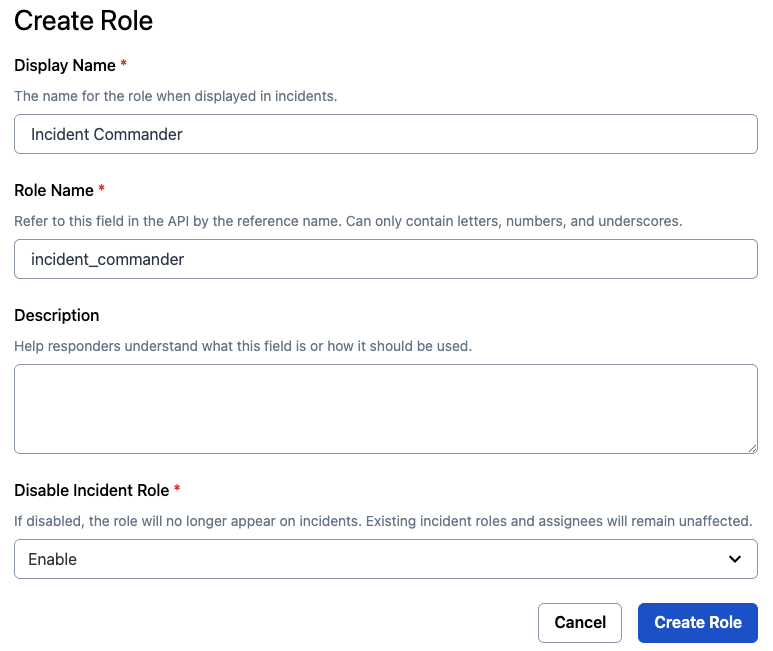
*Create role modal*
### Edit Incident Roles
1. Navigate to **Incidents** → **Incident Roles**.
2. Click the **role** you want to edit.
3. On the edit screen, modify the details using the following fields and click **Save Changes**:
| Field | Description |
| :------------------------ | :---------------------------------------------------------------------------------------------------------------------------------------------------------------------------- |
| **Display Name** | Edit the role name. |
| **Description** | Edit the description to help responders understand the scope of the role and how they should use it. |
| **Disable Incident Role** | Select **Enable** or **Disable** depending on your preference. If disabled, the role no longer appears on incidents. Existing incident roles and assignees remain unaffected. |
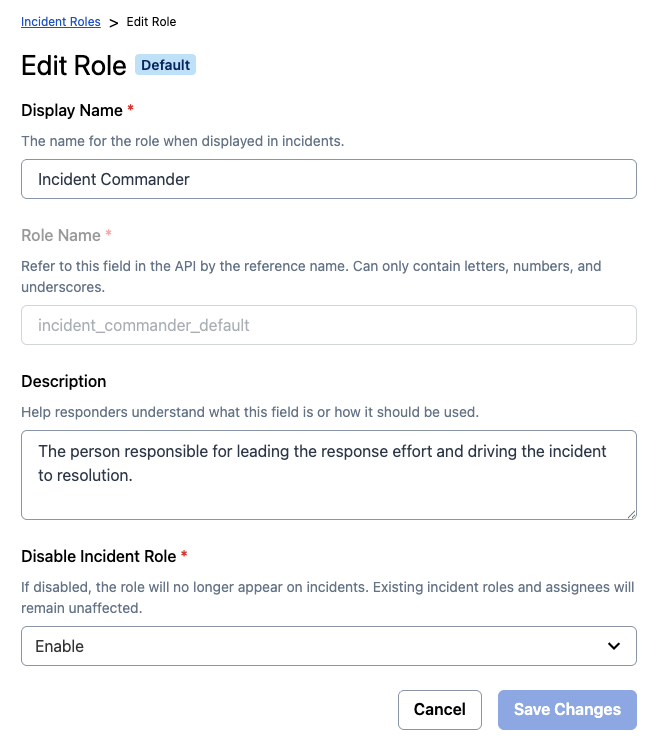
*_Edit incident roles_*
### Enable or Disable Incident Roles
To enable or disable an existing incident role:
1. Navigate to **Incidents** → **Incident Roles**.
2. In the **Ellipsis Icon ()** overflow menu next to the role you want to disable or enable, click **Enable** or **Disable**.
### Delete Incident Roles
> **Deletion Warning:** You cannot recover an incident role after deleting it.
1. Navigate to **Incidents** → **Incident Roles**.
2. In the **Ellipsis Icon ()** overflow menu next to the role you want to delete, click **Delete**.
3. In the confirmation modal, type **Delete** in the text box and click **Delete**.
## Assign an Incident Role
Once you create an incident role, you can assign the role to an incident responder.
> **Behavior When You Assign Roles to Non-Responders:** If you assign a role to a user who is not already a responder on the incident, this action adds them as a responder. For more information on managing responders, see [Add Responders to an Incident](/incident-management/incidents/add-responders#add-responders-to-an-incident). The responder request includes the role assigned to the user.
You can assign an incident role in multiple ways:
**Assign an Incident Role in the Web App**
You can assign incident roles to individual users or to escalation policies. When you assign a role to an escalation policy, it sends a responder invite to the on-call responder. Once accepted, PagerDuty assigns them to the role. If they do not accept the responder request before the escalation timeout, PagerDuty escalates and notifies the next level of the escalation policy.
> **Requirements:** - A user who can take action on the incident (Responder permissions or higher) can assign incident roles in the web app.
> - You cannot assign roles to stakeholders.
Follow these steps to assign an incident role:
1. When viewing an incident, in the **Responders** list on the right, click **Assign Roles**.
2. In the **Assign Roles** modal, complete the following field and click **Save**:
| Field | Value |
| :---------------------------- | :--------------------------------------------------------------------------------------------------------------------------------- |
| **\[Incident Role Dropdown]** | Click the dropdown for your preferred role, select the **Escalation Policies** or **Users** tab, and select the desired responder. |

*Assign roles modal*
_Assign or edit roles_

*_Responder request with Incident Role_*
**Assign an Incident Role in Slack**
You can assign incident roles from a PagerDuty incident notification in Slack.
> **Requirements:** - You must configure the integration via the [Slack Integration Guide](/integrations/slack-integration-guide) to assign incident roles in Slack.
> - You must have Responder permissions or higher to assign incident roles in Slack.
Follow these steps to assign an incident role in Slack:
1. In a Slack workspace integrated via the [Slack Integration Guide](/integrations/slack-integration-guide), navigate to a PagerDuty incident notification.
2. Click **More Actions** → **Assign Roles**.
3. In the **Assign Roles** dialog, click the **Select** dropdown, select a **user**, and click **Save**.

*Manage incident roles modal in Slack*
**Assign an Incident Role in Microsoft Teams**
You can assign an incident role from a PagerDuty incident notification in Microsoft Teams.
> **Requirements:** - You must configure the integration via the [Microsoft Teams Integration Guide](/integrations/microsoft-teams) to assign incident roles in Teams.
> - You must have Responder permissions or higher to assign incident roles in Teams.
Follow these steps to assign an incident role:
1. In a Microsoft Teams chat integrated via the [Microsoft Teams Integration Guide](/integrations/microsoft-teams), navigate to a PagerDuty incident notification.
2. Click the **Ellipsis Icon ()** overflow menu and select **Assign Roles**.
3. In the **Assign Roles** dialog, click the **Type to search for a user** dropdown, select a **user**, and click **Save**.

*_Select team roles in MS Teams_*
**Assign an Incident Role With Incident Workflows**
After you configure your roles, you can assign or unassign them using incident workflows. For more details, see [Create Incident Roles](#create-incident-roles) and [Incident Workflows](/ai-automation/automation/incident-workflows). This feature allows you to automate role assignments based on predefined workflow conditions, reducing manual work in your incident management processes.
To learn more about automated actions, see [Assign a Role via Incident Workflows](/workflow-actions/roles/assign-a-role-eim) and [Incident Workflows Roles](/ai-automation/automation/incident-workflows#assign-an-incident-role-to-the-on-call-user).
## FAQ
**Can I assign the same incident role to multiple responders?**
No. You can only assign incident roles to a single responder at any given time. This promotes accountability during response by eliminating shared ownership.
**Can I assign multiple roles to one user?**
Yes, you can assign multiple roles to a single user.
**Where are incident roles available in PagerDuty?**
Incident roles are available in the web app, Slack, Microsoft Teams, and [incident workflows](/workflow-actions/pagerduty-incident-management/assign-incident-roles-to-an-escalation-policy).