# Edit Incidents
Merge, snooze, add Notes to incidents and more.
When an incident triggers, there are a number of manual actions you may want to take, depending on your workflow or the specifics of the situation:
- [Merge Incidents](#merge-incidents)
- [Snooze an Incident](#snooze-an-incident)
- [Edit Incident Title](#edit-incident-title)
- [Edit Incident Priority](#edit-incident-priority)
- [Edit Incident Urgency](#edit-incident-urgency)
- [Reassign an Incident's Service](#reassign-an-incidents-service)
- [Edit Incident Duration](#edit-incident-duration)
- [Add a Note to an Incident](#add-a-note-to-an-incident)
## Merge Incidents
Merging multiple incidents into a single incident streamlines the notification and resolution process. Merging incidents also consolidates alert information into a single incident, helping responders identify an issue's root cause and impact.
> **Resolved Incidents:** The target incident must be **open**. You _cannot_ merge incidents into a resolved incident.
There are three places to merge incidents in the web app:
- [On the Incidents Page](#on-the-incidents-page)
- [On an Incident's Details Page](#on-an-incidents-details-page)
- [On a Service's Details Page](#on-a-services-details-page)
### On the Incidents Page
1. On the **Incidents** page, select the **checkboxes** next to the incidents you want to merge.
2. Click **Merge Incidents**.
3. In the modal, select the incident you want to group the alerts under. In the **Select the incident to merge into** field, sort incidents by **Selected Incidents**, **Assigned to me**, or **Assigned to my team**.
4. _(Optional)_ Update the **Incident Title** if a different title would better describe the issue.
5. Click **Merge incidents and \[X] Alerts**.
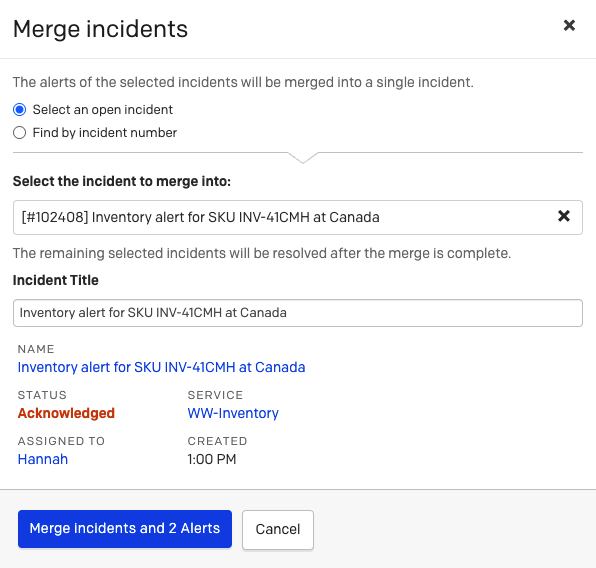
*Merge Incidents and 2 Alerts*
The incident dashboard shows the merged incident. Select the incident to view alerts from all merged incidents under the **Alerts** section.
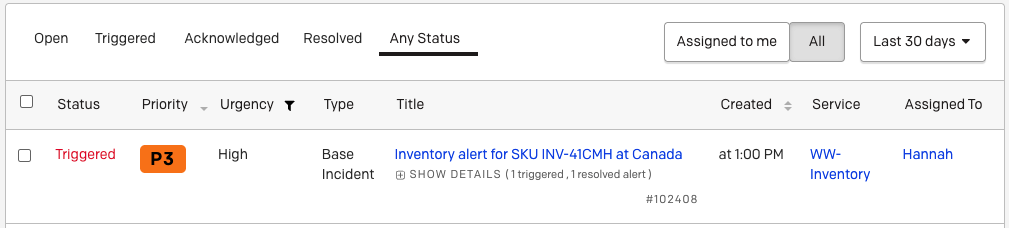
*Merged incident*
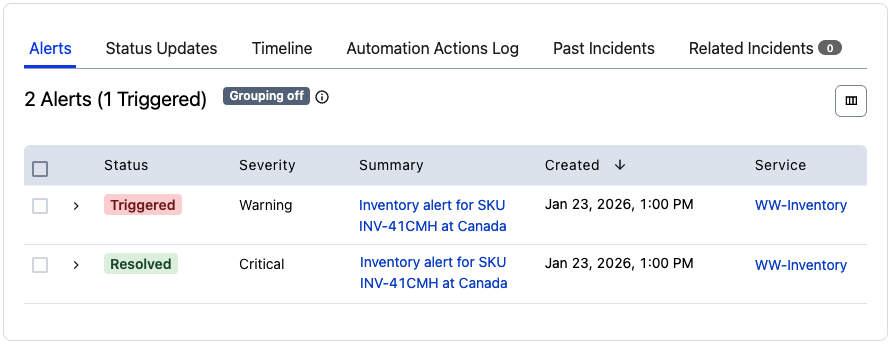
*Merged alerts*
### On an Incident's Details Page
1. Select an incident to view its details page.
2. Click **More** → **Merge with Another Incident**.
3. Enter an **incident number** and click **Find Incident**.
4. Click **Merge Incident and \[X] Alerts**.
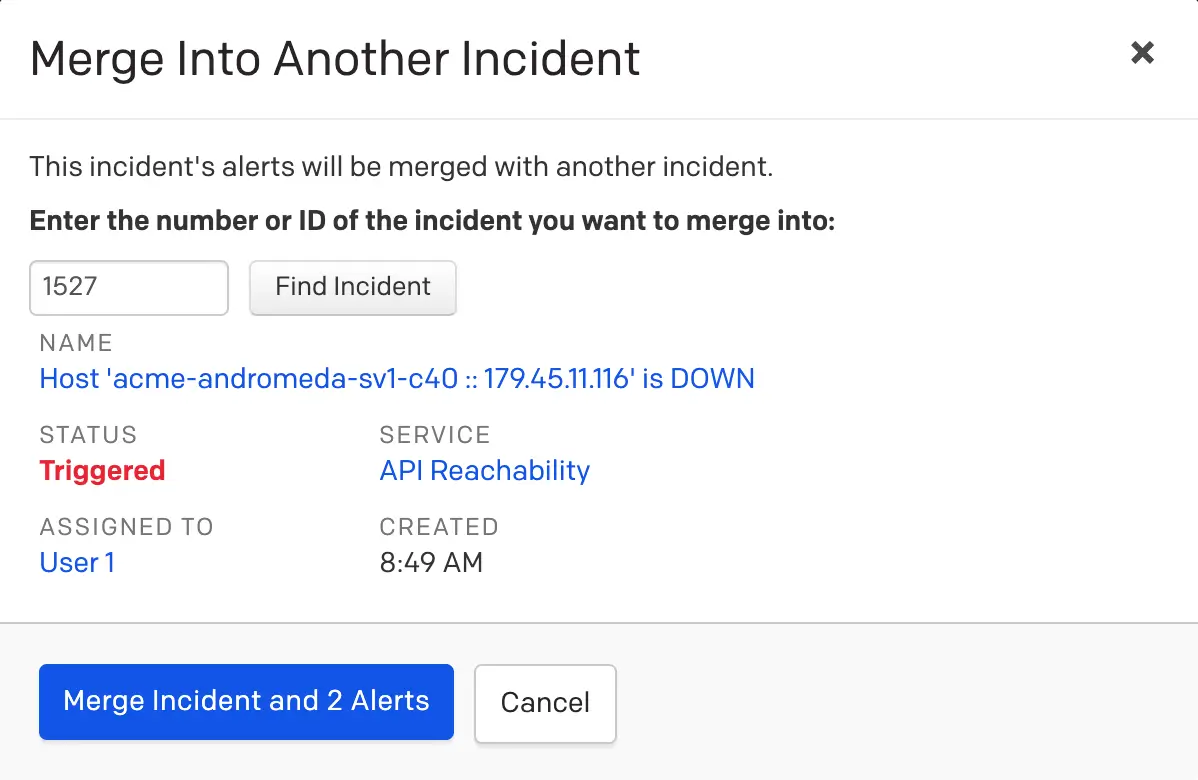
*Merge incidents on the details page*
### On a Service's Details Page
1. Navigate to **Services** → **Service Directory**.
2. Select the service to view its details page.
3. Select the **checkboxes** next to the incidents you want to merge.
4. Click **Merge Incidents**.
5. In the **Merge Incidents** modal, select the radio button of the incident you want to merge into.
6. Click **Merge**. The remaining selected incidents are resolved after the merge is complete.
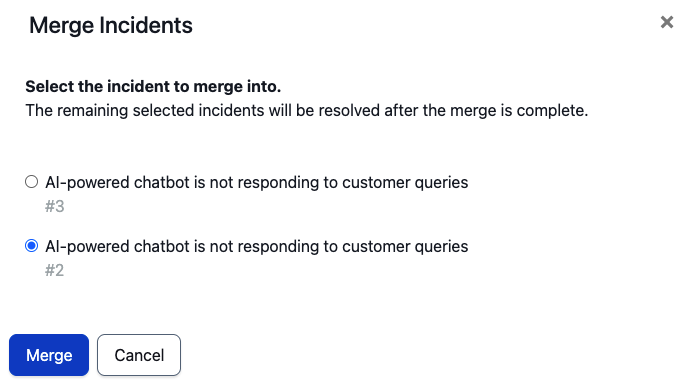
*Merge incidents on the service details page*
1. On the Open Incidents screen, tap (iOS) / (Android) in the top right and tap **Select Incidents**.
2. Select the radio buttons to the left of the incidents you want to merge, then tap **Change (X)** → **Merge X incidents** (iOS) _or_ → **Merge** (Android).
3. Select the **incident** you want to merge into. A confirmation dialog appears at the bottom of the screen indicating the incidents have been merged.
> **Alert Maximum:** An incident cannot have more than 1,000 alerts. You cannot merge incidents if their combined total exceeds 1,000 alerts.
### Merge Behavior
- When you merge multiple incidents, alerts are consolidated into the target incident. The other selected incidents are resolved with the resolution reason listed as **Merged**, and reference the target incident.
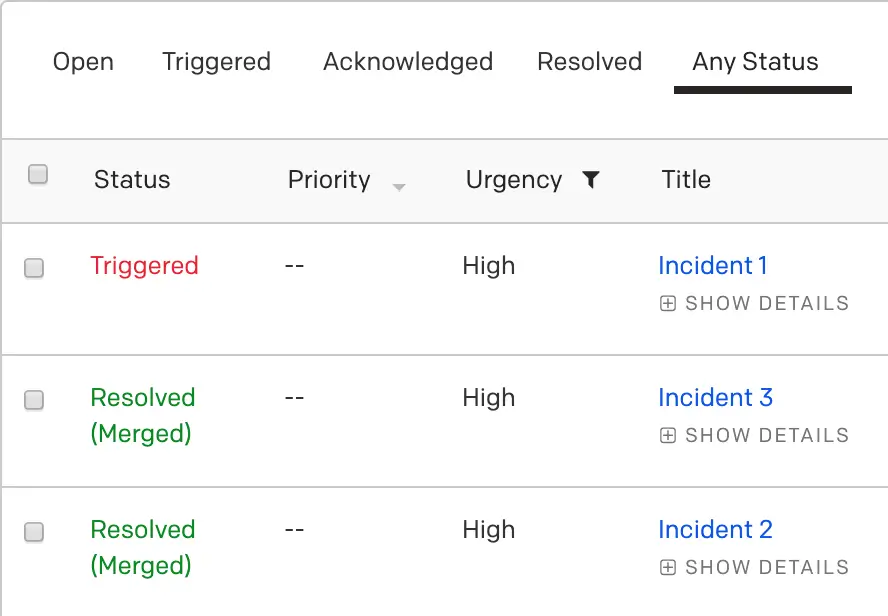
*Merged incidents*
- The deduplication key (**Alert Key**) does not change, but moves so that it is under a single incident with other deduplication keys.
- If you are using a bidirectional integration such as the Slack integration, merged incidents appear as resolved and reference the new target incident where all alerts are aggregated.
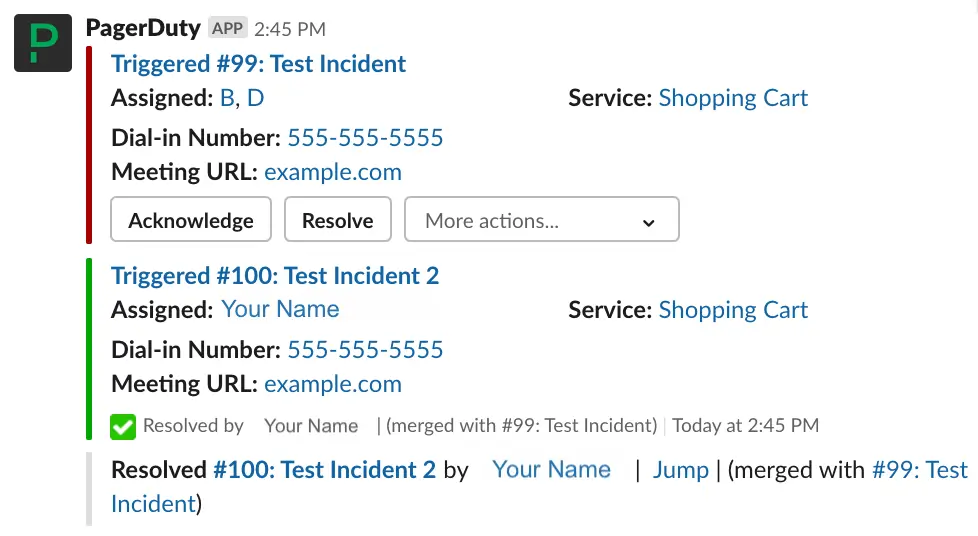
*Merged incident in Slack*
- Responders from source incidents are not merged into the target incident. The target incident's responders are preserved, and all alerts are assigned to them. You can view these users in the **Timeline** tab on the incident's details page.
- Subscribers from source incidents are not merged into the target incident. They must be [re-added](/incident-management/services/business-services/subscription#subscribe-to-incidents) to the target incident.
### Move Alerts to Another Incident
If an alert is incorrectly merged, there are two ways to move it to a new or existing incident:
1. Navigate to an incident's details page and scroll to the **Alerts** section.
2. Select the **checkbox** of the alert you want to move.
3. In the **Move** dropdown, select **Create new incident**.
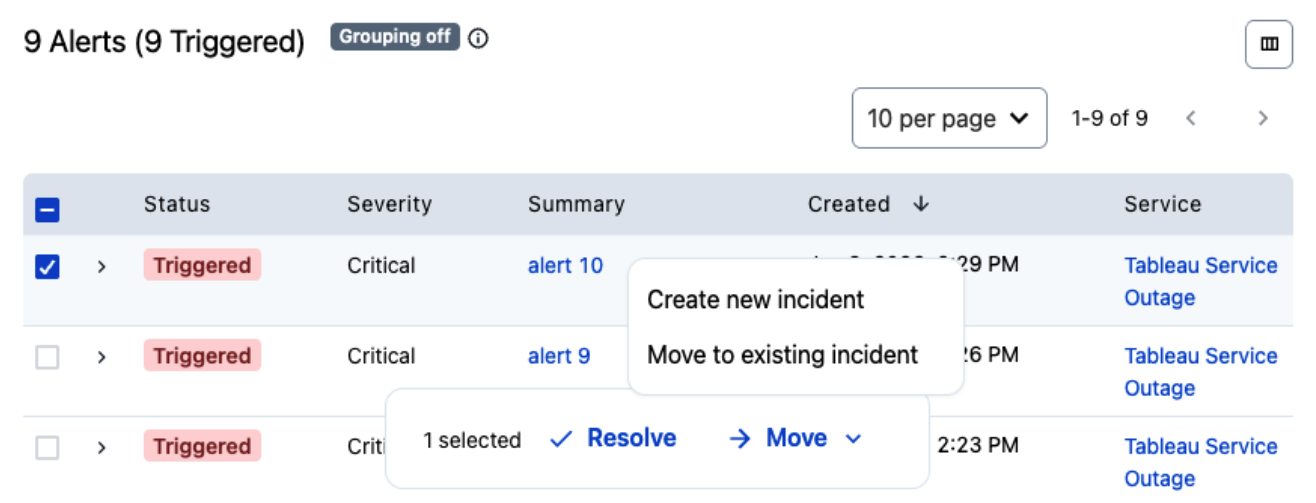
*Move alerts on the Incidents page*
4. _(Optional)_ Click **Edit Incident** to edit the incident details.
5. Click **Create Incident**.
1. Navigate to an incident's details page.
2. In the **Alerts** section, click an alert's **Summary** to navigate to its details page.
3. Click **Move to Another Incident**.

*Move alert to another incident*
4. Enter an **incident number** and click **Find Incident**.
5. Click **Move Alert**.
### Merged Incidents and Webhooks
If you have configured [webhooks](/integrations/webhooks), merging alerts into another incident sends a webhook for the source incident with a `resolve_reason` of `merged`.
Webhooks continue to update the target incident, but all incidents merged into it are marked as resolved.
Webhook updates are only sent for services with open incidents. For example, if you merge an incident from Service A into an incident on Service B, updates are sent only on Service B webhooks.
For incidents that were resolved when they merged into a target incident, resolve webhooks trigger if configured. These incidents contain a reference to the target incident. In the webhook body, the `resolve_reason` object provides detailed information about the target incident and indicates that the `type` is `merge_resolve_reason`.
## Snooze an Incident
Responders can use the snooze feature to prevent an acknowledged incident from escalating while they are working on the issue. You can snooze an incident for the following intervals: **1 hour**, **4 hours**, **8 hours**, **24 hours**, or **Other**. If you choose **Other**, the maximum length is 168 hours (one week).
Snooze is only available for acknowledged incidents. If you do not resolve the incident before the snooze timer expires, the incident returns to a triggered state and notifies you again according to your notification rules. If a different user has come on call since the incident was triggered — for example, due to a rotation on a [schedule](/incident-management/schedules/schedule-basics) — both users are notified.
The incident log captures all snooze actions taken on an incident.
1. **Acknowledge** the incident. **Snooze** replaces the **Acknowledge** button.
2. Select **Snooze** and choose the length of time you want to snooze the incident.
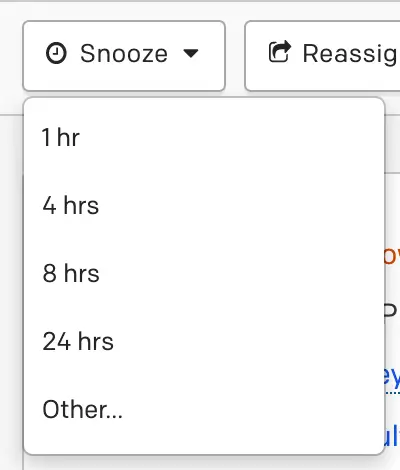
*Snooze an incident*
> **Add an Escalation Policy as a Responder:** If you [add responders](/incident-management/incidents/add-responders#add-responders-to-an-incident) to an incident and select an escalation policy, snoozing does not prevent the incident from escalating.
If you select **Other**, you can set a custom snooze time, snooze until a time tomorrow, or base your snooze on a service's [support hours](/incident-management/services/configurable-service-settings#step-one-configure-urgencies-on-a-service).
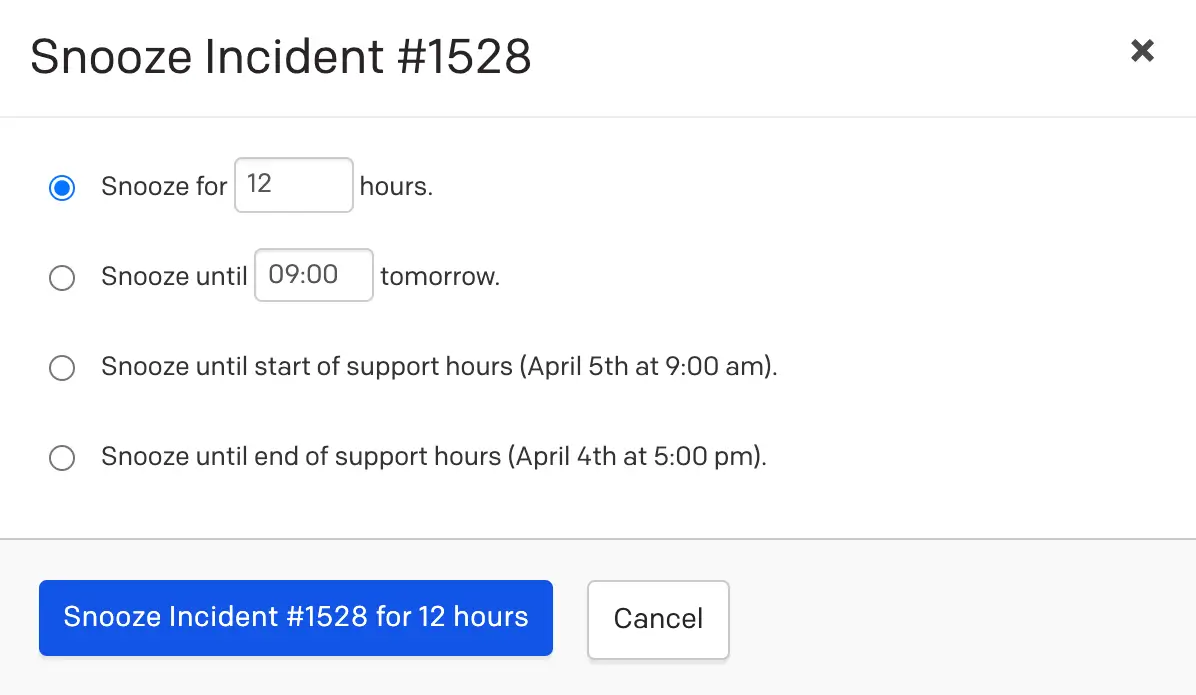
*Snooze an incident*
1. **Acknowledge** the incident. **Snooze** replaces the **Acknowledge** button.
2. Select **Snooze** and choose the length of time:
- **1 hour**
- **4 hours**
- **24 hours**
- **for**
- **until**
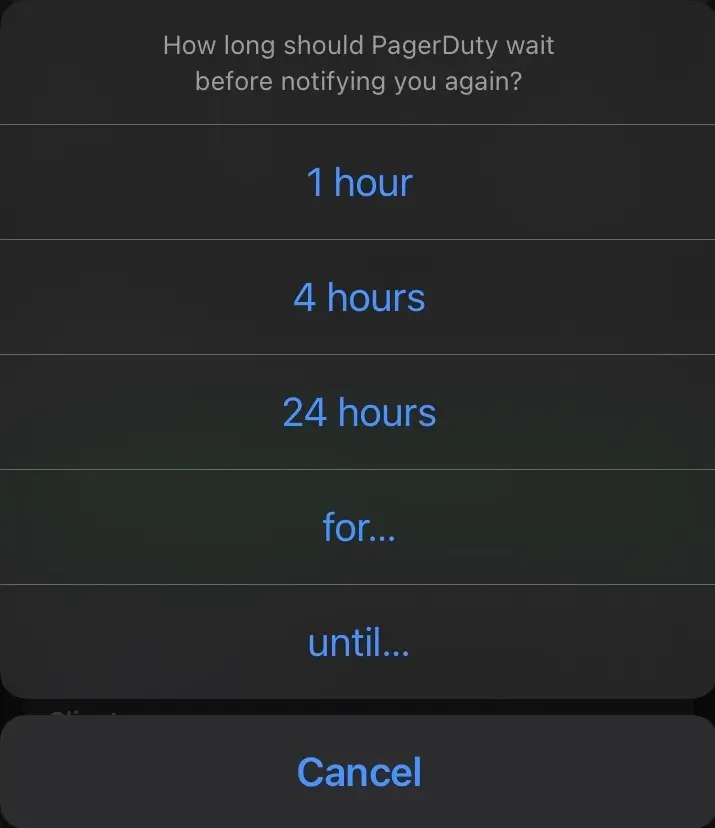
*Snooze an incident in the mobile app*
### Reassign a Snoozed Incident
[Reassigning](/incident-management/incidents/reassign-incidents) a snoozed incident cancels the snooze timer. The [acknowledgement timeout](/incident-management/services/configurable-service-settings#acknowledgement-timeout) resets to the triggering service's default value.
### Acknowledge a Snoozed Incident
If another user acknowledges a snoozed incident, the incident exits the snoozed state and the [acknowledgement timeout](/incident-management/services/configurable-service-settings#acknowledgement-timeout) resets.
### Auto-Resolution and Snooze
You can configure services to automatically resolve an incident after a predetermined period of time — this is called [auto-resolution](/incident-management/services/configurable-service-settings#auto-resolution). If an incident is snoozed past the time when auto-resolution would have resolved it (for example, auto-resolution is set to six hours but the incident is snoozed for 12 hours), the incident remains snoozed and does not automatically resolve. When the incident returns to an acknowledged or triggered state, the auto-resolution timer resets.
## Edit Incident Title
You can change an incident's title as it progresses or as the underlying issue becomes clearer.
1. Select an incident's **Title** to navigate to its details page.
2. Click **Edit** to the right of the incident's title.
3. Update the title.
4. Click **Save**.
1. Select an incident to navigate to its details page.
2. With the **Triage** tab selected, tap **Edit Title**.
3. Enter a new title.
4. Tap **Save**.
## Edit Incident Priority
Incident priority indicates an incident's relative importance (for example, P-1, P-2). You can adjust an incident's priority if its impact grows or shrinks during the course of response. Refer to [Incident Priority](/incident-management/incidents/incident-priority#prioritize-an-incident) for more information.
## Edit Incident Urgency
If it becomes clear during the course of an incident that the [urgency](/incident-management/services/configurable-service-settings#notification-urgency) should change, you can edit it.
1. Select an incident's **Title** to navigate to its details page.
2. Click the **Urgency** dropdown and select **High** or **Low**.
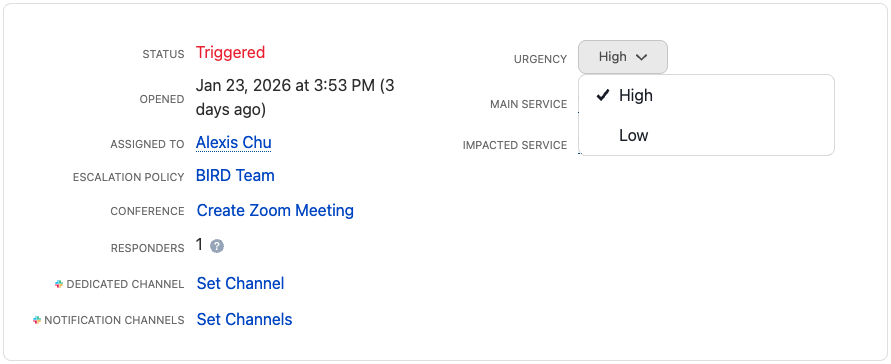
*Edit incident urgency*
1. Select an incident to navigate to its details page.
2. With the **Triage** tab selected, tap **Change to Low/High Urgency**.
3. Confirm your selection by tapping **Change Urgency**.
> **Editing Urgency on Unacknowledged Incidents:** If you acknowledge an incident and change its urgency from low to high, it returns to an [unacknowledged](/incident-management/incidents/overview#unacknowledge-an-incident) state. Escalation then continues, notifying responders using their high-urgency notification rules.
## Reassign an Incident's Service
Every PagerDuty incident has the following:
- **Main Service**: The technical service the incident is assigned to. You can change an incident's main service by reassigning it to a different service.
- **Impacted Services**: Services included in an incident's alert grouping. You cannot manually change or reassign these services.
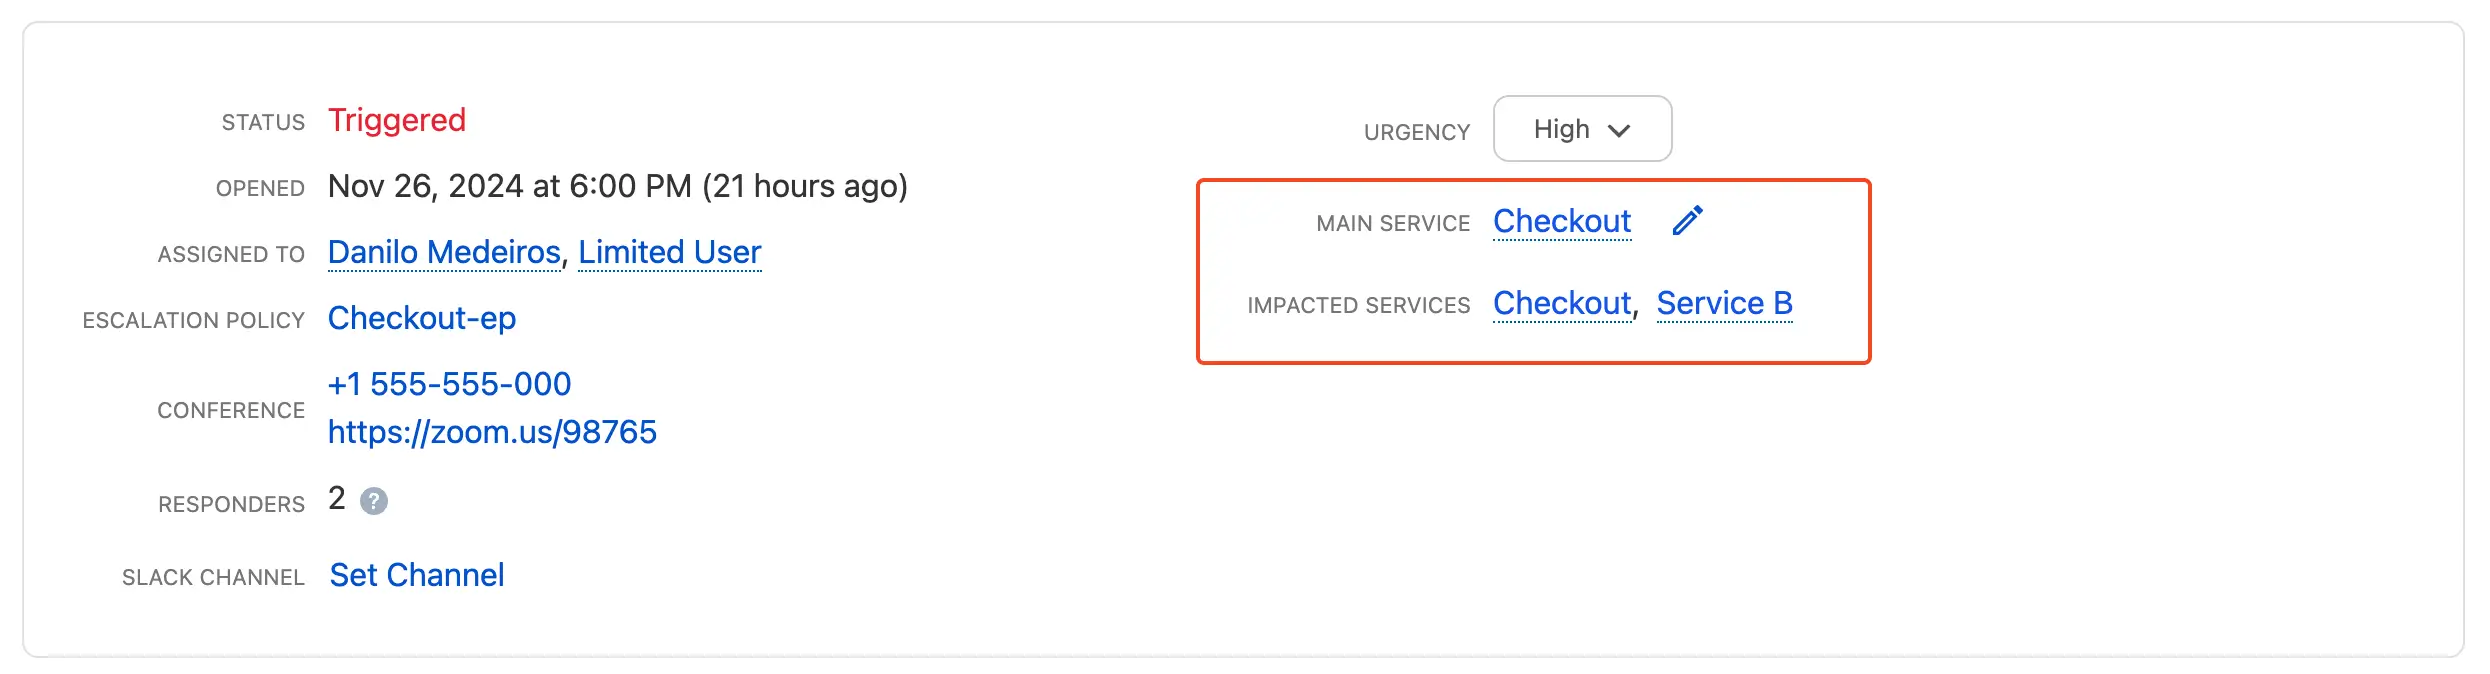
*An incident's main service and impacted services*
A service is automatically included as an impacted service when one of the following three actions occurs:
- [Merging incidents](#merge-incidents) that were created across multiple services into a single incident.
- [Globally grouping alerts](/ai-automation/aiops/noise-reduction/alert-grouping/global-alert-grouping) across multiple services into a single incident.
- Reassigning an incident's service. To ensure alert grouping continues after reassignment across services, the alert group (including the alert key or deduplication key) does not change. The original service remains as an impacted service because alerts from the original service continue feeding into the incident.
> **Service Reassignment:** Consider the following when assigning an incident to a different service:
>
> - Acknowledged incidents return to a triggered state.
> - If the new service uses a different escalation policy, the current incident's assignee is removed and replaced with the on-call responder from the new service.
> - [Incident Roles](/incident-management/incidents/incident-roles), [Incident Tasks](/incident-management/incidents/incident-tasks), [Custom Fields](/incident-management/incidents/custom-fields-on-incidents), and [Incident Workflows](/ai-automation/automation/incident-workflows) are not altered.
> - After reassigning the incident, it continues to participate in [Alert Grouping](/ai-automation/aiops/noise-reduction/alert-grouping) based on the originating service's alert grouping settings.
> - A record of the reassignment appears in the incident's timeline, including the originating service and the user who made the change.
**Incident Details Page**
1. Navigate to the **Incidents** page and click an incident's **title** to view its details.
2. In the **Main Service** field, click .

*Edit icon*
3. In the **Change Service** modal, select a service from the dropdown.
4. Click **Change Service**.
**Operations Console**
> **Availability:** The [Operations Console](/ai-automation/aiops/operations-console) is available with the [PagerDuty AIOps](/ai-automation/aiops/overview) add-on. To sign up for a trial of PagerDuty AIOps features, read [PagerDuty AIOps Trials](/ai-automation/aiops/overview#pagerduty-aiops-trials).
1. Navigate to **AIOps** → **Operations Console**.
2. Click the **Incident Title** or **Alert** to open the side panel.
3. In the **Main Service** field, click **Edit** to the right of the service's name.
4. In the modal, select a **different service** from the dropdown.
5. Click **Change Service**.
1. Navigate to **Incidents**.
2. Tap an **incident** to view its details page.
3. In the **Triage** tab, scroll left in the incident actions carousel and tap **Change Service**.
4. Tap a **service** to select it from the **My Teams** or **All** tab. A confirmation modal appears.
5. Tap **Confirm** to reassign the incident to the new service.
> **Prerequisites:** - The [Service Reassignment](/integrations/servicenow-integration-guide/advanced-servicenow-configuration/sync-service-reassignment-with-servicenow) feature is available with [ServiceNow 8.2](/integrations/servicenow-integration-guide). [Upgrade to the latest version](/integrations/servicenow-integration-guide/servicenow-integration-details#upgrade-to-servicenow-v8) to realize the full feature value.
> - To configure Service Reassignment, refer to [Sync Service Reassignment with ServiceNow](/integrations/servicenow-integration-guide/advanced-servicenow-configuration/sync-service-reassignment-with-servicenow).
With [ServiceNow 8.2](/integrations/servicenow-integration-guide), the [Service Reassignment](/integrations/servicenow-integration-guide/advanced-servicenow-configuration/sync-service-reassignment-with-servicenow) feature enables bidirectional sync between ServiceNow and PagerDuty when incidents are reassigned to different Configuration Items (CIs) in ServiceNow or to different services in PagerDuty.
To reassign in both systems, refer to the following documentation:
- **ServiceNow**: [Associate CIs with Incident](https://www.servicenow.com/docs/bundle/yokohama-it-service-management/page/product/incident-management/task/associate-cis-with-incident.html)
- **PagerDuty**: [Reassign an Incident's Service](/incident-management/incidents/edit-incidents#reassign-an-incidents-service)
> **Service Reassignment Unavailability in Certain Integrations:** Service reassignment is not available for Jira Cloud, Jira Server, or Zendesk integrations. If you reassign a linked PagerDuty incident to a different technical service, the incident remains linked to the issue or ticket, but synchronization rules tied to the original technical service no longer apply.
## Edit Incident Duration
> **Incident Status Requirement and Pricing Plan Availability:** You can edit an incident's duration only once it is resolved. This feature is not available while an incident is triggered or acknowledged.
>
> All pricing plans support editing resolved incident duration. You can view adjusted incident durations in [Insights](/incident-management/analytics/insights) reports by adding the **User Defined Response Effort** column to your table view. When you edit this value, it replaces the original **Response Effort** value and is used for **Total response effort** values in the [Service Performance](/incident-management/analytics/insights/service-performance), [Team](/incident-management/analytics/insights/team), and [Escalation Policy](/incident-management/analytics/insights/escalation-policy-insights) Insights reports.
PagerDuty tracks incident duration to calculate [metrics](/incident-management/analytics/insights) such as **Response Effort** and **MTTR** (Mean Time To Resolve).
Sometimes, the actual effort spent on an incident differs from the total time it was open. To provide more accurate metrics in your [Intelligent Dashboards](/incident-management/analytics/dashboard), you can adjust the incident duration to reflect the actual response effort required.
> **Note:** The **User Defined Effort** metric in the [Incident Activity (Incidents List)](/incident-management/analytics/insights/incident-activity#incidents-list) report reflects adjusted incident duration times.
1. On a resolved incident's details page, click under **Duration**.
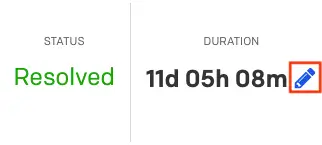
*Edit incident duration*
2. In the **Update Incident Times** modal, enter the **Actual effort** time in the following format: `xd xh xm`.
3. Click **Update Incident**.
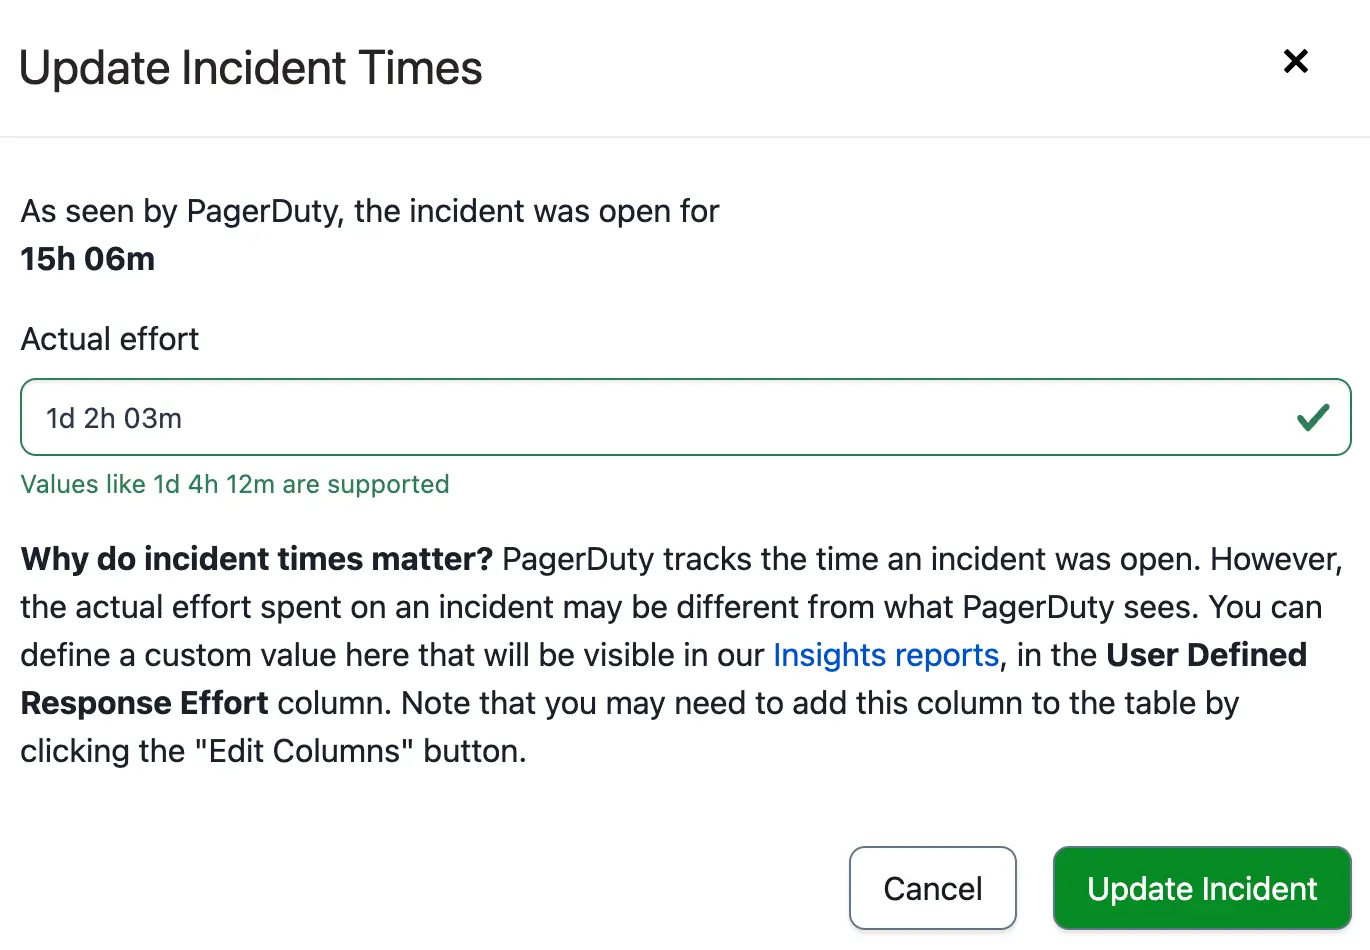
*Update incident times*
> **Edited Incident Durations in Insights Reports:** The [Insights](/incident-management/analytics/insights) feature calculates **Response Effort** in the [Service Performance](/incident-management/analytics/insights/service-performance), [Team](/incident-management/analytics/insights/team), and [Escalation Policy](/incident-management/analytics/insights/escalation-policy-insights) reports using the edited incident duration, if it exists.
>
> The [Responder](/incident-management/analytics/insights/responder) report does not use edited incident durations, as response efforts are calculated based on responder activity rather than incident activity.
## Add a Note to an Incident
Incident notes help responders resolve incidents faster by adding relevant information or links. Notes are useful for teams responding to active incidents and add helpful context for later reference. You can add notes to open and resolved incidents.
> **Incident Note Limitations:** The following limitations apply to notes on both open and resolved incidents:
>
> - An incident can have up to 2,000 notes.
> - Incident notes are limited to 65,535 single-byte characters (~16,000 characters of [UTF-8](https://en.wikipedia.org/wiki/UTF-8) encoded text).
1. On the **Incidents** page, select an incident's **Title** to navigate to its details page.
2. In the **Notes** section on the right-hand side, enter a note in the text field and click **Add Note**.
3. To edit or delete a note, open the more actions **(…)** menu next to the note.
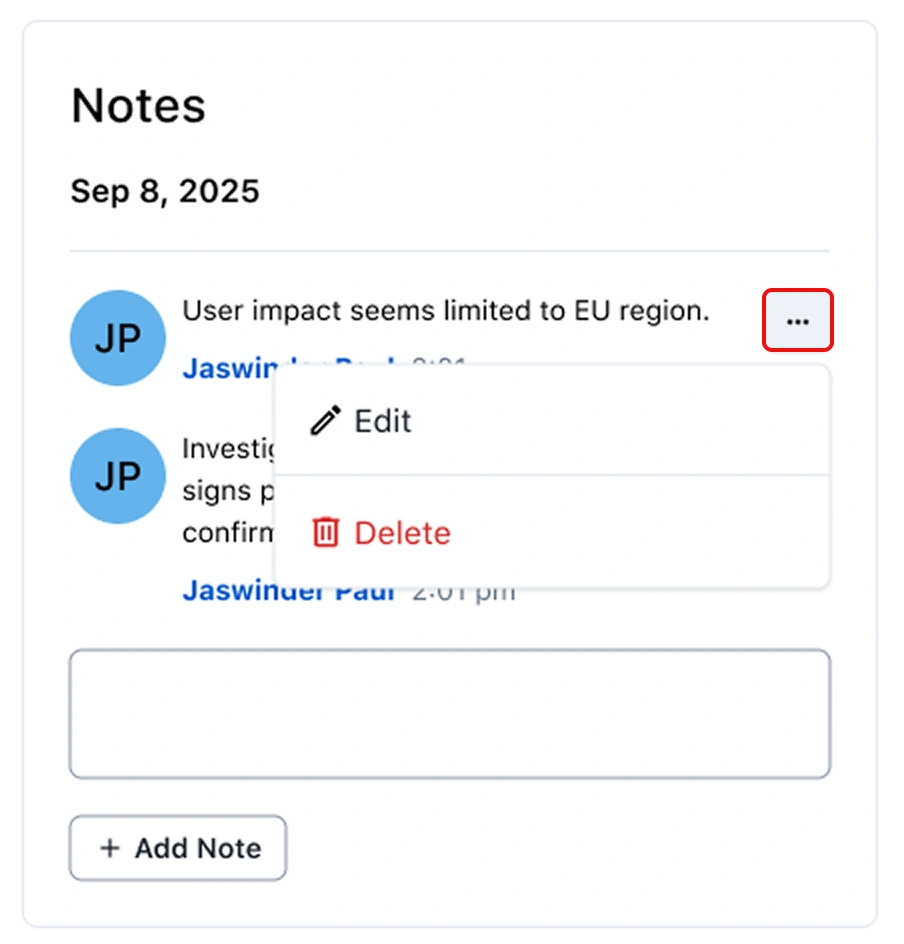
*Edit a note in the web app*
1. Navigate to **Open Incidents** or **Resolved Incidents** → select an incident to navigate to its details screen.
2. On iOS, tap **More** at the bottom of the screen and tap **Add Note**. On Android, under the **Triage** tab, tap **Add Note**.
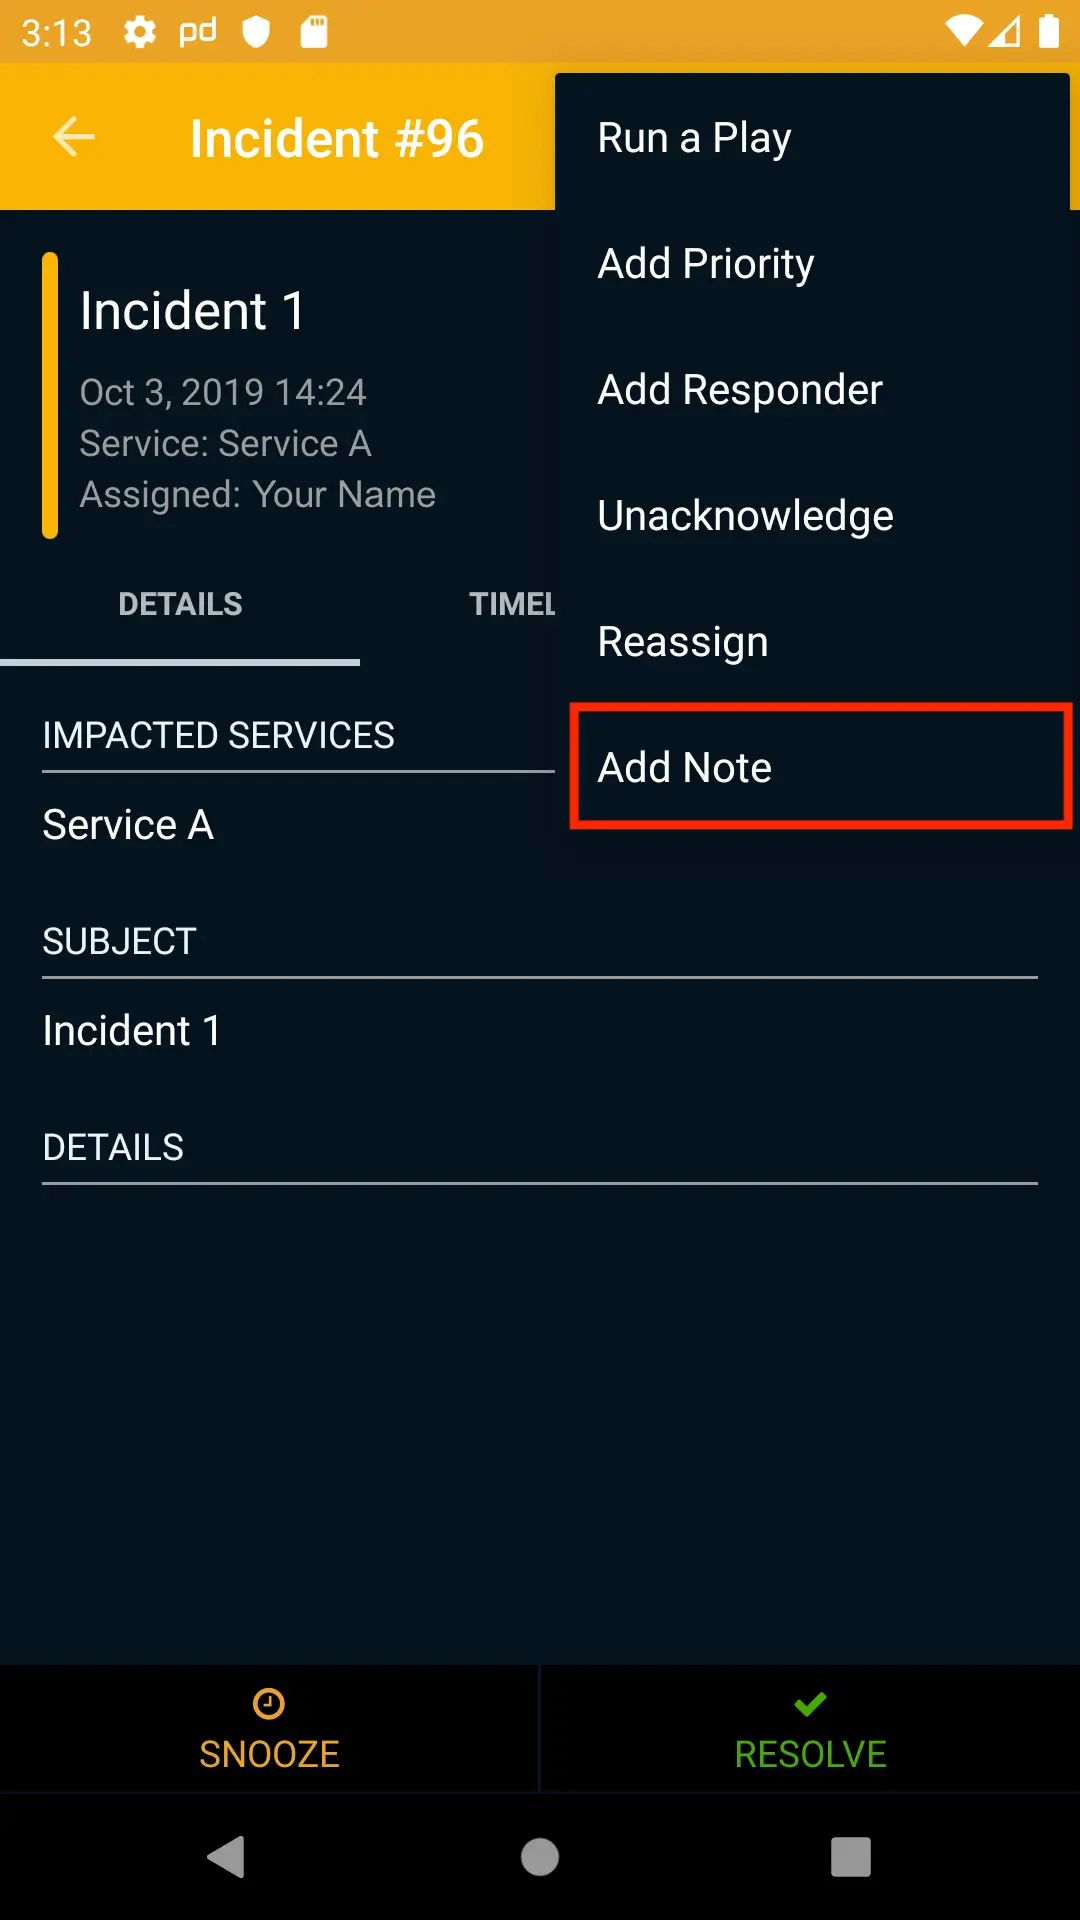
*Add a note in the mobile app*
3. Enter the text for your note and tap **Post Note**.
[Incident Workflows](/ai-automation/automation/incident-workflows) allow you to automate your incident response processes. The following workflow actions add incident notes:
- [Add Note to an Incident](/workflow-actions/pagerduty-incident-management/add-note-to-an-incident)
- [Prompt to Add a Note to the Incident](/workflow-actions/slack/prompt-to-add-a-note-to-the-incident) (Slack)
> **Availability:** Adding notes using Event Orchestration is available in [Advanced Event Orchestration](/ai-automation/aiops/event-orchestration/pricing-tiers#advanced-event-orchestration). Contact the [Sales team](https://www.pagerduty.com/contact-us/#contact-sales) to change your pricing tier.
You can automate adding notes to incidents as part of [Event Orchestration](/ai-automation/aiops/event-orchestration). While [configuring a Global or Service Orchestration Rule](/ai-automation/aiops/event-orchestration#configure-a-global-or-service-orchestration-rule), select the **Incident Data** tab and enter your desired text in the **Add incident note** section.
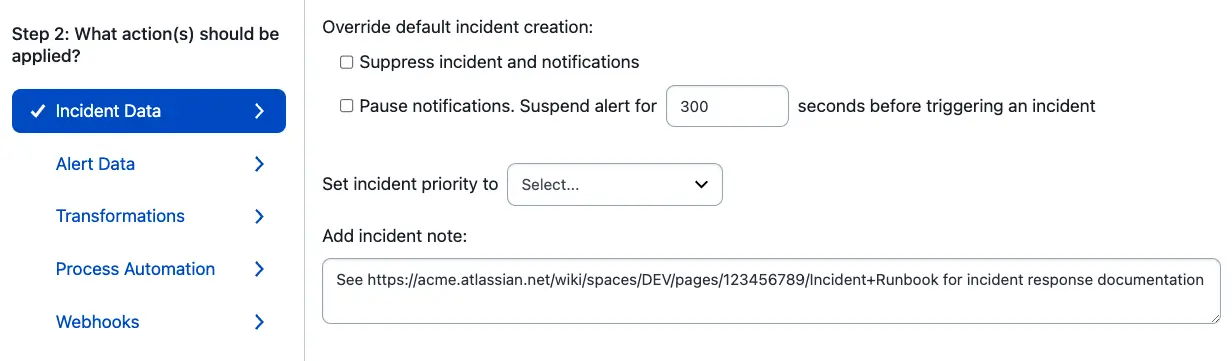
*Add a note using Event Orchestration*
Notes added by Event Orchestration appear on an incident's details page under the **Notes** section, with **An Orchestration Event Rule** listed as the note's author.