# Private Status Page
Restrict a status page to authorized users through OpenID SSO, kept independent of PagerDuty's own single sign-on feature.
Private Status Pages are similar to [External Status Pages](/incident-management/communicate/external-status-page), but only authorized users are allowed to access them. Private Status Pages are not available to the general public. Authorization is handled by OpenID SSO, and is independent from PagerDuty's [Single Sign-On (SSO)](/account-admin/sso) feature.
> **Pricing Information:** PagerDuty offers two Status Page packaging add-on options, one which includes Public Status Pages, and a premium package that also features [Private Status Pages](/incident-management/communicate/external-status-page/private-status-page) and [Audience-Specific Status Pages](/incident-management/communicate/external-status-page/private-status-page#audience-specific-status-page). Depending on the package you choose, features such as Page Subscribers, Premium Account Subscribers, and Total Account Subscribers may vary.
>
> Please contact our [Sales Team](https://www.pagerduty.com/contact-us/#contact-sales) for more information.
## Create a Private Status Page
1. In the PagerDuty web app, navigate to **Status** → **External Status Page**.
2. Click **New Status Page**.
3. Under **Status Page Type**, select **Private**.
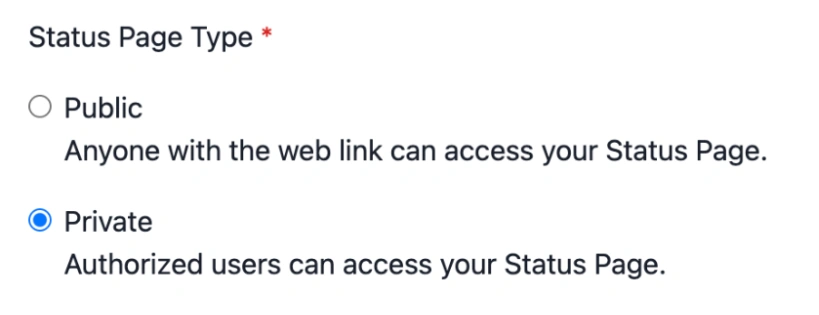
*Initial setup*
3. Continue setting up the status page using the instructions from [Create an External Status Page](/incident-management/communicate/external-status-page#create-an-external-status-page).
## Prerequisites for Single Sign-On (SSO)
Before configuring Single Sign-On for your Private Status Page, review the following requirements to ensure a smooth setup process.
### Identity Provider Compatibility
> **OIDC Application Support:** Verify that your IdP subscription or plan includes OIDC application support. Some providers restrict this functionality to specific pricing tiers or enterprise plans.
Your identity provider (IdP) must support the OpenID Connect (OIDC) protocol with the authorization code flow. PagerDuty's Private Status Pages have been tested and verified to work with the following identity providers (but not limited to):
- Okta
- Azure AD (Microsoft Entra ID)
- Salesforce
- Ping Identity
### Administrative Access
You must have administrative access to your identity provider with sufficient privileges to:
- Create new OAuth 2.0/OIDC applications
- Configure application settings and callback URLs
- Manage client credentials (client ID and client secret)
- Define custom claims and user attributes
### Required OIDC Scopes
PagerDuty requests the following standard OIDC scopes during authentication:
- `openid` — Required for OIDC authentication
- `email` — Used to identify and match users
- `profile` — Provides basic user profile information
Ensure your identity provider is configured to support and return these scopes.
### Custom Claim Requirement
Your identity provider must support sending a custom claim named `status_pages` in the ID token or access token response. This custom claim must contain the identifier(s) of the private status pages(s) an individual can access.
## Configure Single Sign-On (SSO)
You will need to configure SSO on your Private Status Page before users can access it. Private Status Pages use the OpenID Connect (OIDC) protocol to allow users access.
1. In the PagerDuty web app, navigate to **Status** → **External Status Page**.
2. Select the **Private** tab.
3. Click the name of the page you want to configure.
4. In the left pane, navigate to **Configuration** → **Single Sign-On**.
5. If prompted to **Update your SSO Configuration**, click **Continue** to proceed.
6. Update the following fields:
| Field | Value |
| ------------------------ | -------------------------------------------------------------------------------------------------------------------------------------------------------------------------------------------------------------------------------------- |
| **Custom Claims** | You can disable custom claims. If you disable custom claims, any authenticated account from your IdP can access this page via SSO. To restrict access further, re-enable claims or configure separate IdP applications for each page. |
| **Configuration URL** | The URL on your OpenID server that ends with `/.well-known/openid-configuration` |
| **OpenID client ID** | Your OpenID client ID |
| **OpenID client secret** | Your OpenID client secret |
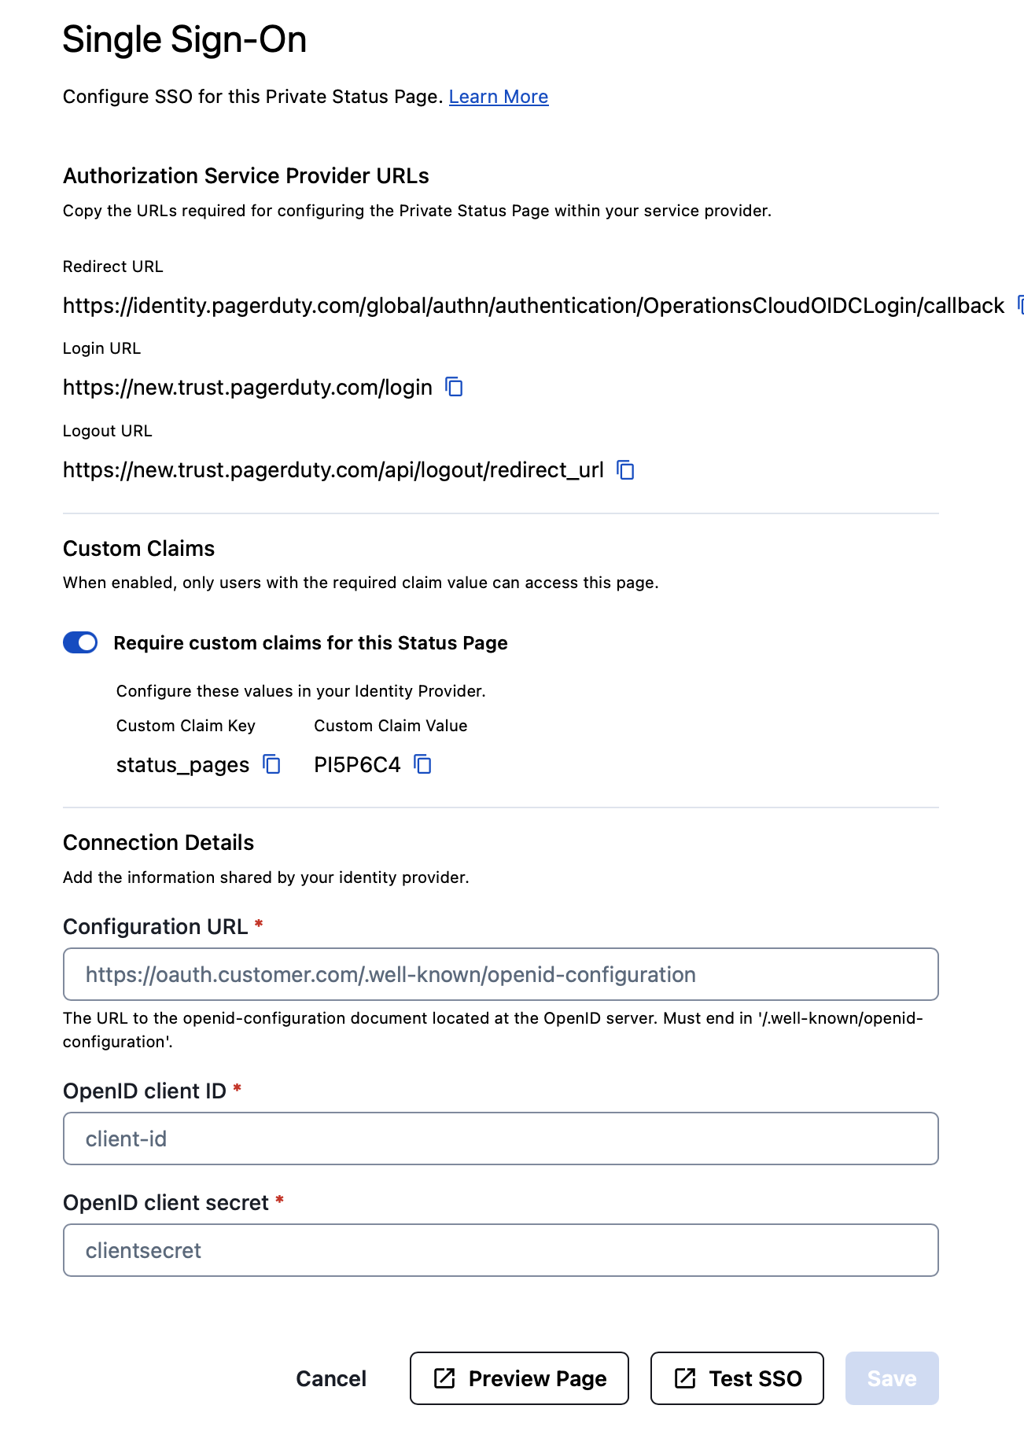
*SSO configuration*
7. Click **Test SSO** to check your configuration. Resolve any reported errors and proceed to the next step.
> **Note**: After successfully configuring and saving your SSO settings, **Test SSO** may not appear in the UI the next time you visit the page.
8. If using Custom Claims, copy the **Custom Claim Key** and **Custom Claim Value**, as these will be necessary to complete the Identity Provider configuration in the next step. You'll need to create a custom claim in your IdP using this exact key name and assign the corresponding value to users who should have access to this status page.
9. Click **Save**.
The instructions below detail how to integrate with common SSO providers. You are free, however, to integrate with the SSO provider of your choice:
- [Audience-Specific Status Page](#audience-specific-status-page)
- [Okta](#okta)
- [Azure](#azure-ad--entra-id)
- [Salesforce](#salesforce)
- [Ping Identity](#ping-identity)
### Audience-Specific Status Page
Audience-Specific Status Pages enhance Private Status Pages by allowing authorized users to see customized views based on their access level. This feature is only available to users authenticated through OpenID SSO, which operates separately from [PagerDuty's Single Sign-On (SSO)](/account-admin/sso) feature.
> **Audience Limit:** You can add up to 100 audiences per status page.
#### Create an Audience-Specific Status Page
> **Requirements:** To set up Audience-Specific Status Pages, you must first:
>
> 1. [Configure a Private Status Page](#create-a-private-status-page).
> 2. [Configure SSO](#configure-single-sign-on-sso) on the Private Status Page.
> **Conversion Warning:** Once you convert a Private Status Page to an Audience-Specific Status Page, you will not be able to revert it. If you want all users to see the same view of the status page, you must add them to the same audience.
1. After you’ve created the Private Status Page and configured SSO, click the Status Page’s **name** to open its settings.
2. From the left menu, select the **Configuration** drop-down → **Business Services**
→ **Audiences** tab.
3. To the right of the **New Audience** button, select the menu → **Audience Settings**.
4. Next, select the **Default Business Services** that should be visible to all users who have access to the Private Status Page.
5. At the bottom of the page, enter the **Group claim custom key** to enable audience filtering. This is the **Claim name** from your SSO Provider. For example, with Okta, this is the claim name from the claim created for the Status Page Authorization Server.
6. Click **Save**.
7. Once saved, click **New Audience** to create a new audience view for the status page.
8. Enter the following:
| Field | Value |
| --------------------- | --------------------------------------------------------------------------------------------------------------------------------------- |
| **Audience Name** | Add a name for this audience. |
| **Description** | Describe the purpose of this audience. |
| **Group Claim** | Add the group claim used in your SSO provider to link groups. This must match the audience key from the SSO provider. |
| **Business Services** | Select the business services that should be visible to this audience, or individuals who log in with credentials with this Group Claim. |
9. Click **Create Audience** to create the Audience-Specific Status Page.
#### Example: Configure Audience Groups in Okta
Using Okta as an example, the following is a sample flow for setting up Audiences.
> **Prerequisite:** You must first configure [Okta SSO for Private Status Pages](/incident-management/communicate/external-status-page/private-status-page#okta) in PagerDuty.
1. In Okta, navigate to **Directory** → **Groups**.
2. Click **Add group** to create groups for the PagerDuty Status Page Audiences. Enter a **Group Name** and optional **Description**.
1. **Note**: The names of the groups created need to match the **Group Claim** for each PagerDuty Audience.
3. Click **Save** and continue adding as many groups as necessary.
4. Assign users to each created group as necessary by clicking **Group Name** → **Assign people** → plus icon to the right of each user you’d like to assign → **Done** in the upper right.
5. Next, navigate to **Security** → **API** → select the **Authorization Server** for the Private Status Page.
6. Select the **Claims** tab → **Add Claim** and perform the following:
| Field | Value |
| -------------------------- | --------------------------------------------------------------------------- |
| **Name** | Match the Group Claim custom key on the Audience setting page in PagerDuty. |
| **Included in token type** | Select ID Token and Always. |
| **Value Type** | Select Groups. |
| **Filter** | Select Matches regex and enter `.*`. |
| **Disable claim** | Leave unchecked. |
| **Include in** | Select Any scope. |
7. Click **Create**. You should now be able to see the audiences in the token under the **Token Preview** tab → **Preview Token**.
### Okta
#### Create the Application
1. Go to **Applications** → **Create App Integration**.
2. For **Sign-in method**, select **OIDC - OpenID Connect**, and for **Application type**, select **Web Application**. Click **Next**.
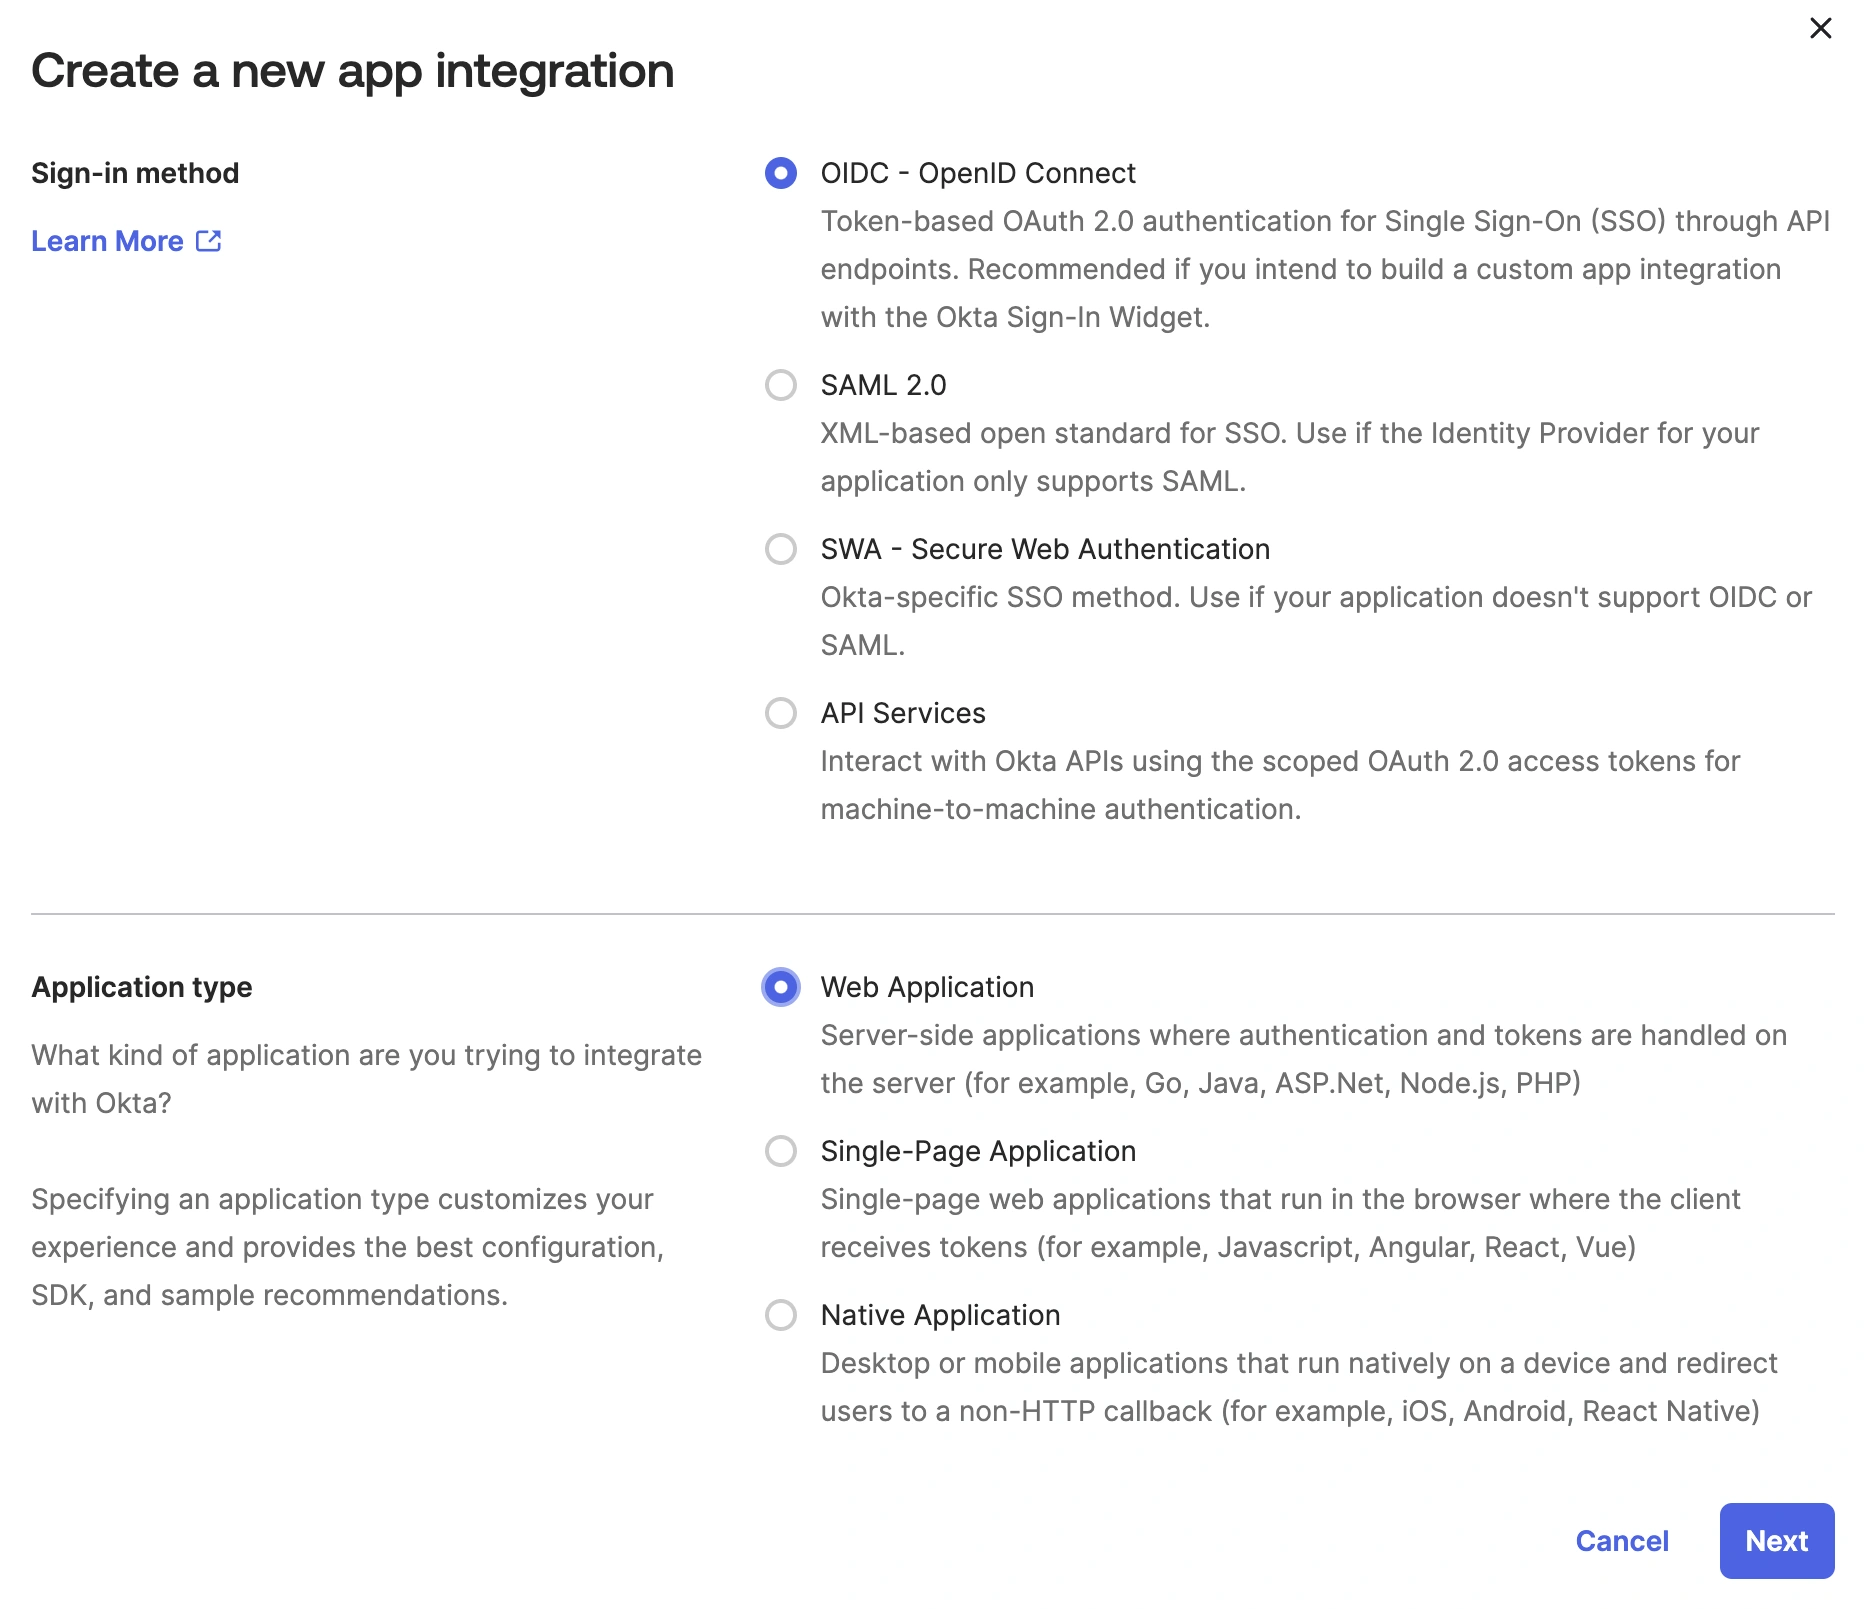
*Create a new app integration*
3. Under **Application**, enter a name for the application.
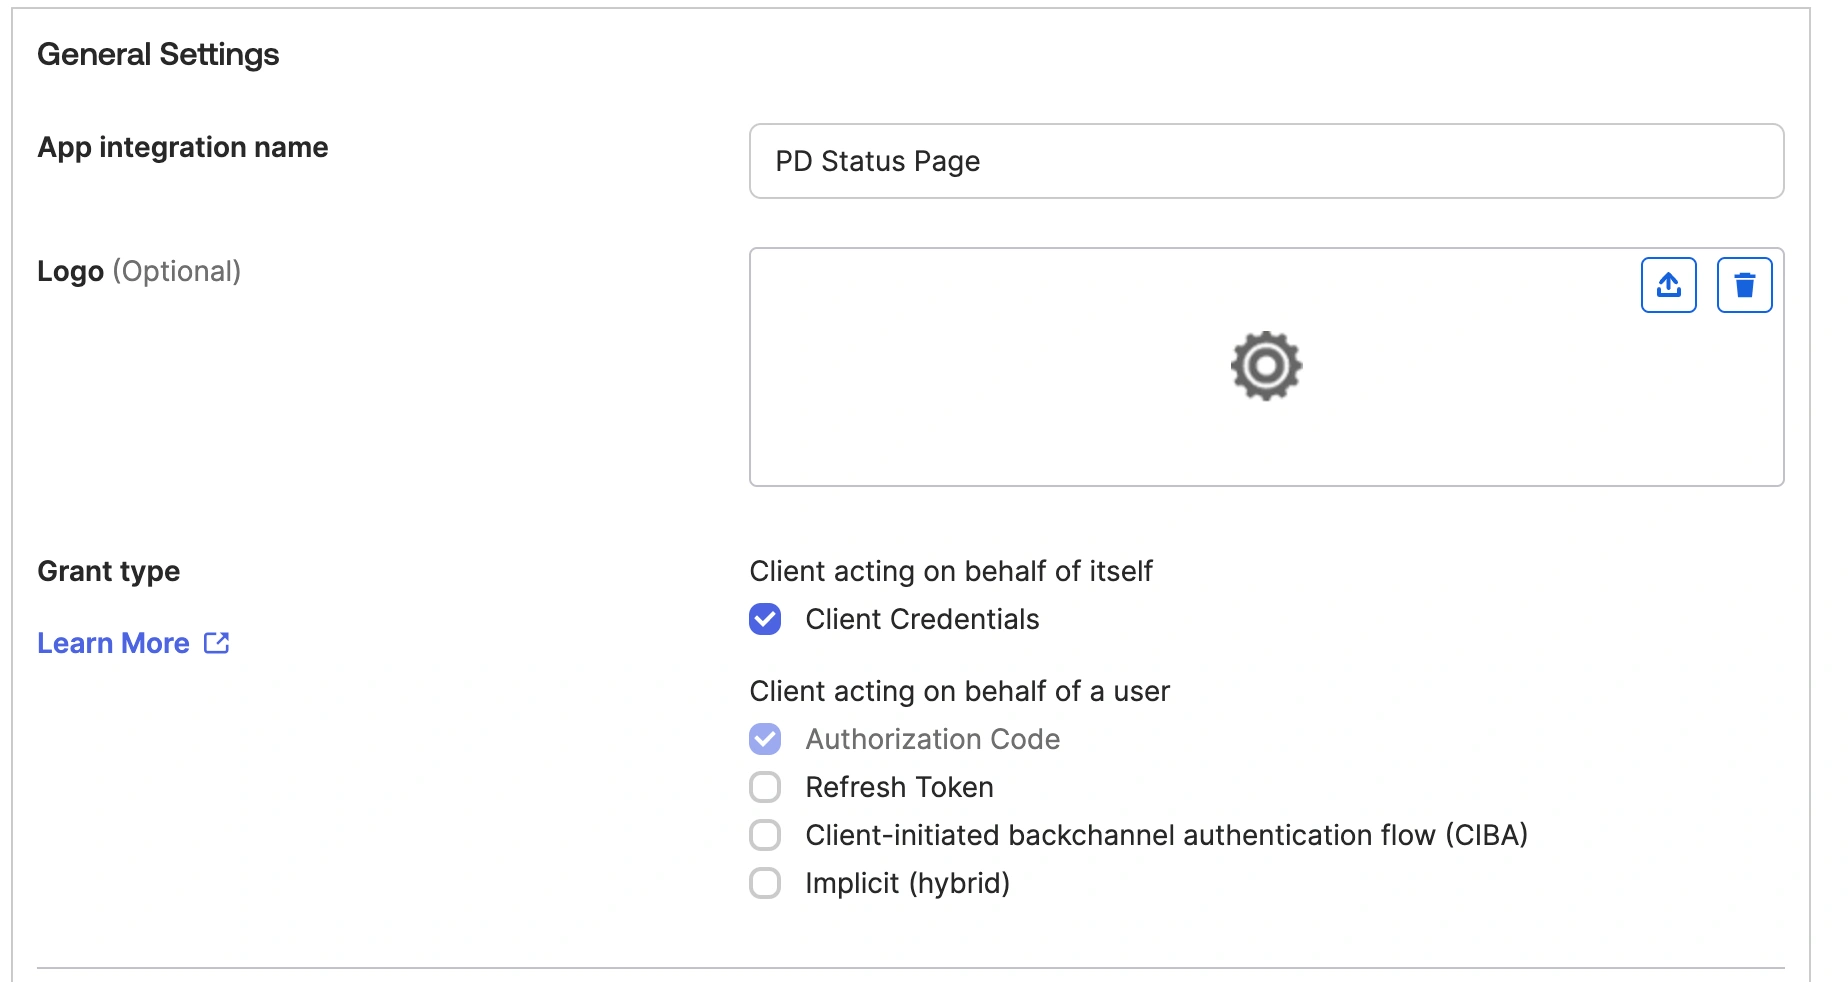
*General settings*
4. Copy the **Redirect URL** from the SSO configuration in PagerDuty and paste it into the **Sign-in redirect URI**. Do the same for the **Login URL** and the **Sign-out redirect URIs**.
5. Select how you would like to assign the application, and click **Save**.
6. On the next page, copy the client ID and client secret, and paste it into the **OpenID client ID** and **OpenID client Secret** fields on the PagerDuty SSO configuration page.
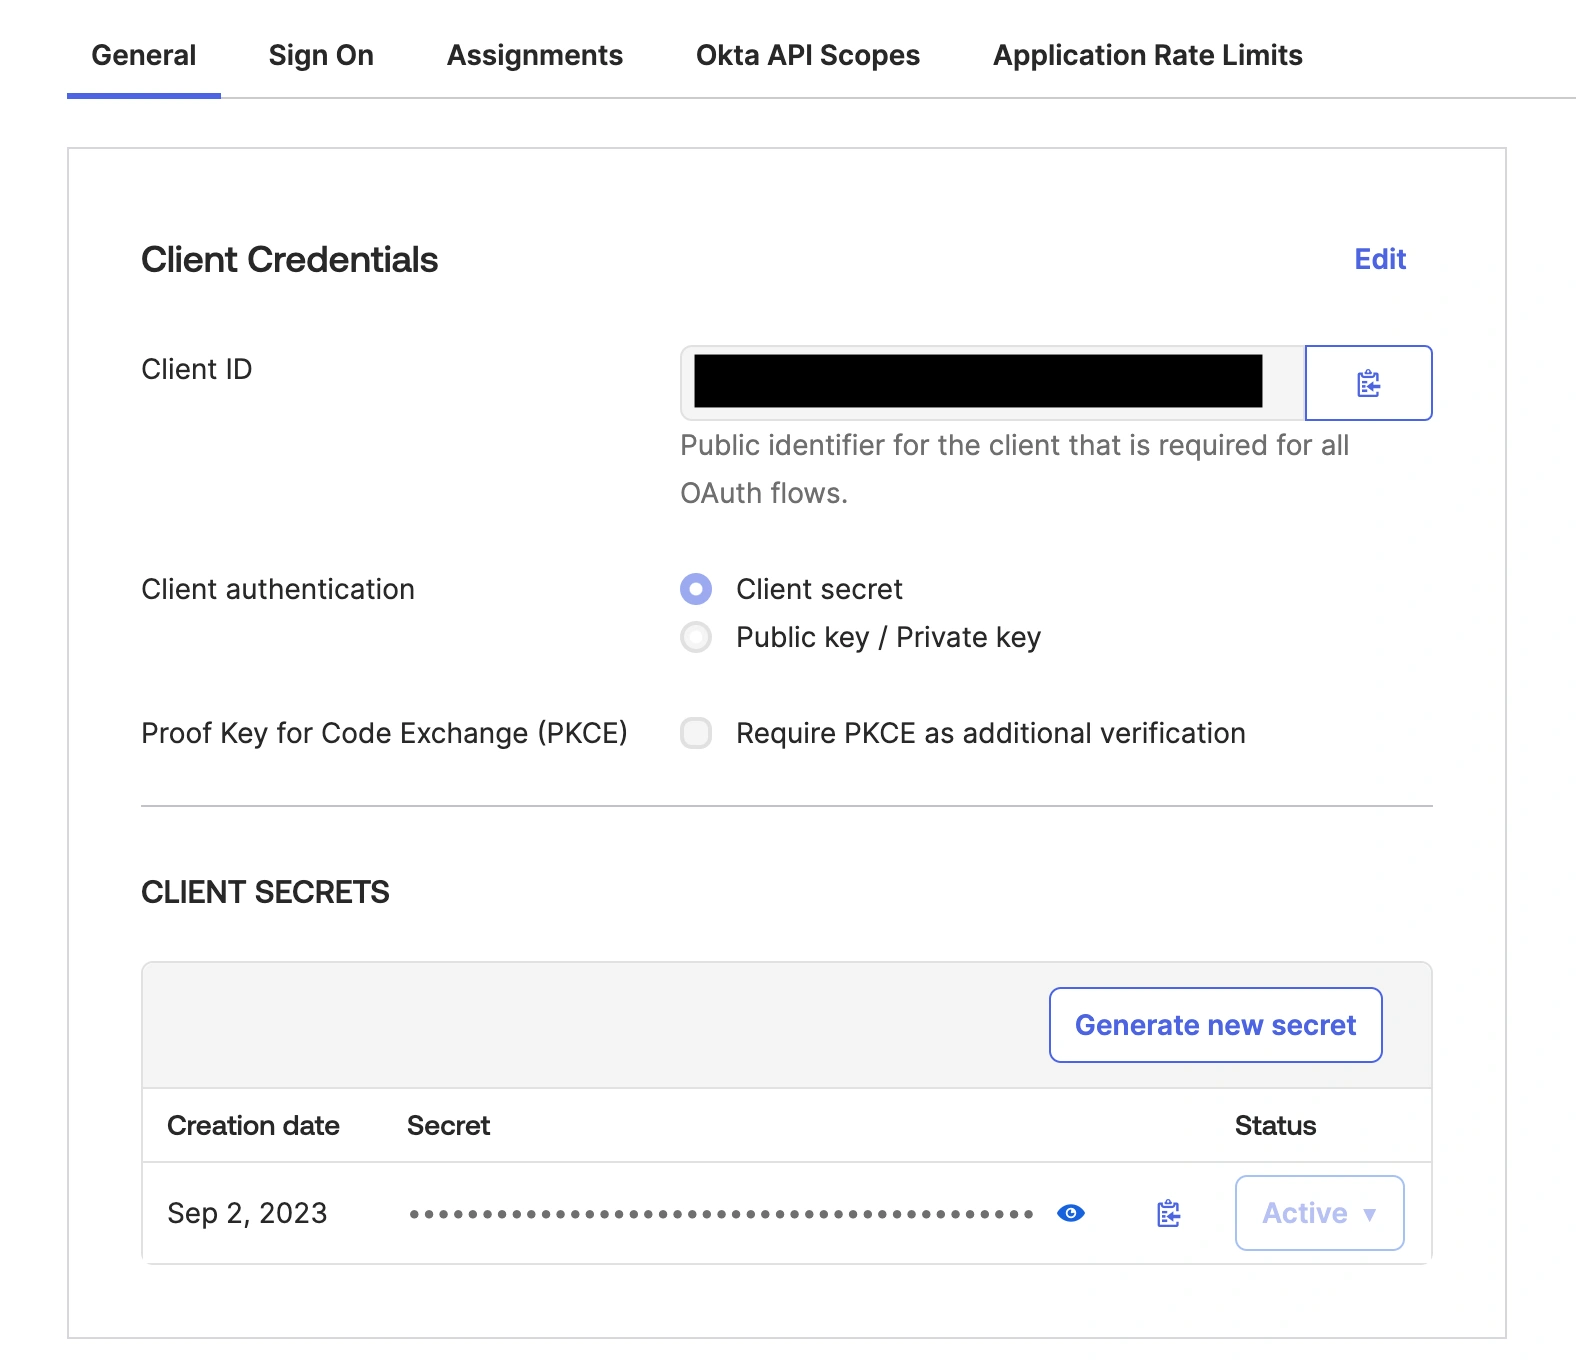
*Client credentials*
7. Go to **Security** → **API** and select the **Authorization Server** you want to connect.
8. Copy the **Metadata URI** and paste it into the **Configuration URL** field in the PagerDuty SSO configuration page.
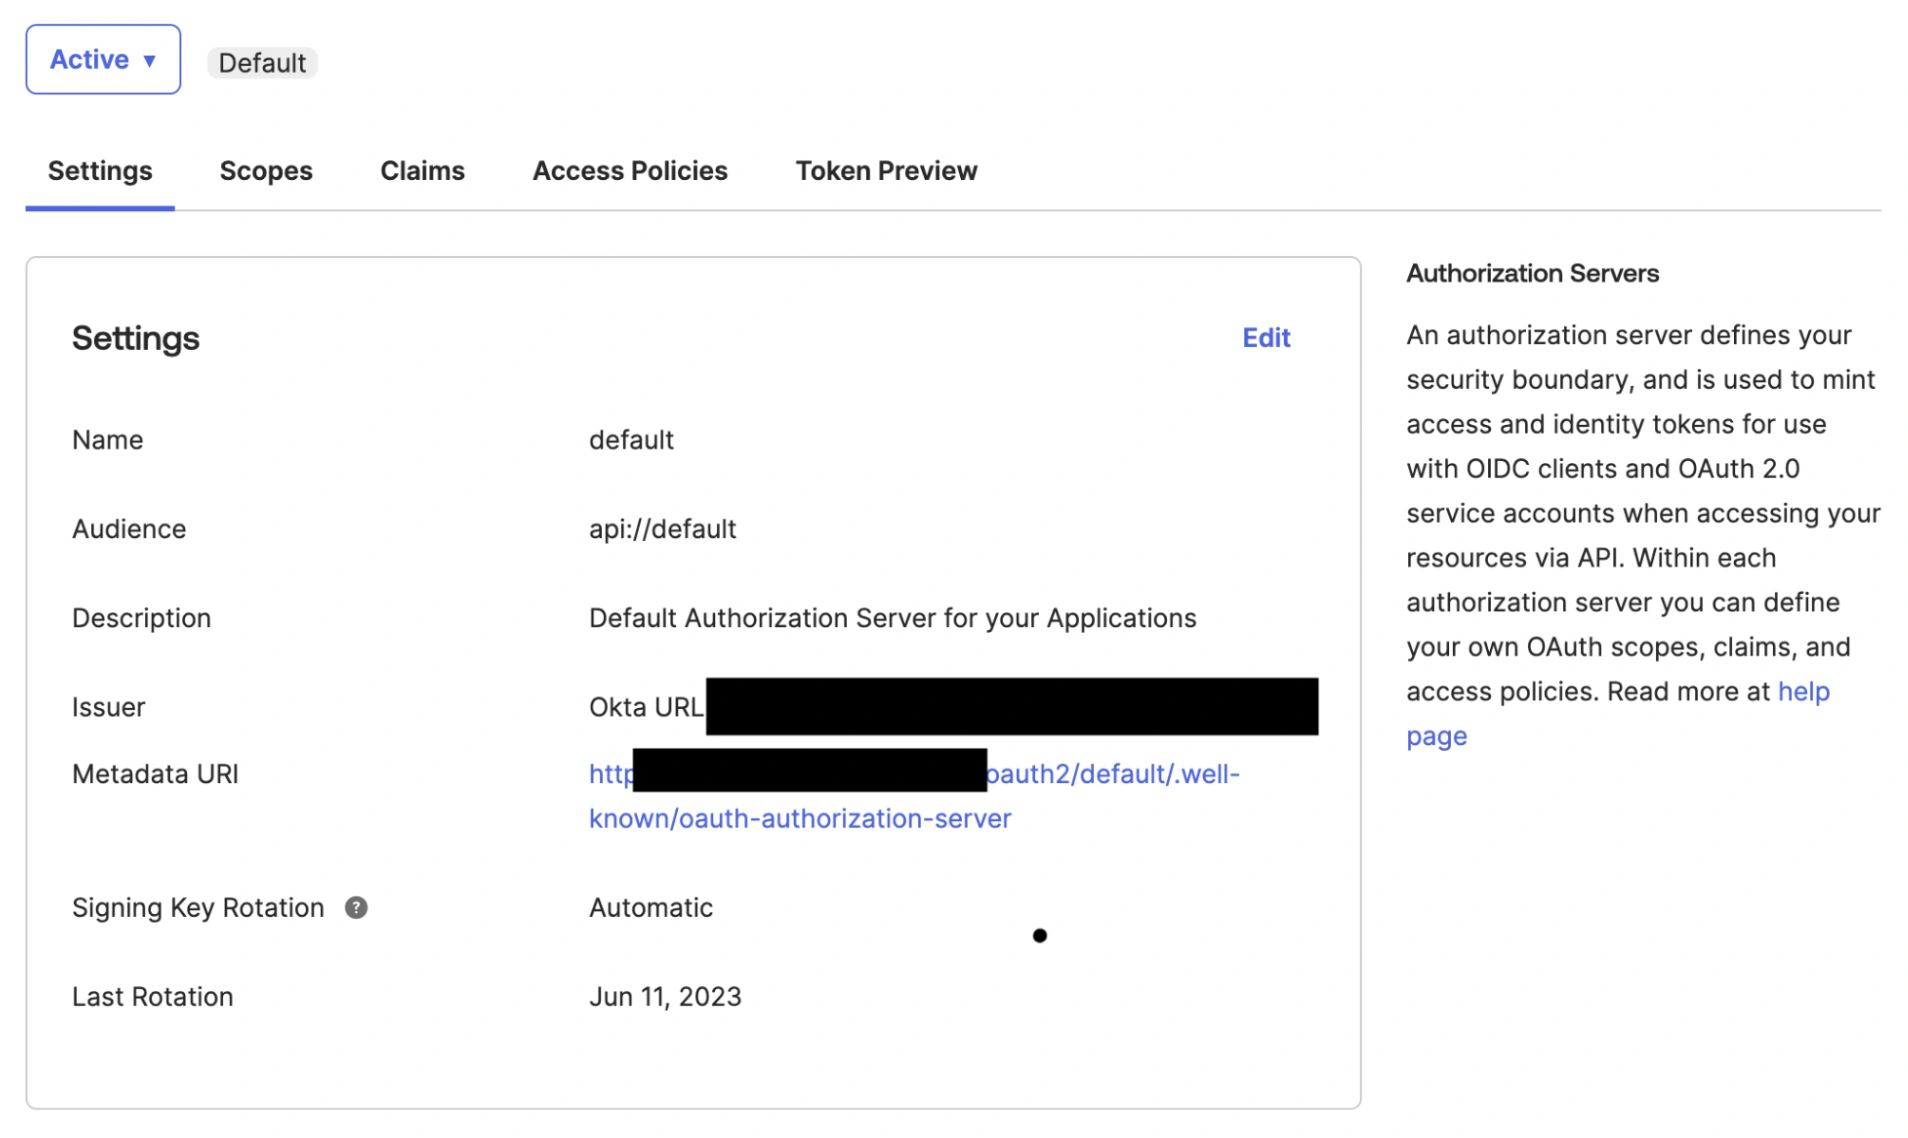
*Metadata URI*
9. Replace the end of the URL (`oauth-authorization-server`) with `openid-configuration`. The URL in PagerDuty must end with `/.well-known/openid-configuration`.
10. Save the SSO configuration.
#### Profile Mapping and Custom Claims
1. Go to **Directory** → **Profile Editor** and select your application.
2. Click **Add Attribute**. For the Data type, select string. Enter a Display name. For the variable name enter `pd_status_pages`. Select **Greater than** for **Attribute length**, with a value of **0**. Select **Yes** for **Attribute required** and click **Save**.
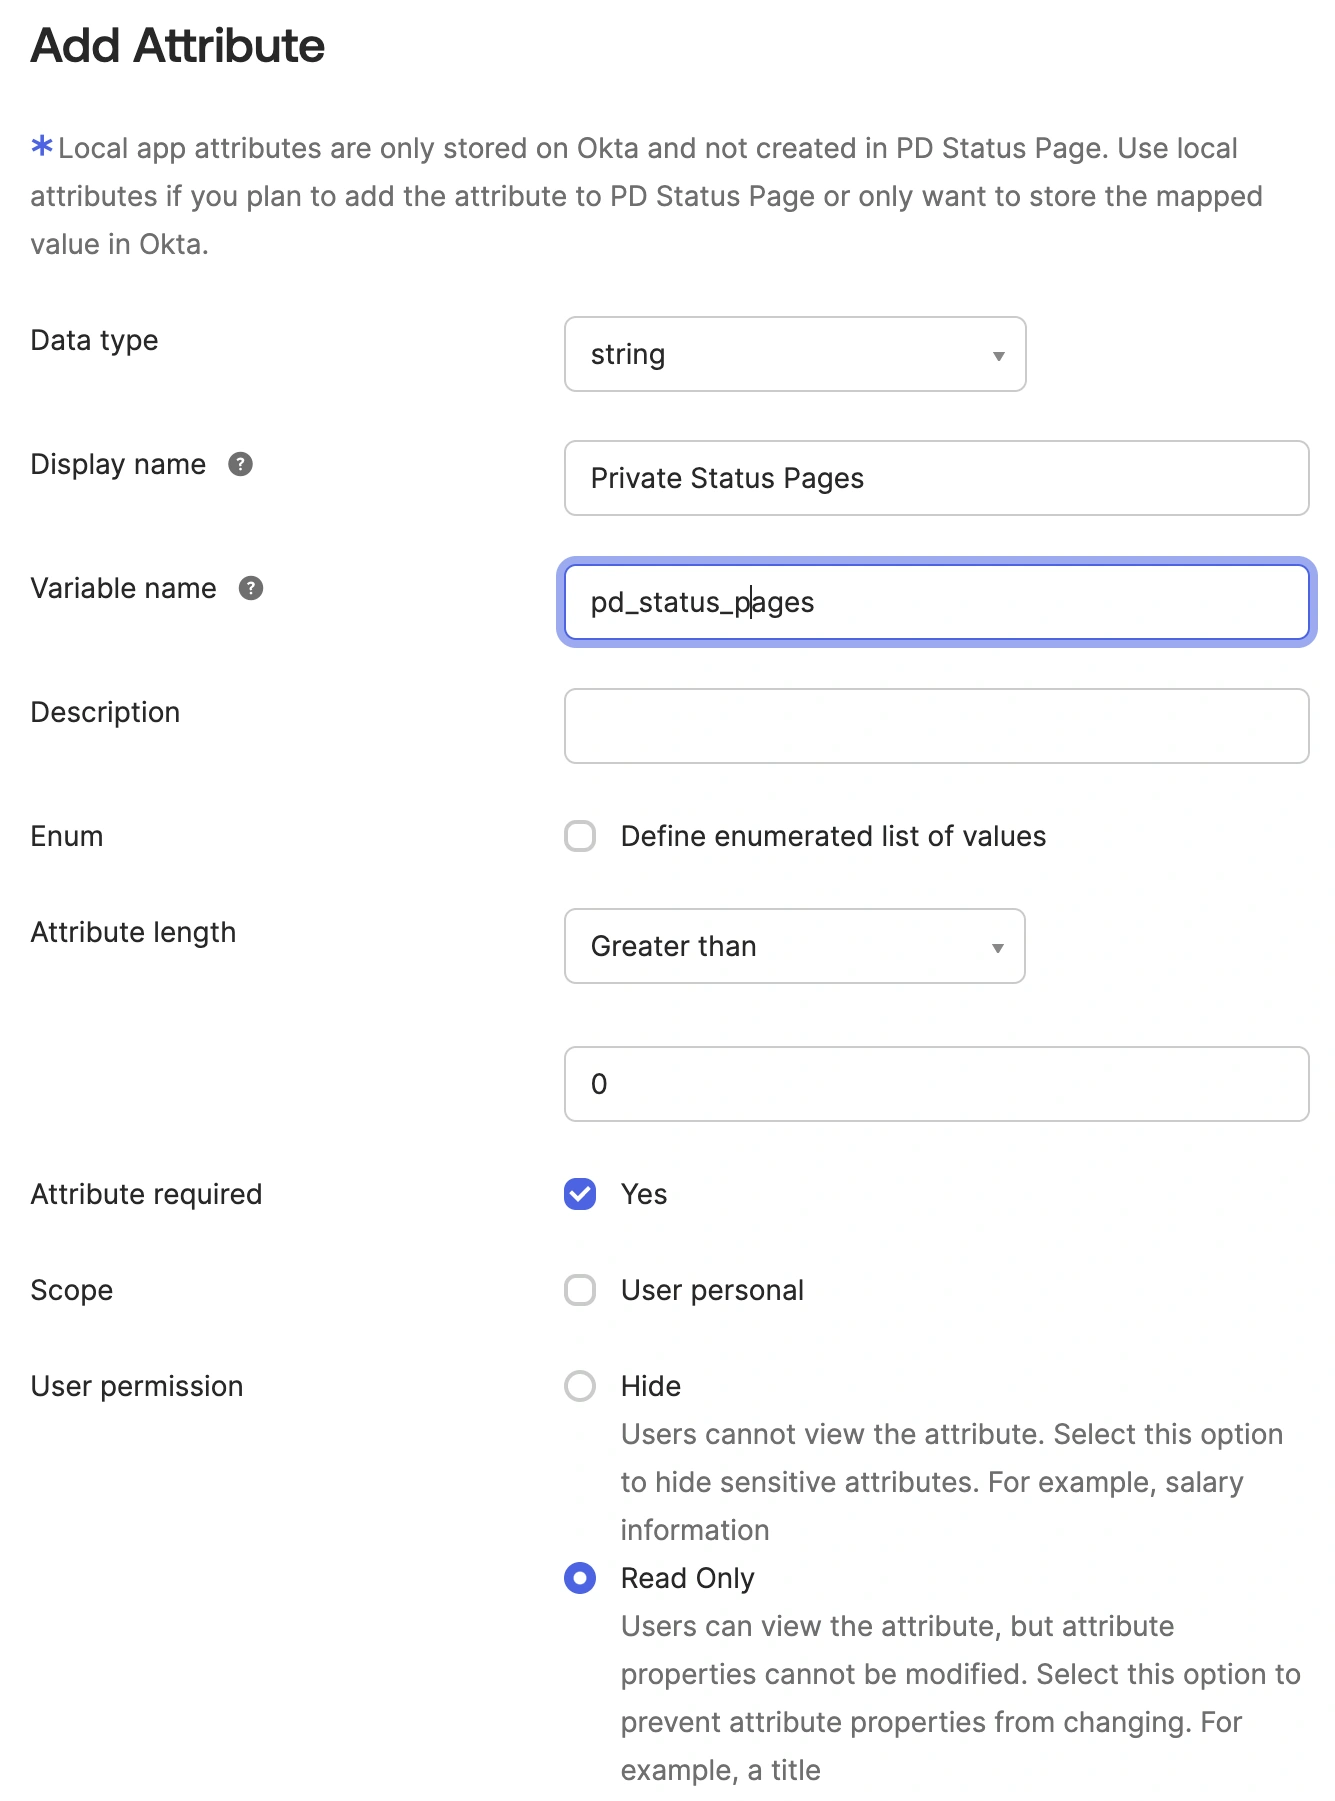
*Add attribute*
3. Click **Mappings**, and find `pd_status_pages`. Ensure that **Apply mapping on user create and update** is selected (i.e., it shows a green arrow). Enter the custom claim value from the PagerDuty SSO configuration page, surrounded by single quotes, and click **Save Mappings**.
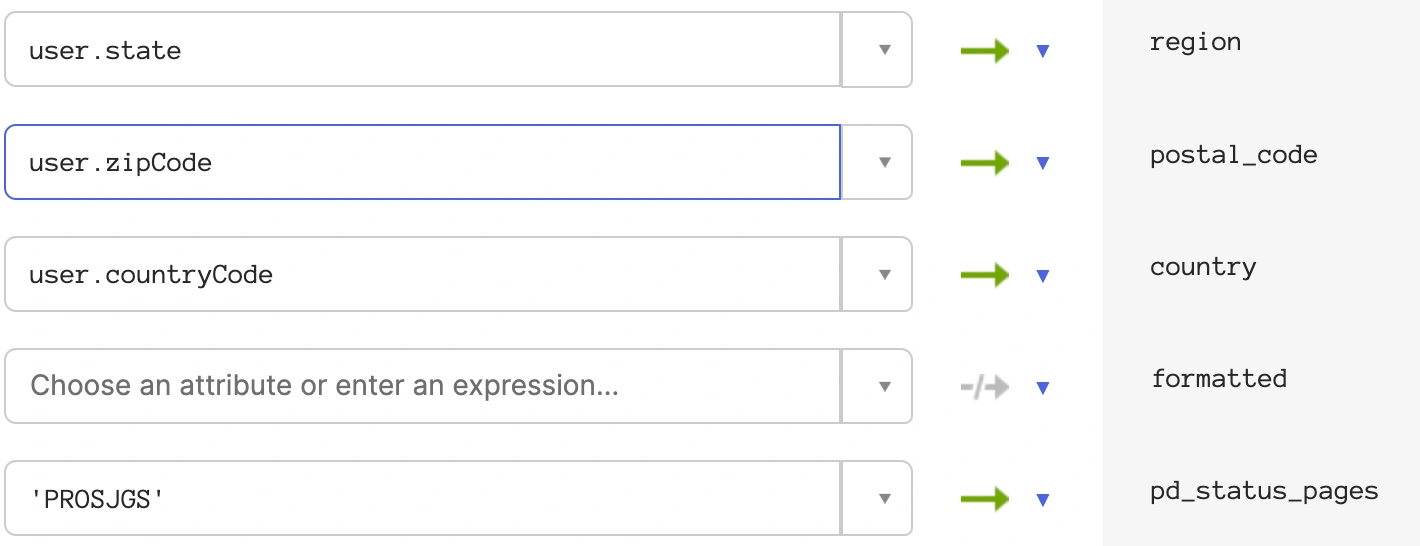
*Custom claim value*
4. Go to **Security** → **API** and select the authorization server you will be using. Then select the **Claims** tab and click **Add Claim**.
5. In the **Name** field, enter the name found under the **Custom Claim Key** on the PagerDuty SSO configuration page. Select **ID Token** as **Always**. Under **Value**, enter `appuser.pd_status_pages`.
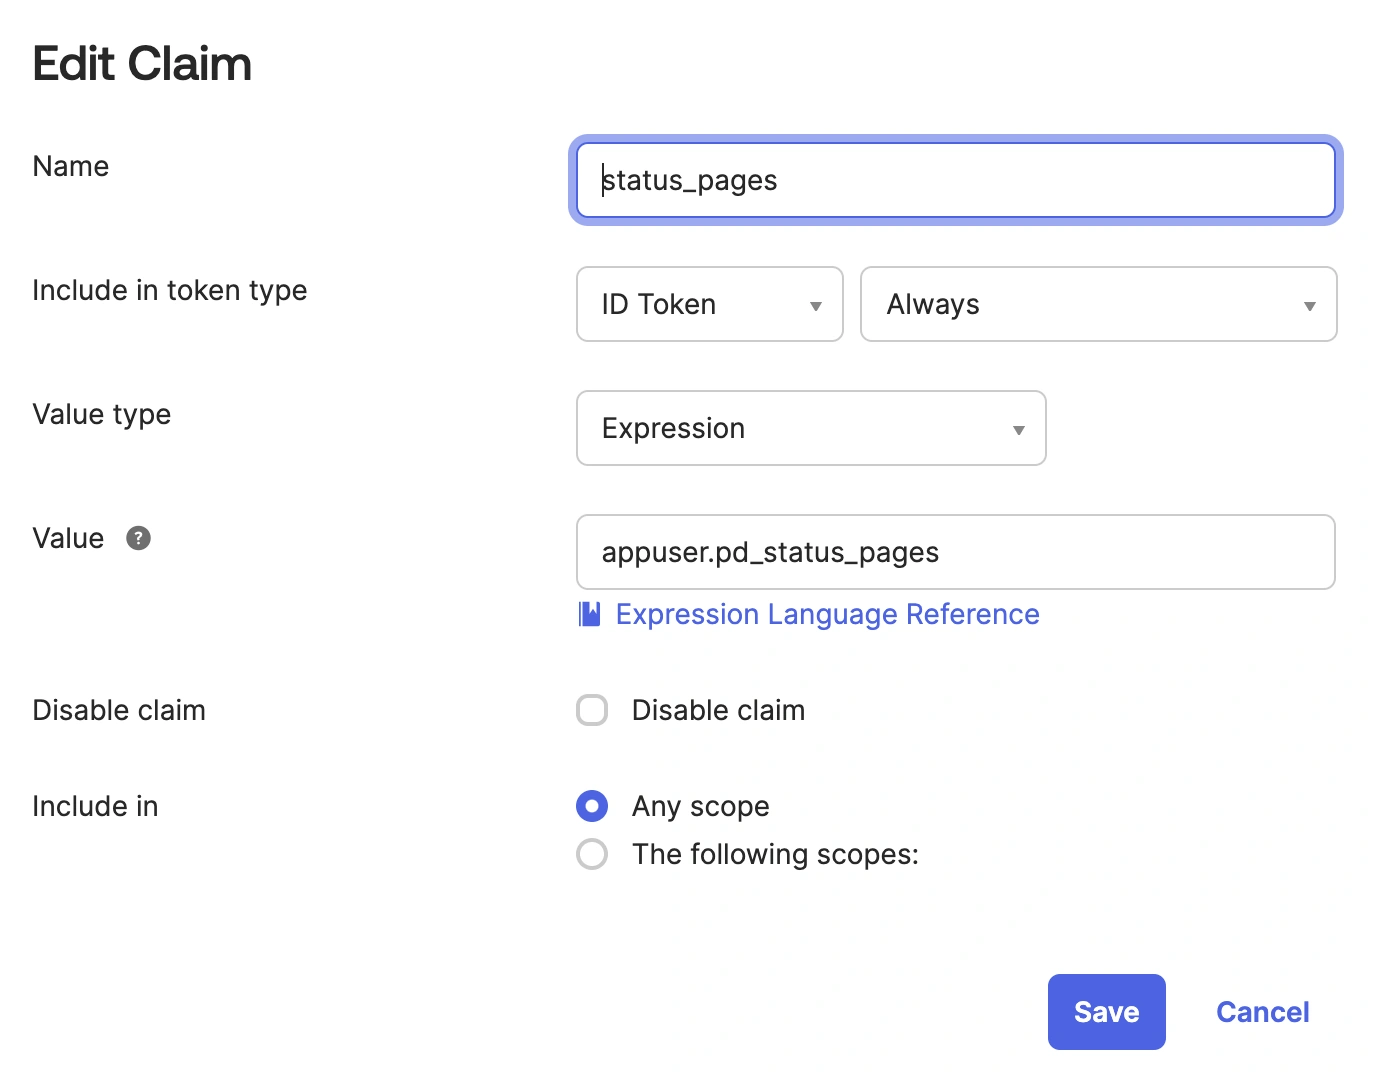
*Edit claim*
> **Data Requirement:** The name of the claim _must_ match the **Custom Claim Key** name.
### Azure AD / Entra ID
#### Create the Application
1. In the Microsoft Entra Admin Center, navigate to **App Registrations** → **New Registration**.
2. Enter a name for the app and the **Redirect URI** from the PagerDuty SSO Configuration page.
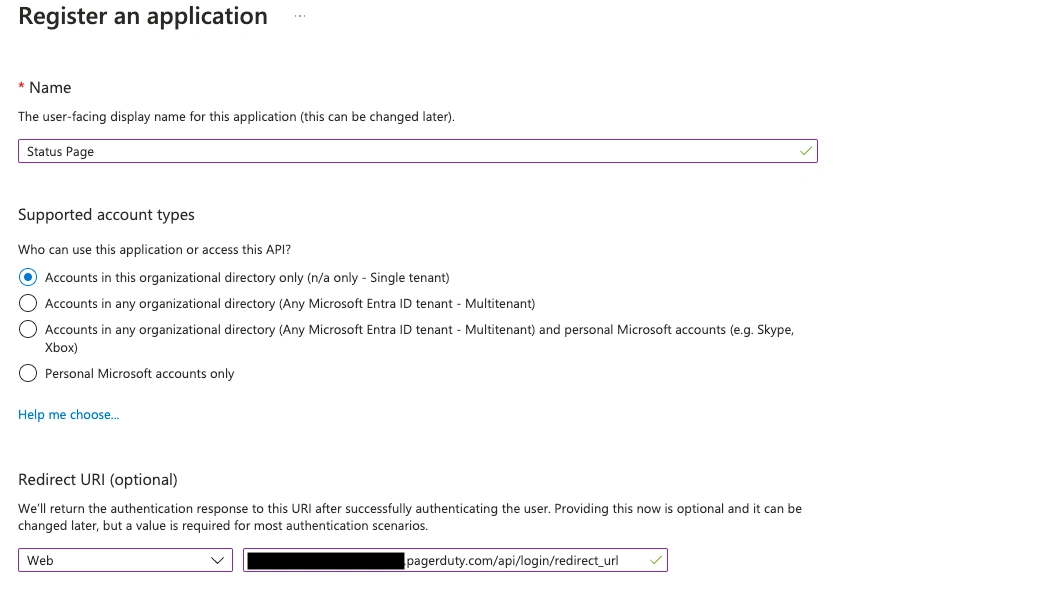
*Register an application*
3. Find the newly created app under **App Registrations** and select it. Then, click **Add a certificate or secret** to create a client secret. On the next screen, click **New Client Secret**.

*Add a certificate or secret*
4. Copy newly created client secret and paste it into the PagerDuty SSO configuration page. Then go back to the previous page and copy and paste the Application (i.e., client) ID.
**Note**: you will be presented with an array of values associated with your client secret.
- Typically the values will include the following fields: **Description**, **Expires**, **Value**, **Secret ID**.
- Look for the secret's **Value** field.
- **Note**: Please **_do not_** use the data in the Secret's **Secret ID** field, which is UUID and not intended for the secure use.
5. Go back to the previous screen and click **Authentication**. Under **Front-channel logout URL**, add the logout URL from the PagerDuty SSO Configuration page and **Save**.

*Redirect URL*
6. In the same menu where **Authentication** was found, select **Manage** → **Branding and Properties**. In the **Home page URL** field, enter the login URL from the PagerDuty SSO Configuration page and click **Save**.
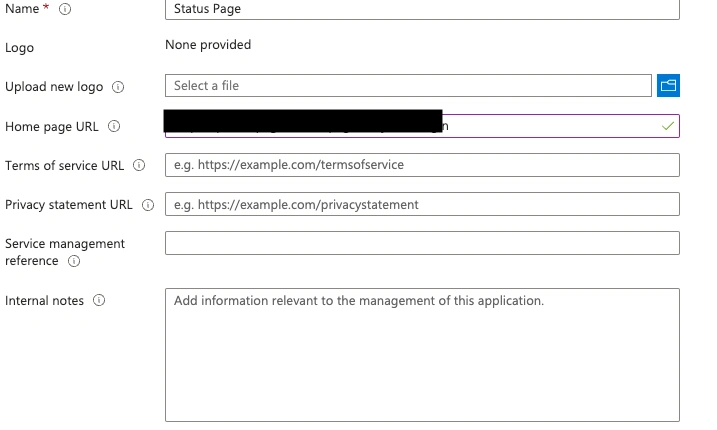
*Home page URL*
7. Go back to the created application (as in step 3), and click on **Endpoints**. Locate the **OpenID Connect metadata document** URL and copy it and paste it into the **Configuration URL** on the PagerDuty SSO Configuration page.
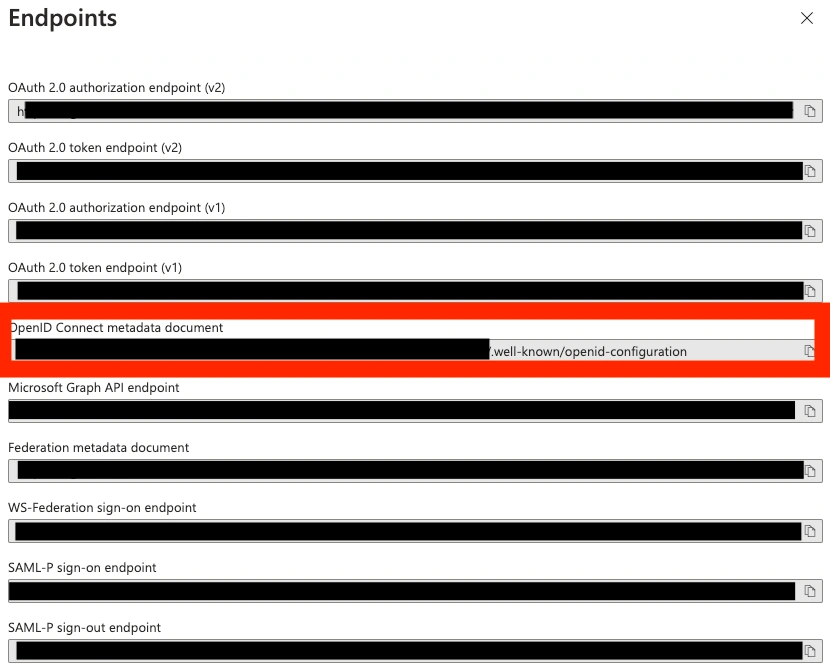
*OpenID Connect metadata document*
#### Profile Mapping and Custom Claims
1. On your app page (from app registration), select **Manage** → **App roles**.
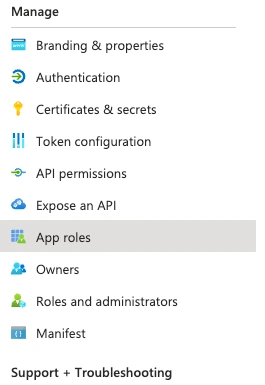
*App roles*
2. Click **Create Role**, and enter the custom claim key and custom claim value found on the PagerDuty SSO configuration page. Click **Apply**.
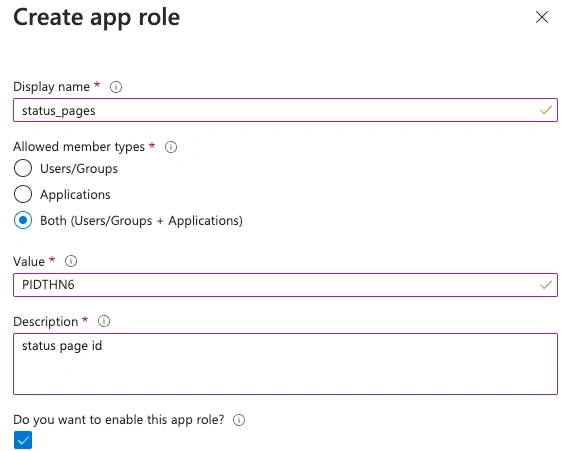
*Create app role*
3. Under **Manage**, select **Manifest**. In the JSON representation, update `acceptMappedClaims` to `true` and save.
4. Go to **Applications** → **Enterprise Applications**, select the application, and go to **Single Sign-On**. Click **Edit** next to **Attributes & Claims**.
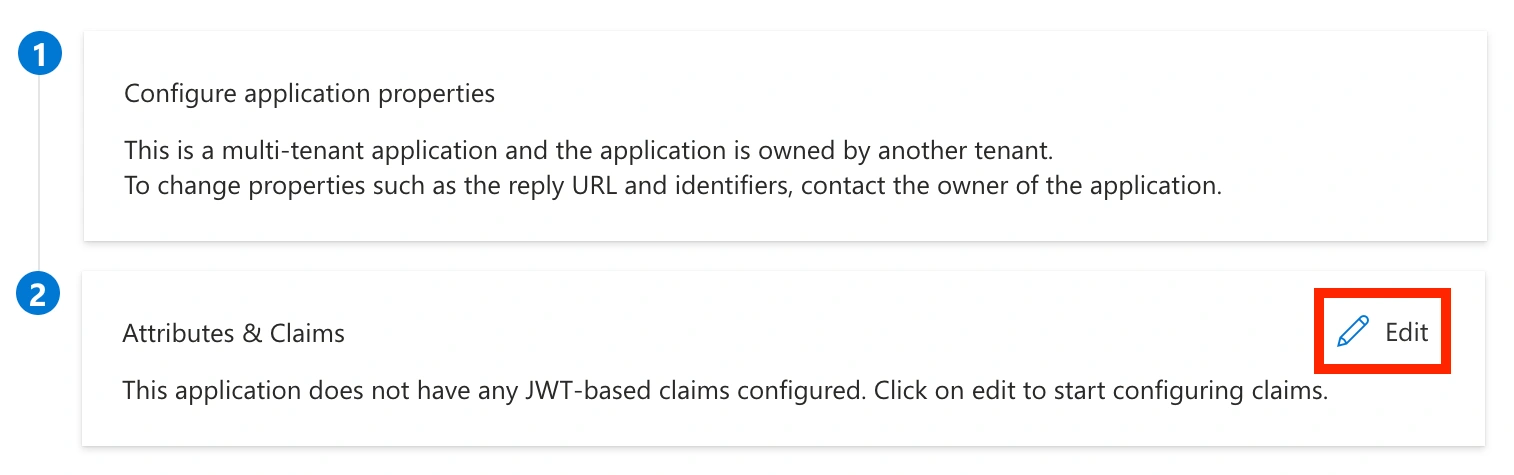
*Attributes and Claims*
5. Click **Add New Claim**. Enter the custom claim key (`status_pages`) for the name. Under **Source**, select **Attribute**, and under **Source attribute**, enter `user.assignedroles`. Click **Save**.
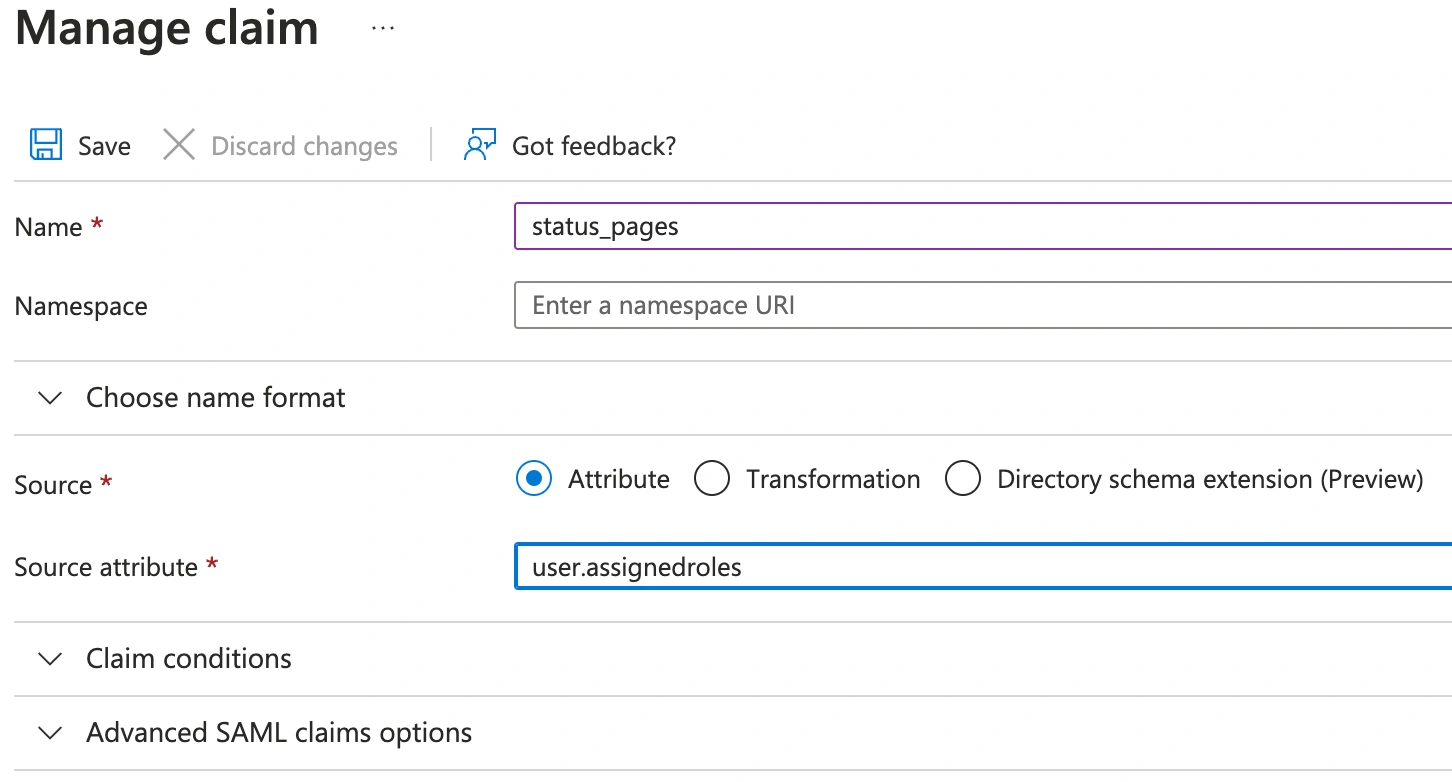
*Manage claim*
6. Go to **Applications** → **Enterprise Applications**, select the application, and go to **Users and groups**. Click **Add user/group**. Select the users who should have access to the private status page, then select the `status_pages` role. Click **Assign**.
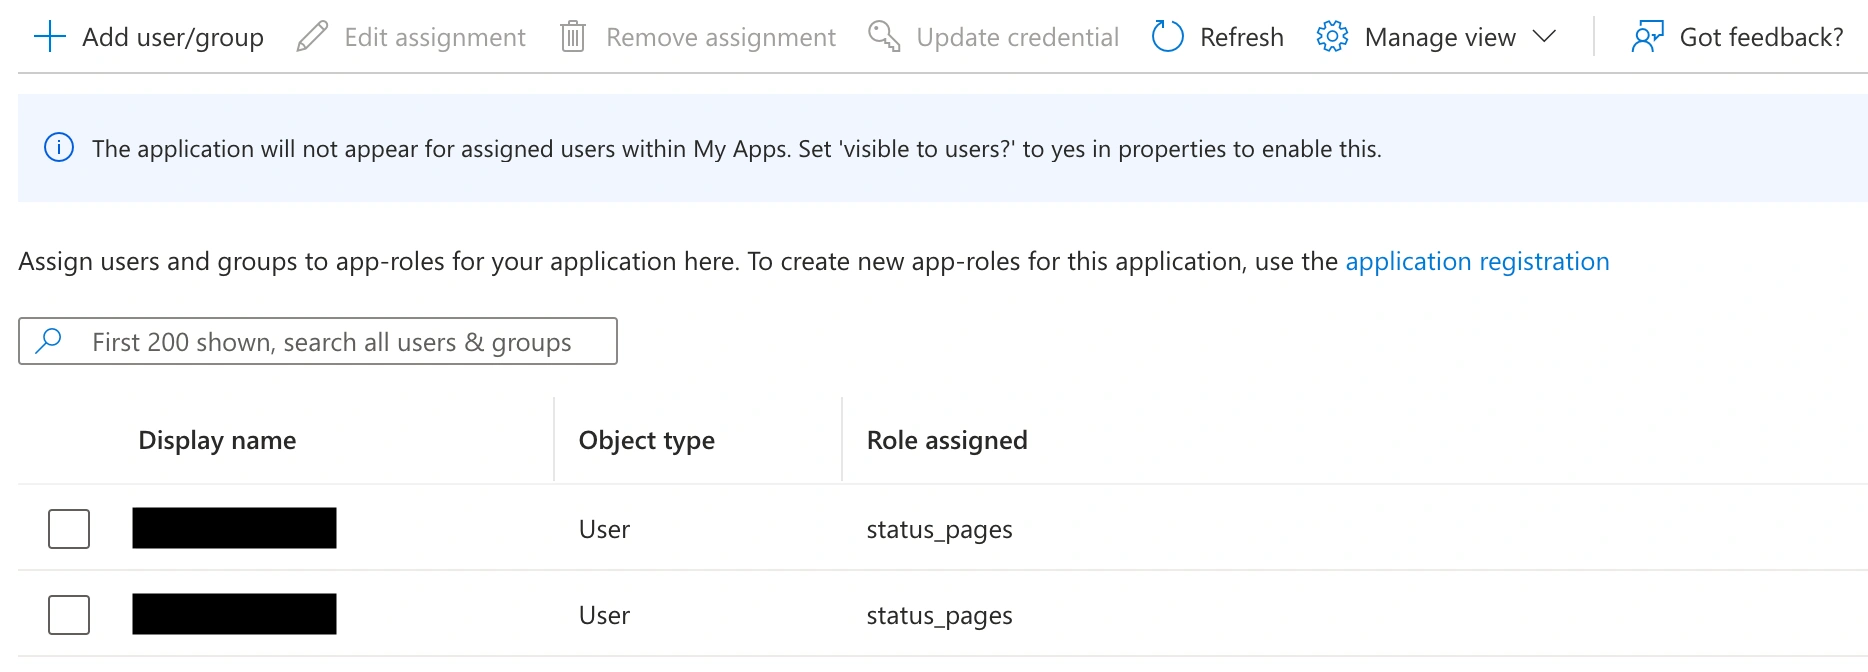
*Assign app role*
### Salesforce
#### Create the Application
1. Ensure that the Identity Provider is enabled in Salesforce. In the Setup view, go to **Settings** → **Identity** → **Identity Provider**, and click **Enable Identity Provider**.

*Enable identity provider*
2. Go to **Settings** → **Identity** → **OAuth and OpenID Connect Settings** and ensure that the **Allow Authorization Code and Credentials Flows** option is enabled.
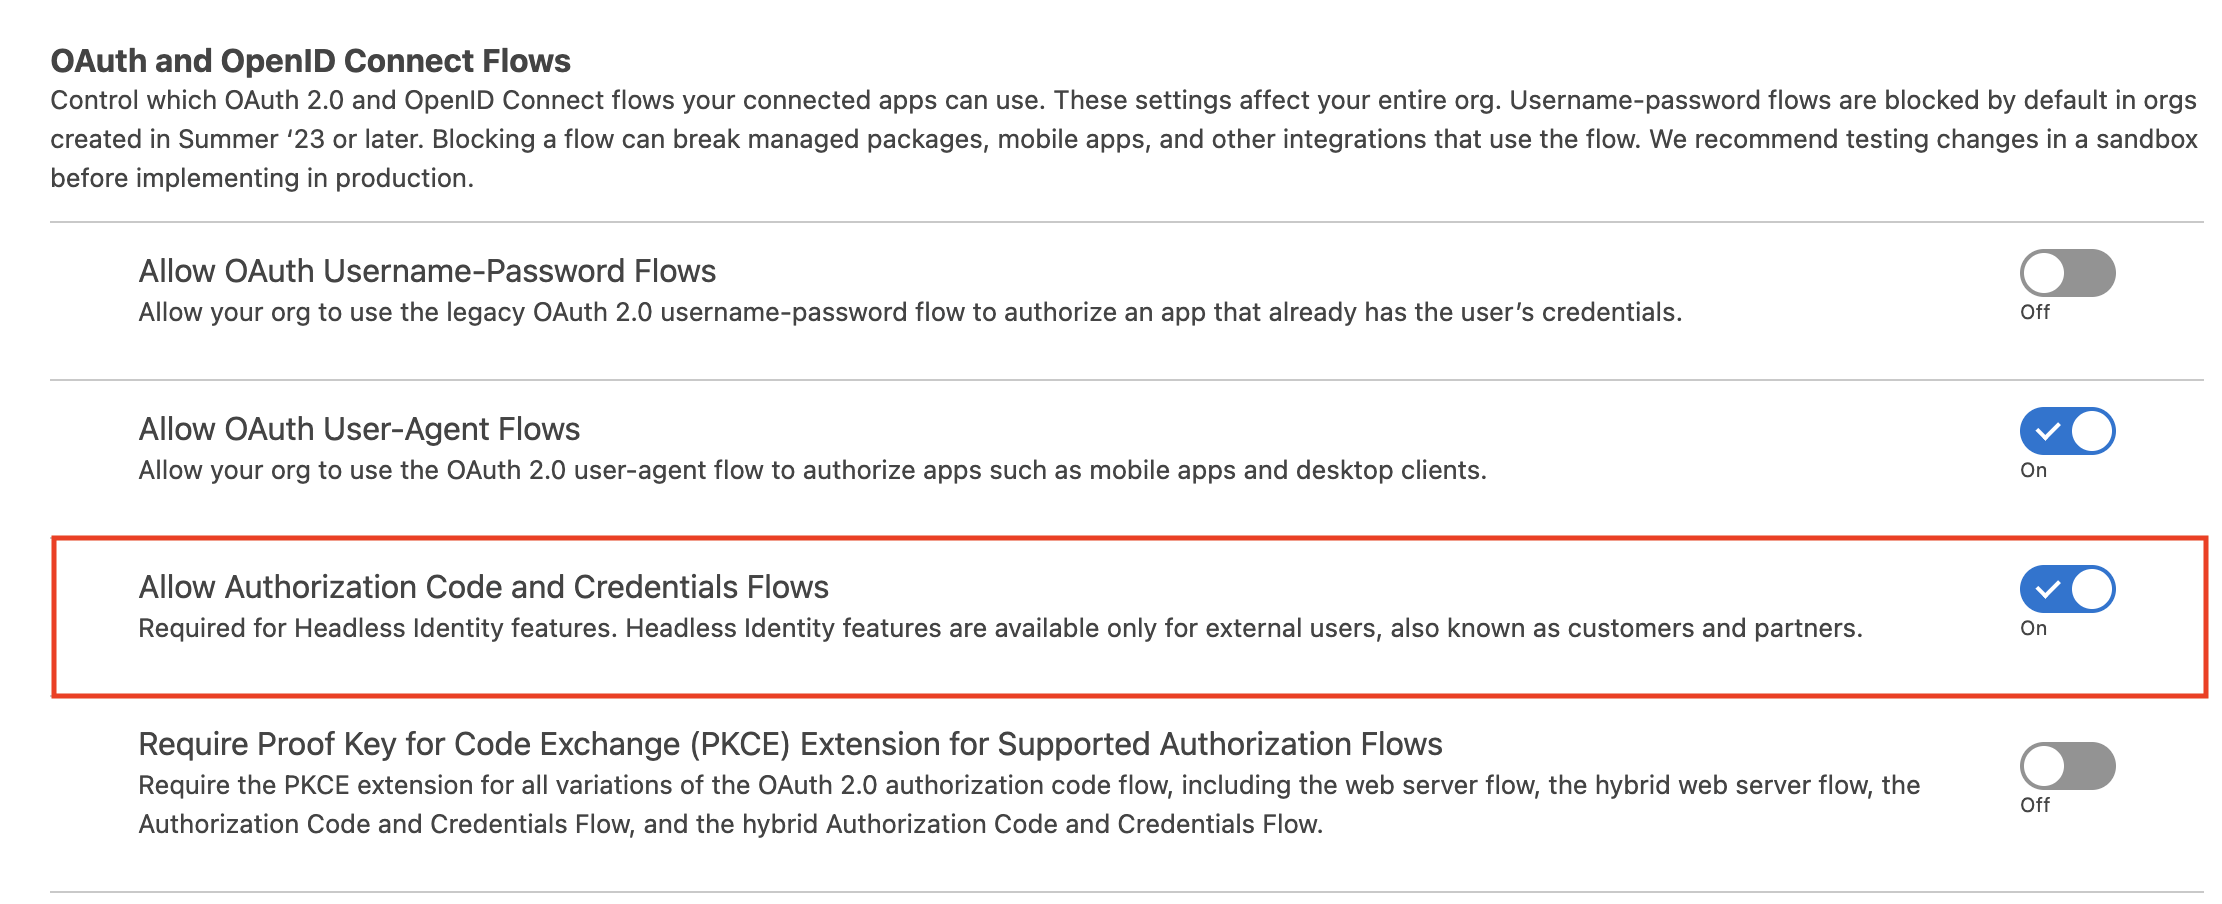
*Allow Authorization Code and Credentials Flows*
3. Go to **PlatformTools** → **Apps** → **External Client Apps** → **External Client App Manager**, and click **New External Client app** to add a new application.

*New external client app*
4. Under **Basic Information**, enter a name and contact email for the app.
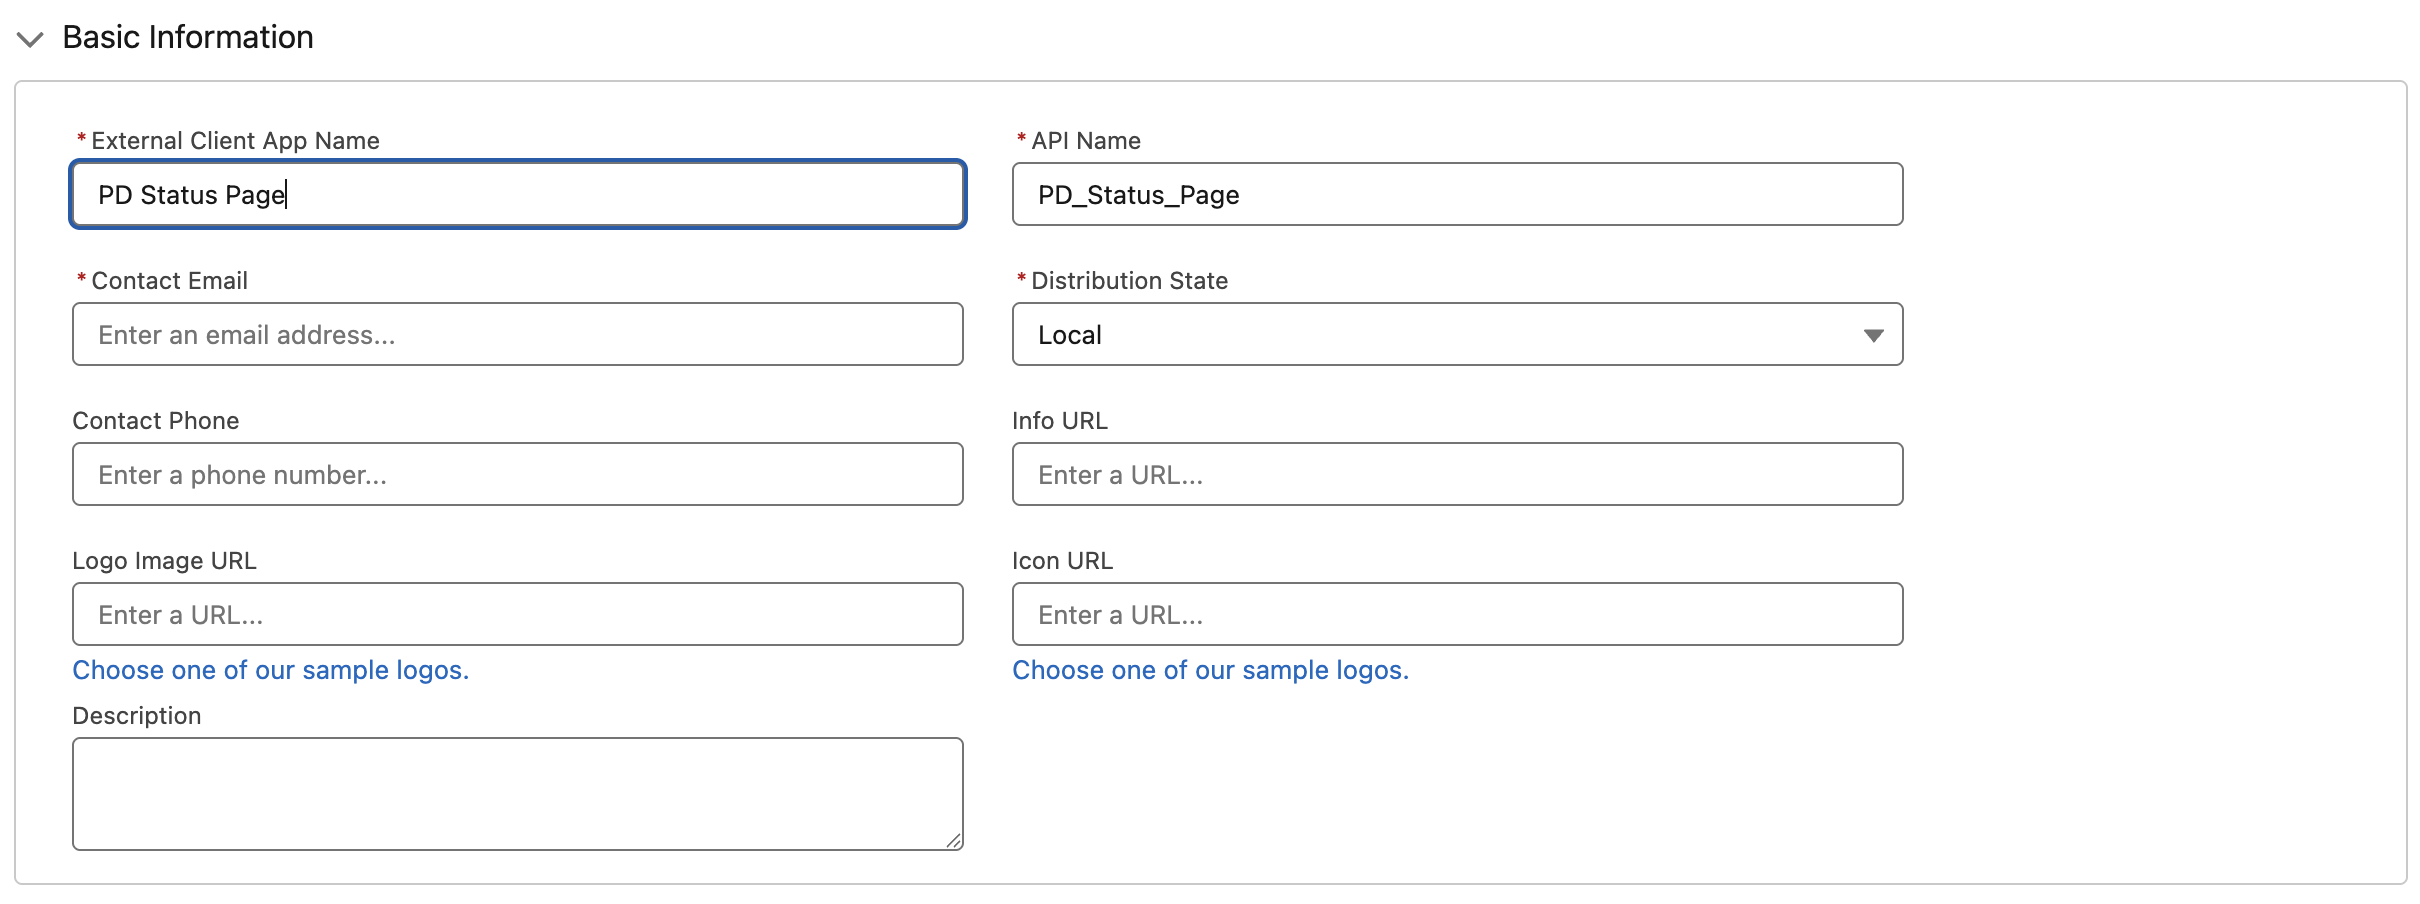
*Application settings*
5. Scroll to **API (Enable OAuth Settings)** and check the **Enable OAuth** checkbox.

*Enable OAuth*
6. Under **App Settings**, configure the following:
- **Callback URL**: the redirect URL from the PagerDuty Private Status Page's Single Sign-On configuration page
- **OAuth Scopes**: Add the following two scopes:
- `Access unique user identifiers (openid)`
- `Access the identity URL service (id, profile, email, address, phone)`
- Check **Configure ID token**
- Check **Include standard claims**
- Check **Custom Attributes**
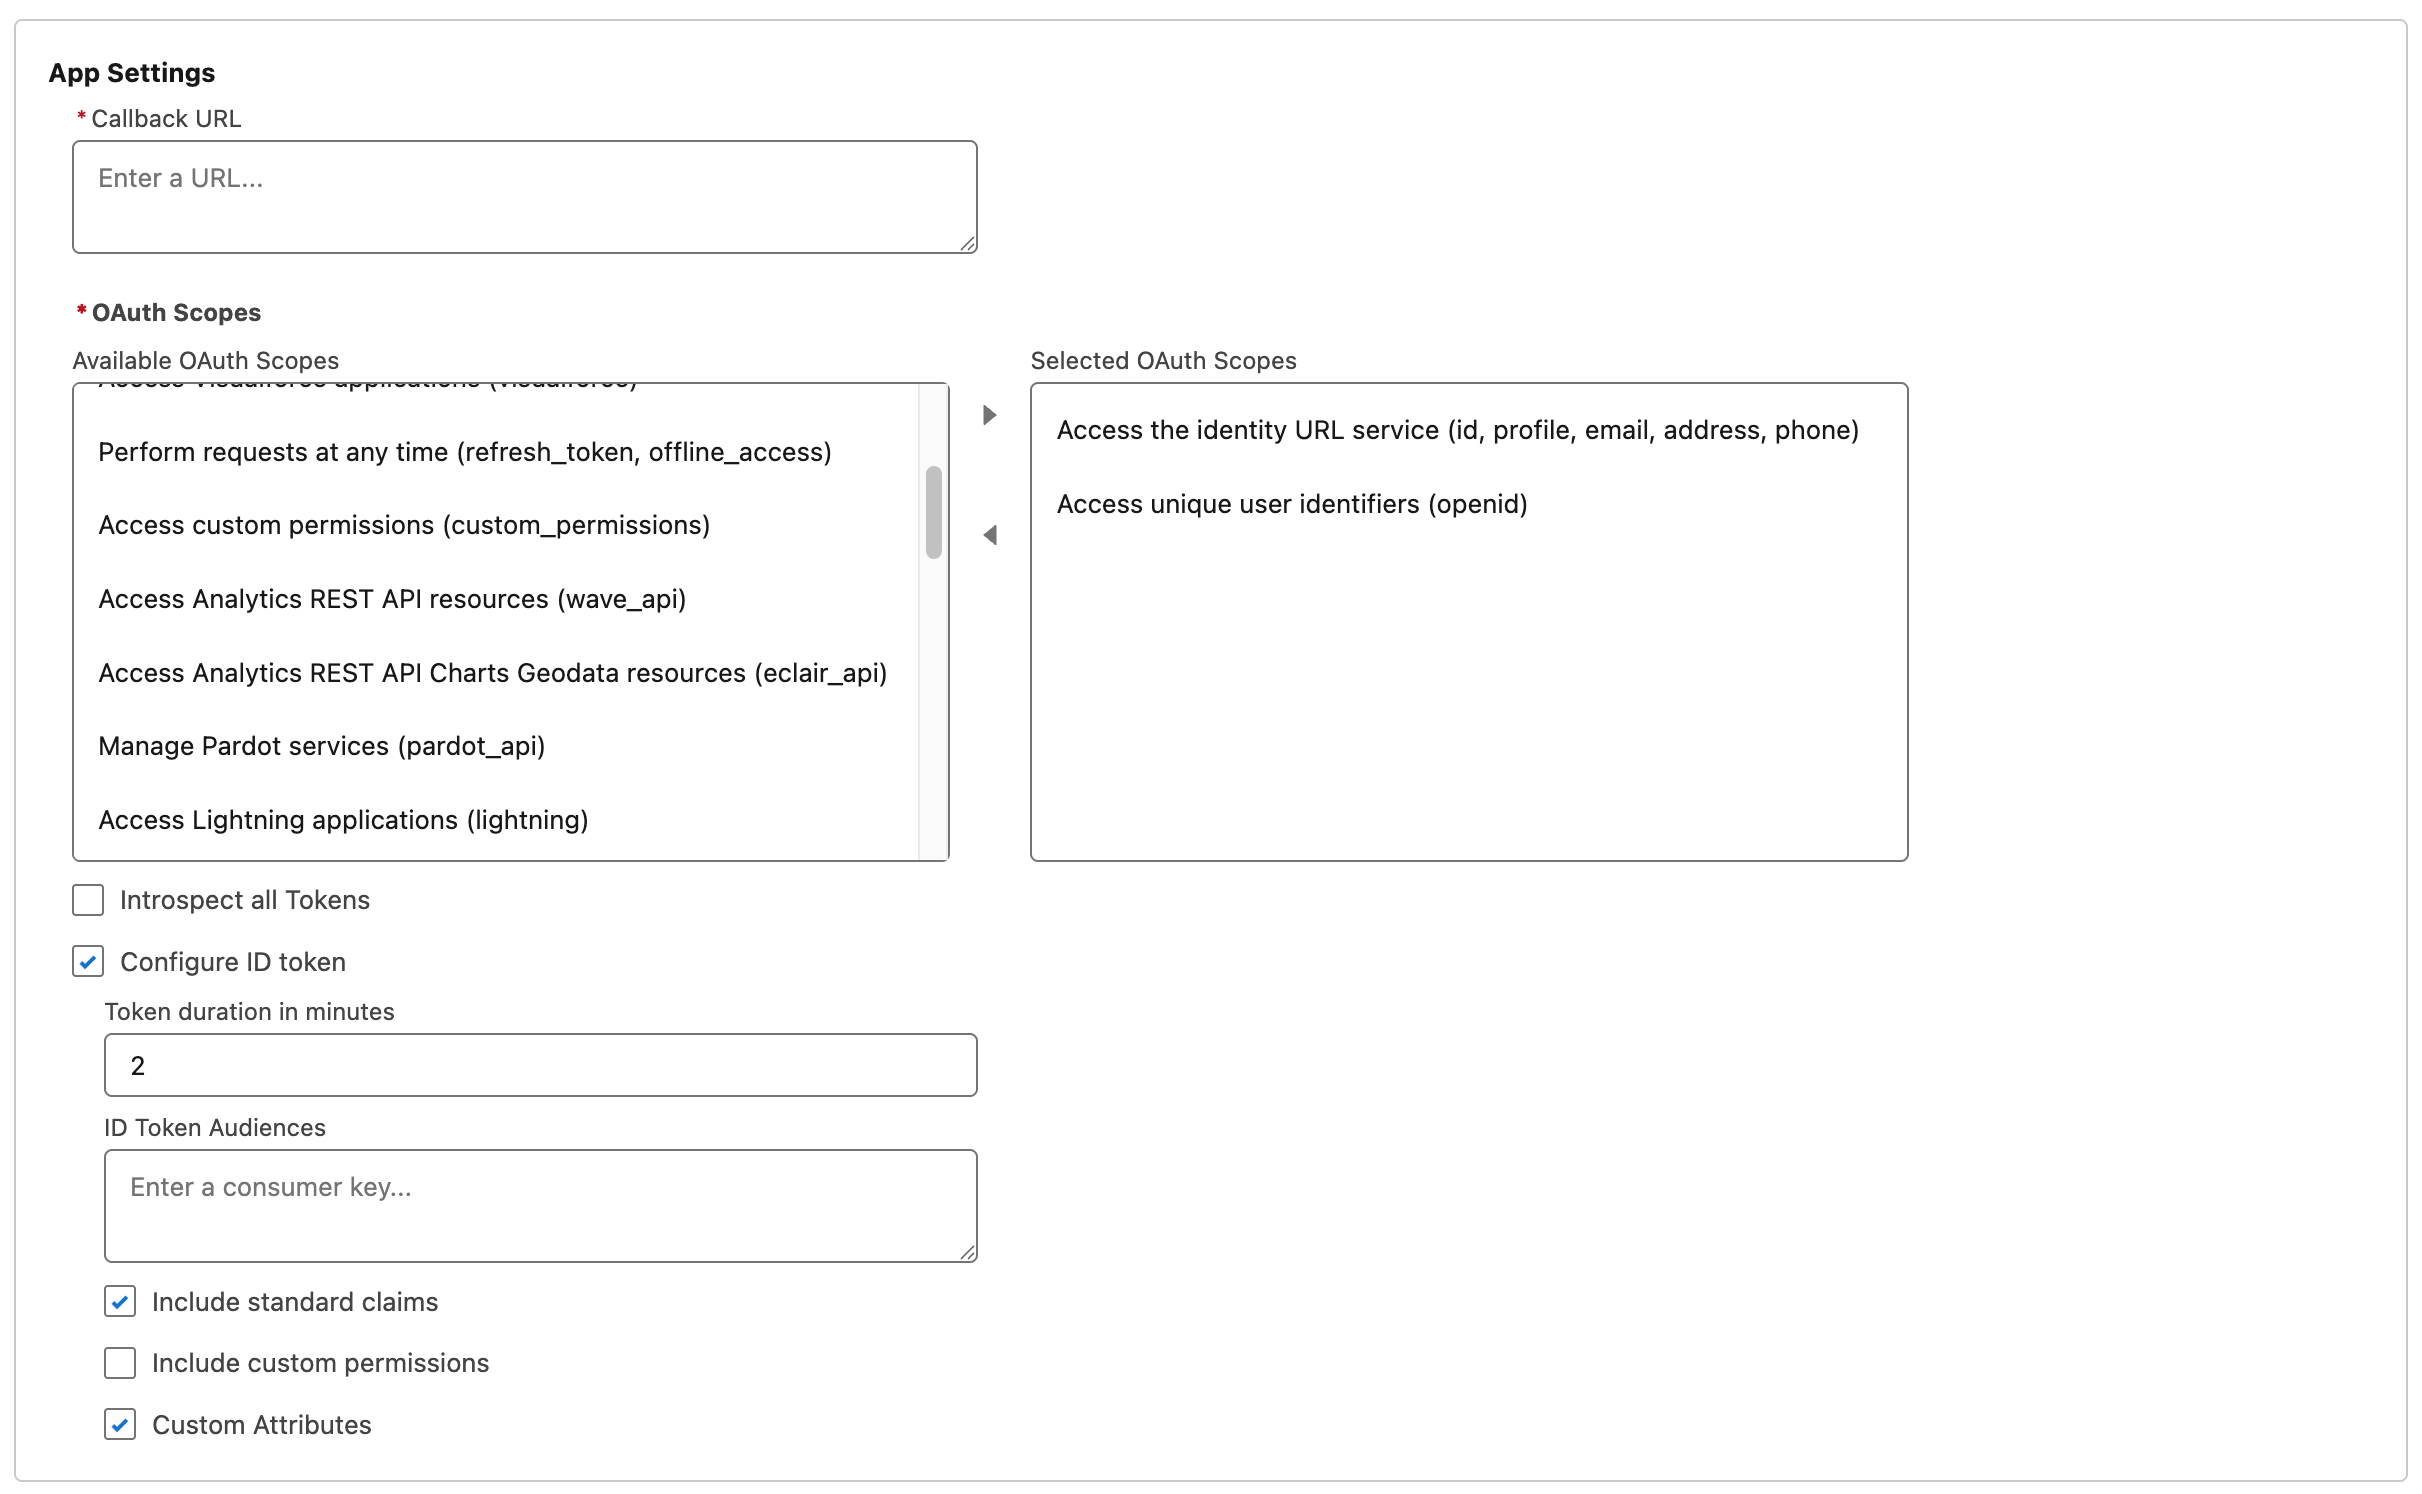
*App details*
7. Under **Flow Enablement**, select:
- **Enable Authorization Code and Credentials Flow**
- **Require user credentials in the POST body for Authorization Code and Credentials Flow**
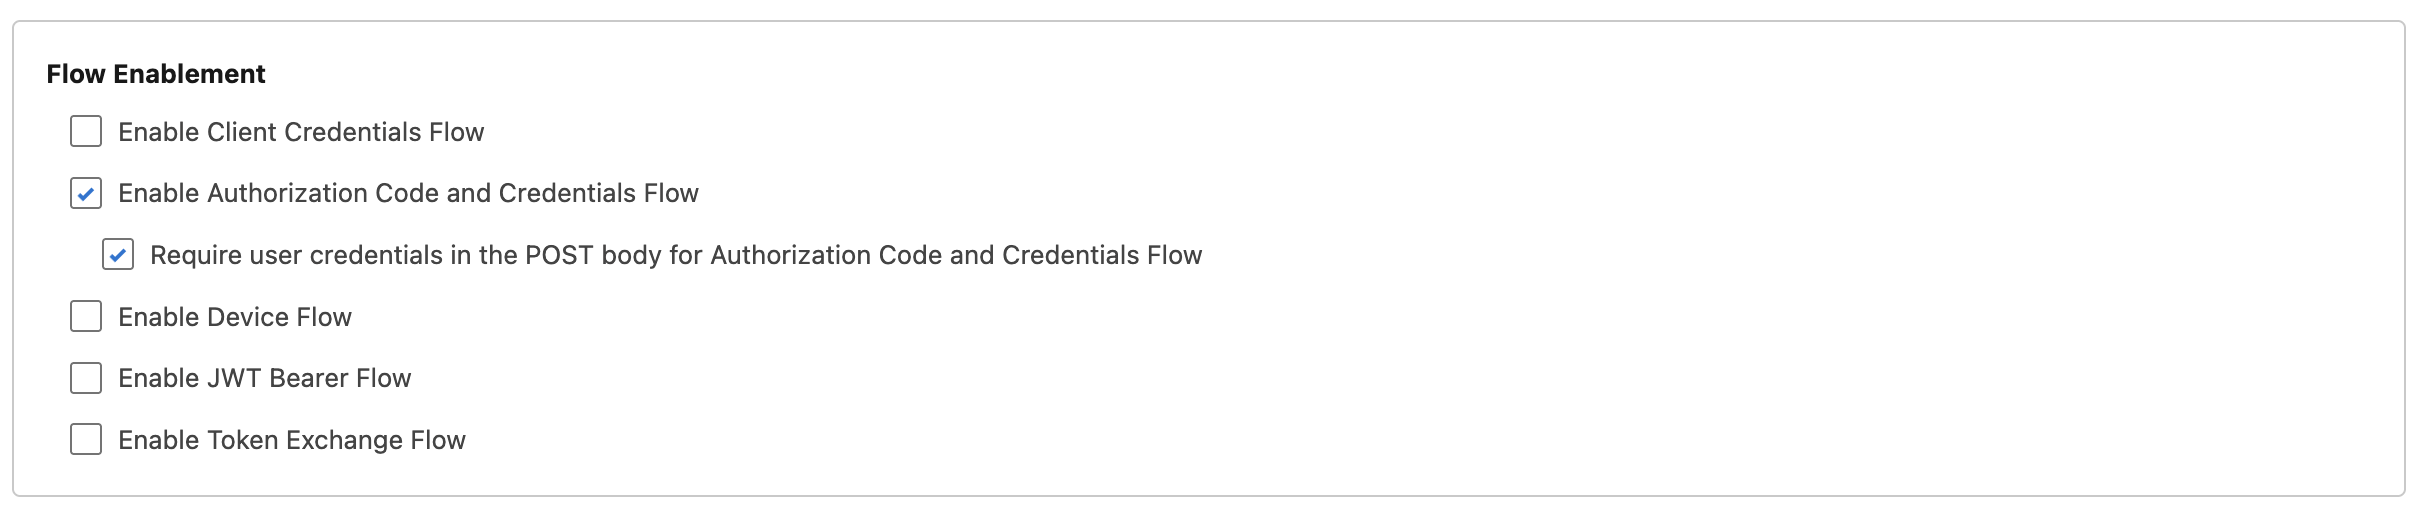
*Flow enablement*
8. Under **Security**, select (some may be on by default):
- **Require secret for Web Server Flow**
- **Require secret for Refresh Token Flow**
- **Require Proof Key for Code Exchange (PKCE) extension for Supported Authorization Flows**
- **Issue JSON Web Token (JWT)-based access tokens for named users**
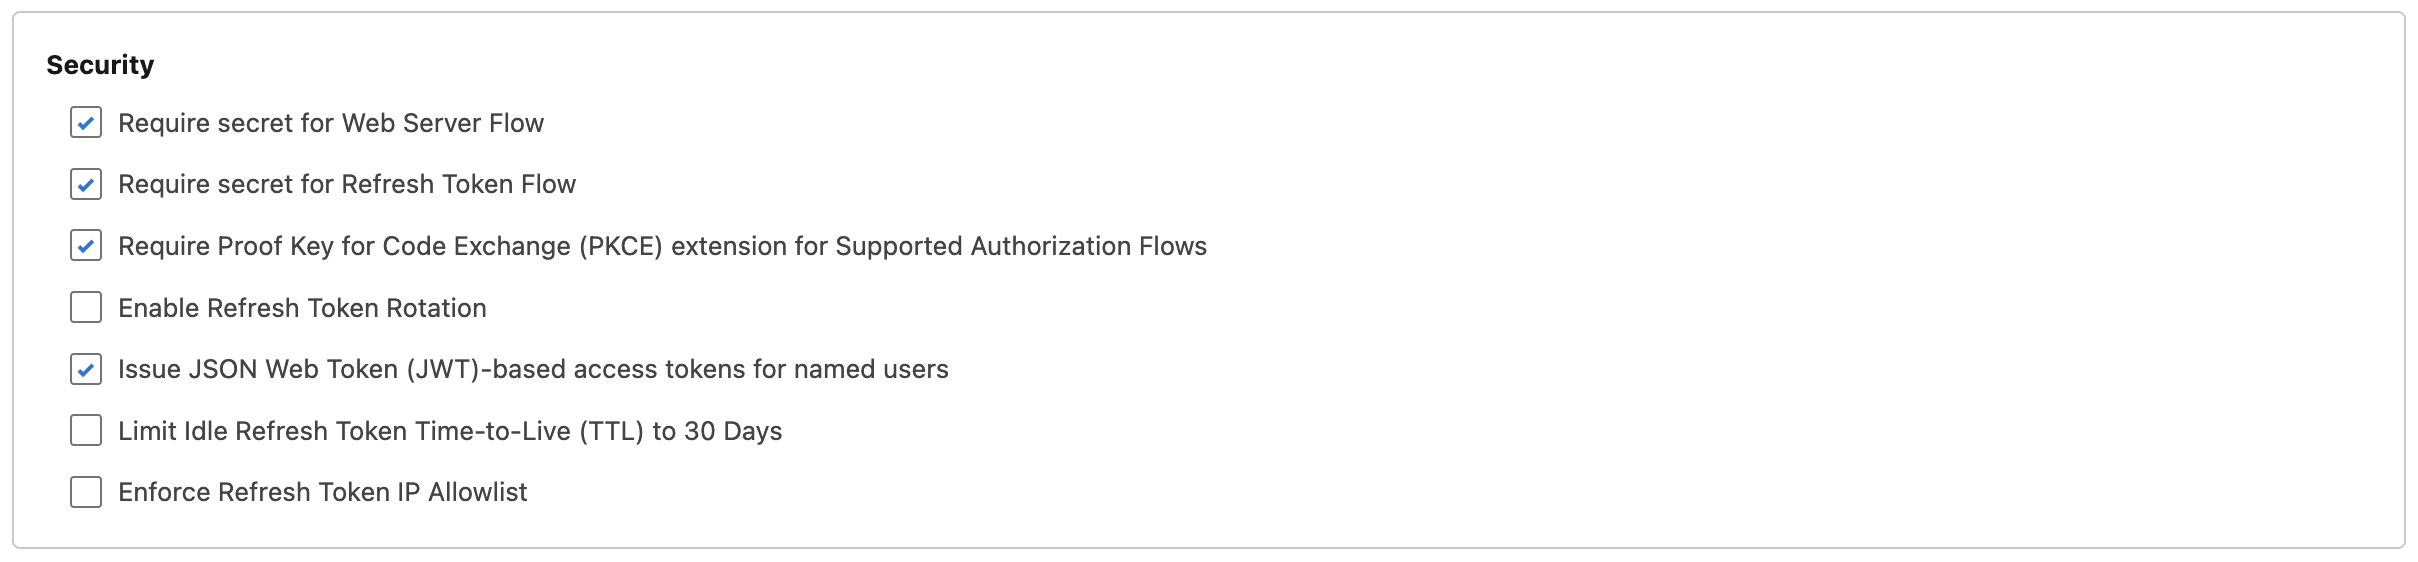
*Security settings*
9. Click **Create**.
10. Go to the external client app's **Policies** tab and click **Edit**.
11. Under **App Policies**, set the **Start Page** field to **None**.

*App Start Page*
12. Click **Save**.
13. Go to the external client app's **Settings** tab.
14. Expand the **OAuth Settings**, and click the **Consumer Key and Secret** button.
15. Copy the **Consumer Key** and **Consumer Secret** values.
16. In your PagerDuty Private Status Page's Single Sign-On settings, enter the following:
- **Configuration URL**: `https://{{your-Salesforce-subdomain}}.my.salesforce.com/.well-known/openid-configuration`
- **OpenID client ID**: `{{Consumer Key}}`
- **OpenID client secret**: `{{Consumer Secret}}`
17. Click **Save**.
#### Profile Mapping and Custom Claims
1. Back in Salesforce, grant permissions to the groups that you want to be able to access the page (if users are not self-authorizing). To do this, go to your external client app's **Policies** tab and click **Edit**. Select the **Profiles** and/or **Permission Sets** for users who can access the app.
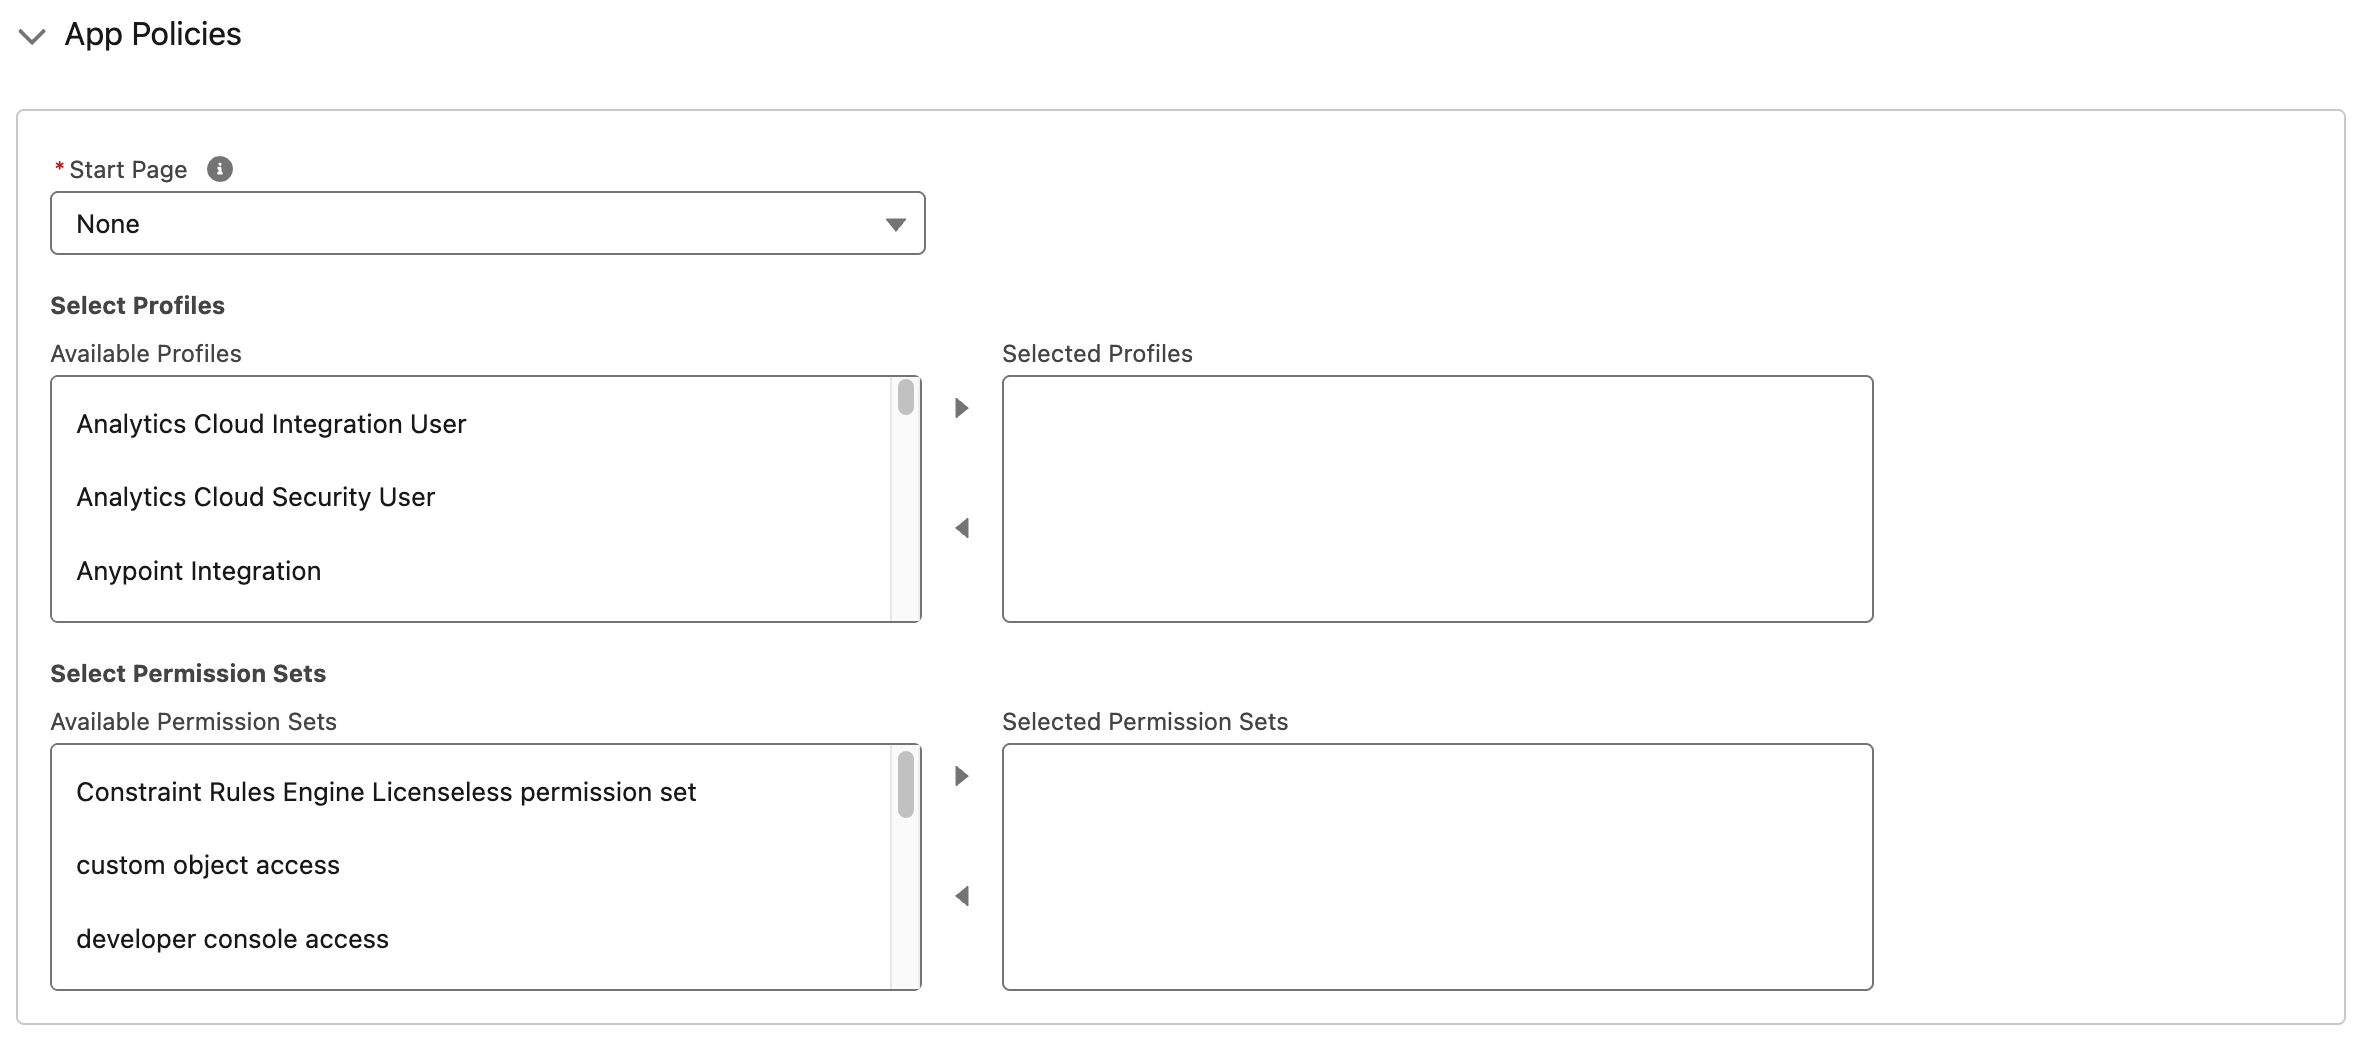
*App Profiles and Permission Sets*
2. Expand **OAuth Policies** and scroll to **Custom Attributes**.
3. Click the plus button to add a new attribute:
- **Attribute Key**: `status_pages`
- **Attribute Value**: `"PXXXXXX"` (including the double quotes, and replacing `PXXXXXX` with the **Custom Claim Value** from your PagerDuty Private Status Page's Single Sign-On configuration page)
4. Click **Save** for the new custom attribute, then click **Save** at the bottom of the **Policies** page.
### Ping Identity
#### Create the Application
1. Go to **Applications**, and click to add a new application.
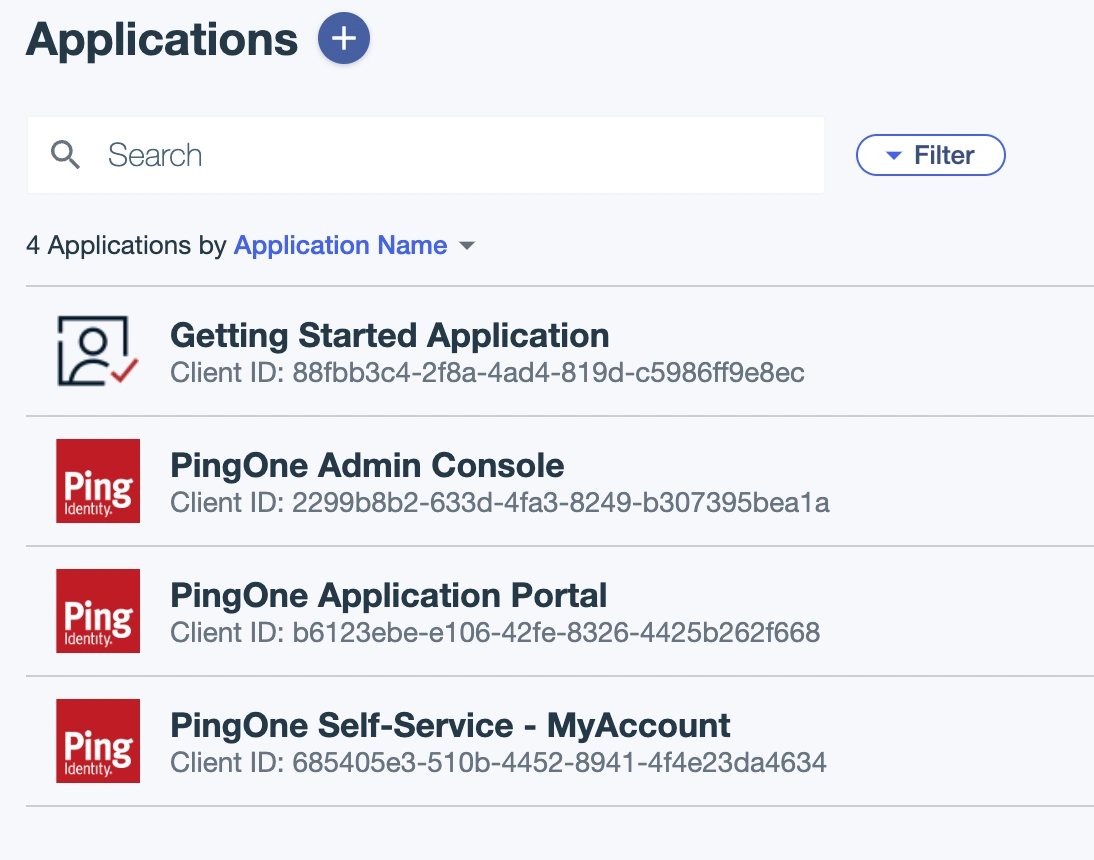
*Add application*
2. Enter an application name, select an application type, and click **Save**.
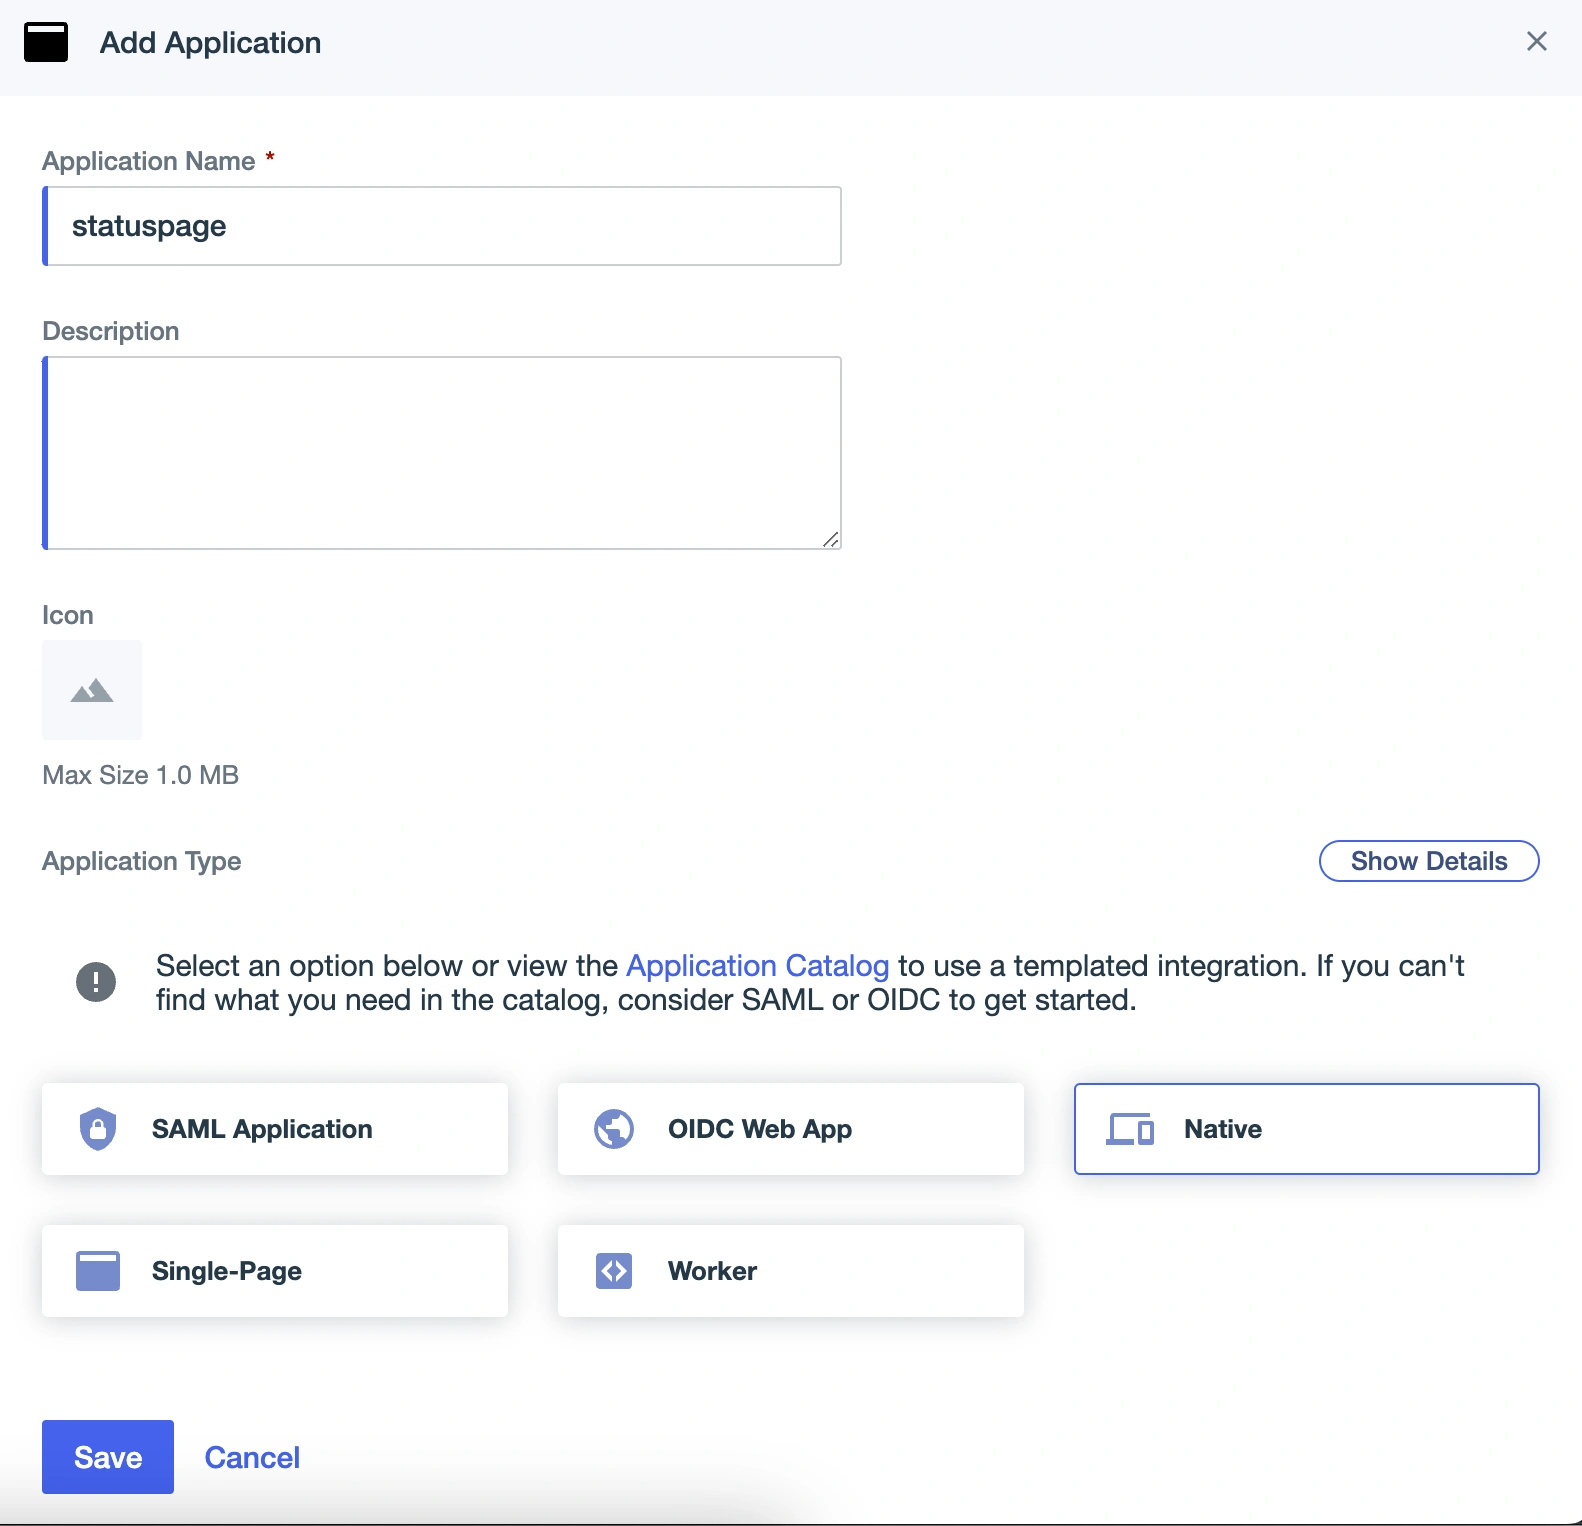
*Application settings*
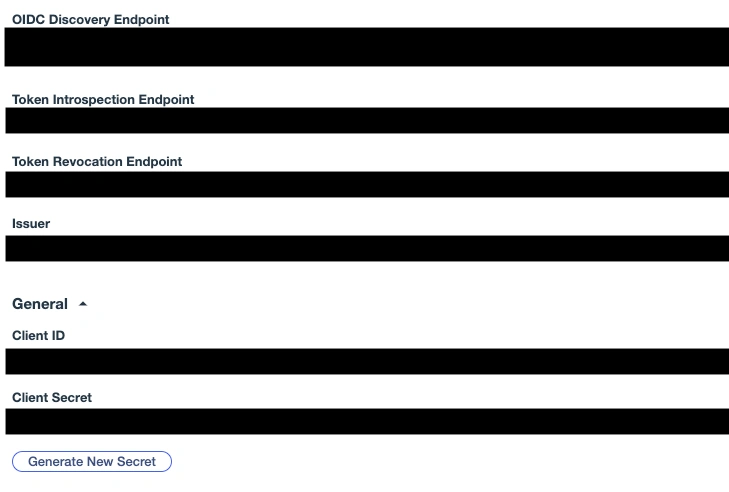
3. Click on the **Configuration** tab and the **URLs** dropdown.
4. Copy the **OIDC Discovery Endpoint**, the **Client ID**, and the **Client Secret**, and paste these values into the PagerDuty private page Single Sign-On Settings.
5. Edit the configuration by clicking the pencil button in the top right corner, update the following fields, and save:
1. **Client Credentials**: Enable
2. **Redirect URIs**: the redirect URL from the PagerDuty Single Sign-On page
3. **Token Endpoint Authentication Method**: **Client Secret Post**
4. **Initiate Login URI**: Login URL from the PagerDuty Single Sign-On page
5. **Signoff URLs**: Logout URL from the PagerDuty Single Sign-On page
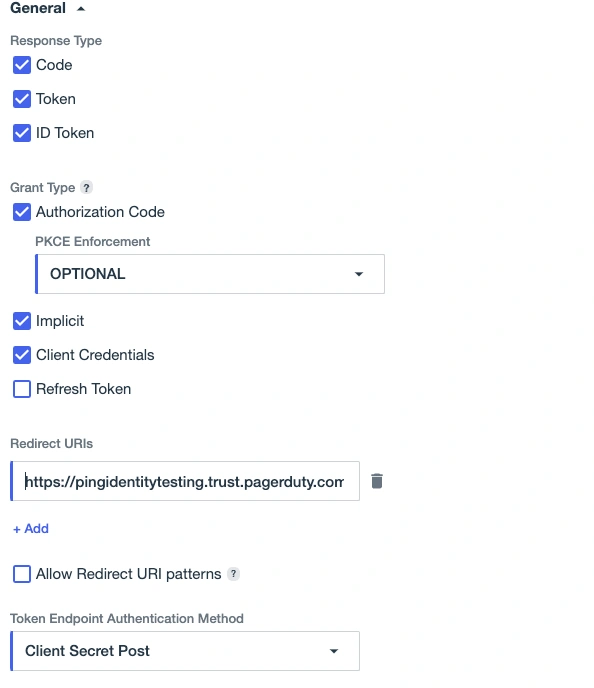
*General settings*
6. In the **Resources** tab, check that the **openid** scope is available.
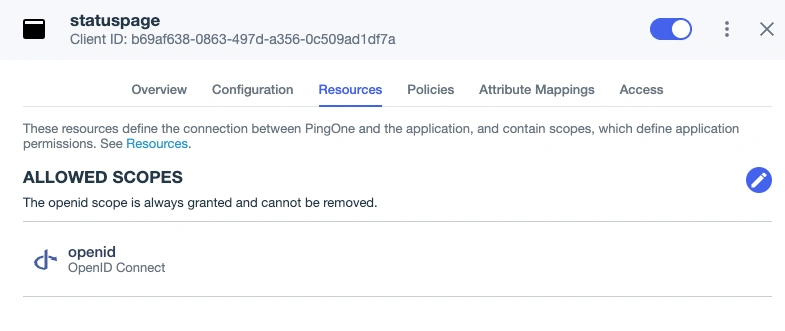
*Allow openid*
#### Profile Mapping and Custom Claims
1. Go to **Directory** → **User Attributes** and click to add a new attribute.
2. Select **Declared**, enter a name for the attribute and save it.
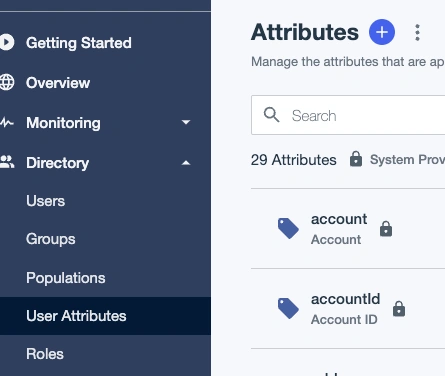
*Add attribute*
3. Go to **Users**, edit any users you want to grant access, and click **Add** next to **Custom Attributes**. Enter the **custom claim ID** value found on the Single Sign-On page.
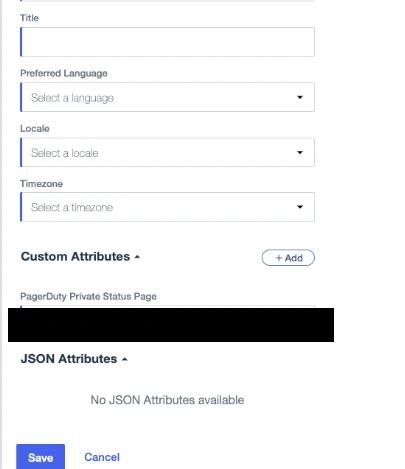
*Custom attributes*
4. Go to **Applications** → **Resources**, find the openid resource that is being used, and select it.
5. Go to the **Attributes** tab and click to add a new attribute.
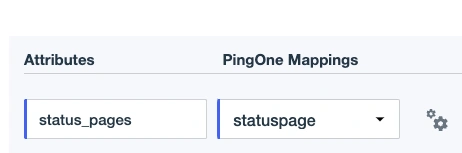
*Attributes*
6. Enter the **Custom Claim Key** from the Single Sign-On page and select the attribute that you created in steps 1–3.
## Remove Users from a Private Status Page
Removing a user's access through your SSO provider alone will not automatically remove them as a subscriber to a Private Status Page in PagerDuty as well. They may continue to receive status update until you have taken the following steps:
1. Remove the user's access in your SSO provider. Please see your SSO provider's documentation for specific instructions.
2. In the PagerDuty web app, navigate to **Status** → **External Status Page**.
3. Select the desired status page's **name**.
4. In the left panel, select **Subscribers**.
5. Select the appropriate tab (i.e., **Email**, **Slack** or **Webhook**), and _optionally_ enter a search term to find the desired user.
6. On the right of the user's row, select → **Delete**.
7. In the confirmation modal, click **Yes, delete**.