# Trial Account Onboarding
Get started with your new PagerDuty account
Getting started with PagerDuty is straightforward with our trial account setup. Sign up with your work email, choose your personalized web address, and follow our step-by-step onboarding process. Learn how to set up your first service, connect your tools, configure how you want to be notified, and get your team ready to respond to incidents.
## Create a Trial Account
1. Navigate to our [sign up page](https://www.pagerduty.com/sign-up/), enter your **Work Email**, then click **Get Started**.
> **Work Email Required:** Non-work email addresses (gmail.com, yahoo.com, icloud.com, and similar) are restricted and cannot be used to create a trial account.
2. Enter your **First Name**, **Last Name**, **Company**, and **Country**, then click **Next Step**.
3. Enter a **Password** and click **Next Step**.
4. Enter a **Subdomain**: PagerDuty accounts are accessible via a personalized [subdomain](/account-admin/account-subdomains). If your company name is EveryNine Inc., for example, you can set your account's subdomain to everynine.pagerduty.com, e9inc.pagerduty.com, or anything else provided that is five or more characters long and is not already in use.
5. Select the **Service Region** where you would like to [host your account](/get-started/service-regions), **USA** or **EU**. Once you have reviewed our [Terms of Service](https://www.pagerduty.com/service-terms-use/) and [Privacy Policy](https://www.pagerduty.com/privacy-policy/), check the **checkbox** to acknowledge and agree to be subject to those terms and policies. Click **Create Account** to create your account.
## Onboarding
The trial onboarding flow will help you get started with your PagerDuty account, from creating your first service to adding the chat tools you’ll use to communicate.
> **Skipped Onboarding?:** If you have skipped your trial’s onboarding flow and would like guidance on how to get started, refer to the **Post-Onboarding** resources linked at the end of each section below.
### Step 1: Create a Service
A service is an entity you monitor that serves as a container for related incidents. Another way to think of a service is a discrete piece of functionality that is built, run, and owned by a single team.
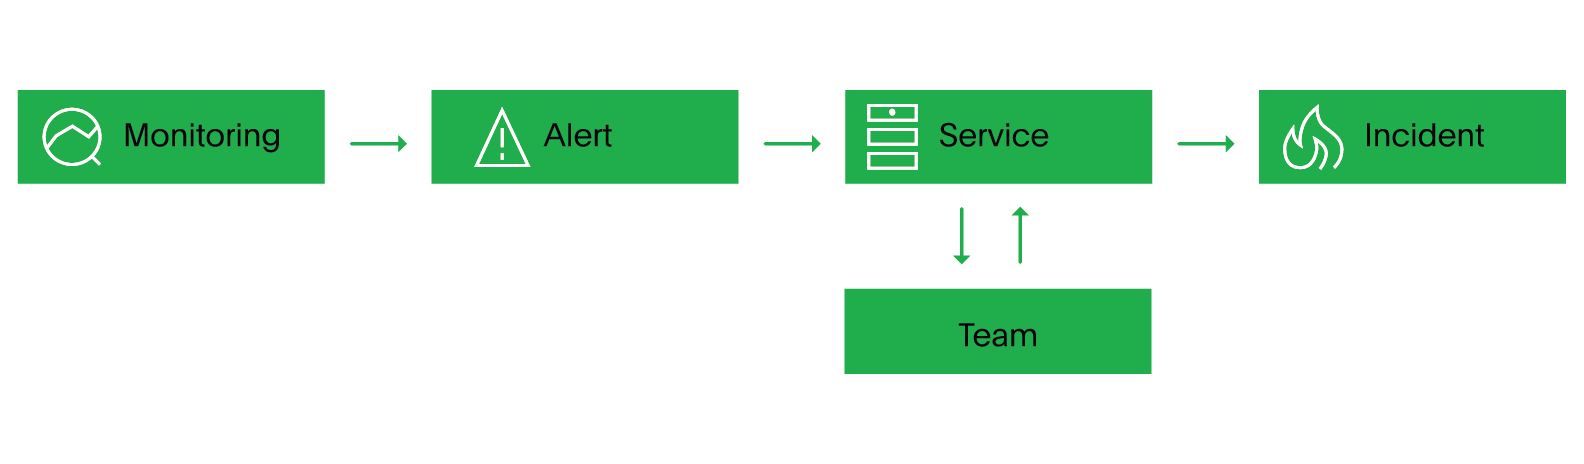
*Quickstart flow chart*
1. Enter a **Service Name** for a service your team is responsible for. The more [descriptive the name](/ops-guides/service-ownership/service-ownership-functions#service-name), the better. Examples:
- Account Authentication
- Checkout App Server
- Inventory Database
2. Click **Continue**.
**Post-Onboarding**
Once you are finished with onboarding, we recommend reading the following articles to continue configuring your account:
- [Create a Service](/incident-management/services/services-and-integrations#create-a-service): Create more services.
- [Configurable Service Settings](/incident-management/services/configurable-service-settings): Adjust your new service’s settings to your preferences.
### Step 2: Configure Inbound Integrations
Your service relies on other tools to receive alerts and data. This information helps you make the right decisions during incident response. Common integrations could include monitoring or ITSM tools.
1. Select **Integration(s)** to add to your service. You may select from the **Most Popular** tab or **All** tab. If you would like to add integrations later, you can click **Skip step** to continue.
2. If you have selected your integration(s), click **Continue**.
**Post-Onboarding**
Once you are finished with onboarding, we recommend reading the following guides and articles to continue configuring your account:
- [Integration Guides](/integrations): Search for and follow instructions in your integration's guide to complete the integration created during onboarding.
- [Add Integrations to an Existing Service](/incident-management/services/services-and-integrations#add-integrations-to-an-existing-service): Add more integrations to your service.
- [Create a Service](/incident-management/services/services-and-integrations#create-a-service): Create a new service with integrations.
### Step 3: Configure Notification Methods
Imagine your service is experiencing an incident. How do you want to find out? You can choose from three methods of notification including email, voice call, and SMS. In your initial account setup, we recommend that you set up all three methods to test them out.
> **Trial Account Notification Limits:** Trial accounts have limits on SMS and voice notifications. See the [**Trial Account Notification Limits**](#trial-account-notification-limits) section later in this article for details.
1. To add a phone and SMS notification method, check the **checkbox** to the left of **Phone & SMS** and enter your **phone number**. To add an email notification method, check the **checkbox** to the left of **Email** and enter your **email**. If you would like to configure your notification methods later, click **Skip step** to continue.
2. If you have entered your notification method(s), click **Send Test Notification**.
3. On the next screen, confirm that your details are correct and click **Send Test Notification** again. You should receive test notifications via the methods configured.
**Post-Onboarding**
Once you are finished with onboarding, we recommend reading the following articles to continue configuring your account:
- [Configure Notification Rules](/account-admin/user-profile/notification-rules): Determine how you are notified during incidents.
- [Contact Methods](/account-admin/user-profile/contact-information): You may choose to add more contact methods.
- [User Settings](/account-admin/user-profile/user-settings): Manage your user settings.
### Step 4: Download the Mobile App
Your service doesn't just experience issues during work hours. You may need to acknowledge alerts, run automations, and respond to incidents from anywhere at any time.
1. Download the PagerDuty mobile app:
[ ](https://apps.apple.com/us/app/pagerduty/id594039512) [
 ](https://play.google.com/store/apps/details?id=com.pagerduty.android&hl=en_US&pcampaignid=MKT-Other-global-all-co-prtnr-py-PartBadge-Mar2515-1)
2. Click **Next** to continue.
**Post-Onboarding**
Once you are finished with onboarding, we recommend reading the following articles to continue configuring your account:
- [PagerDuty Mobile App](/get-started/mobile-app): Learn more about the mobile app.
### Step 5: Configure an On-Call Schedule
On-call schedules are essential to your team’s setup in PagerDuty, as they are used to map out your on-call coverage needs. In conjunction with escalation policies, your on-call schedule determines who will be notified when an incident is triggered.
1. Enter the first and last **Name** of a user that you would like to add to your first on-call schedule. Then enter their **Email** and click to the right to invite them to PagerDuty and add them to the on-call schedule. Repeat this process for as many users as you would like to invite and add. If you would like to create an on-call schedule later, click **Skip step** to continue.
2. If you have invited user(s), click **Create Schedule**.
3. A confirmation dialog will appear stating that your first schedule and escalation policy have been created, and that invites have been sent to your new users. Click **Continue**.
**Post-Onboarding**
Once you are finished with onboarding, we recommend reading the following articles to continue configuring your account:
- [Manage Users](/account-admin/manage-users): Add more users.
- [Create a Schedule](/incident-management/schedules/schedule-basics#create-a-schedule): Add more on-call schedules.
- [Edit Schedules](/incident-management/schedules/edit-schedules): Edit the schedule you have created.
- [Create an Escalation Policy](/incident-management/schedules/escalation-policies#create-an-escalation-policy): Create more escalation policies.
- [Edit an Escalation Policy](/incident-management/schedules/escalation-policies#edit-an-escalation-policy): This step of the onboarding flow creates a Default escalation policy and assigns it to your first service and on-call schedule. If you would like to edit this escalation policy, follow instructions in this article.
### Step 6: Connect With Your Chat Tools
Resolve incidents quickly with your teammates by collaborating directly in Slack and Microsoft Teams. These tools are called extensions because they extend the functionality of your PagerDuty account to your team’s workflows and level up your incident resolution power.
1. Click **Add Extensions**. If you would like to add extensions later, click **Skip step** to continue.
2. You will be directed to your account’s Extensions page. Click **Add** below some of our most popular extensions at the top of the page, or click **New Extension** to search for others.
3. Follow the authentication workflow for your extension.
After completing the final step of onboarding, you will be directed to your PagerDuty account. Please refer to the **Post-Onboarding** articles at the end of each of the onboarding steps to continue configuring account objects.
**Post-Onboarding**
Once you are finished with onboarding, we recommend reading the following articles to continue configuring your account:
- [Extensions](/integrations/extensions)
- [Add-Ons](/integrations/add-ons)
## Trial Account Notification Limits
Trial accounts have a limit on phone-based notifications — SMS and voice combined — to prevent misuse. Push, Email, and Slack notifications are not limited.
| Limit | Threshold |
| :--- | :--- |
| Per-user limit | 100 phone-based notifications |
| Per-account limit | 500 phone-based notifications |
PagerDuty emails the account owner when the account reaches 50%, 80%, and 100% of the account limit.
> **Notifications Blocked at 100%:** When a user or account reaches its phone-based notification limit, PagerDuty blocks further SMS and voice notifications for that user or account. This block does not expire automatically. Email notifications continue to work.
> **Notifications Do Not Resume Automatically After Upgrading:** Moving from a trial to a paid account does not automatically remove an existing SMS or voice notification block. If you were blocked during your trial, contact [PagerDuty Support](mailto:support@pagerduty.com) after upgrading to have the block removed.
## Move from a Trial to a Paid Account
> **Required User Permissions:** Only the Account Owner can move from a trial to a paid account.
When you’re ready to move forward from a trial account:
1. In the web app, navigate to **User Icon** → **Subscriptions**.
2. Under Subscription Details, click **Upgrade Plan**.
3. Choose your preferred **plan**. You may use the toggle on the left to change whether this plan will be **Billed Yearly** or **Billed Monthly**. Click **Select Plan**.
> **Enterprise Plan:** If you select the Enterprise for Incident Management plan, you will be directed to [contact the Sales team](https://www.pagerduty.com/contact-us/) rather than completing the steps below.
4. Under Plan Details, select the preferred **Billing Cycle**, any **Add-Ons**, a **Full User Count**, and a **Stakeholder Bundle**. If you have a discount code, enter it in the **Discount Code** field and click **Apply Discount**.
5. In the Billing and Payment section, enter your **credit card information**. You may _optionally_ select **Same bill-to contact as credit card** to set the contact information for billing to be the same as the credit card information and/or **Same sold-to contact as credit card** to set sold-to contact information to be the same as the credit card.
6. Review your transaction details and click **Complete Your Purchase**.
](https://play.google.com/store/apps/details?id=com.pagerduty.android&hl=en_US&pcampaignid=MKT-Other-global-all-co-prtnr-py-PartBadge-Mar2515-1)
2. Click **Next** to continue.
**Post-Onboarding**
Once you are finished with onboarding, we recommend reading the following articles to continue configuring your account:
- [PagerDuty Mobile App](/get-started/mobile-app): Learn more about the mobile app.
### Step 5: Configure an On-Call Schedule
On-call schedules are essential to your team’s setup in PagerDuty, as they are used to map out your on-call coverage needs. In conjunction with escalation policies, your on-call schedule determines who will be notified when an incident is triggered.
1. Enter the first and last **Name** of a user that you would like to add to your first on-call schedule. Then enter their **Email** and click to the right to invite them to PagerDuty and add them to the on-call schedule. Repeat this process for as many users as you would like to invite and add. If you would like to create an on-call schedule later, click **Skip step** to continue.
2. If you have invited user(s), click **Create Schedule**.
3. A confirmation dialog will appear stating that your first schedule and escalation policy have been created, and that invites have been sent to your new users. Click **Continue**.
**Post-Onboarding**
Once you are finished with onboarding, we recommend reading the following articles to continue configuring your account:
- [Manage Users](/account-admin/manage-users): Add more users.
- [Create a Schedule](/incident-management/schedules/schedule-basics#create-a-schedule): Add more on-call schedules.
- [Edit Schedules](/incident-management/schedules/edit-schedules): Edit the schedule you have created.
- [Create an Escalation Policy](/incident-management/schedules/escalation-policies#create-an-escalation-policy): Create more escalation policies.
- [Edit an Escalation Policy](/incident-management/schedules/escalation-policies#edit-an-escalation-policy): This step of the onboarding flow creates a Default escalation policy and assigns it to your first service and on-call schedule. If you would like to edit this escalation policy, follow instructions in this article.
### Step 6: Connect With Your Chat Tools
Resolve incidents quickly with your teammates by collaborating directly in Slack and Microsoft Teams. These tools are called extensions because they extend the functionality of your PagerDuty account to your team’s workflows and level up your incident resolution power.
1. Click **Add Extensions**. If you would like to add extensions later, click **Skip step** to continue.
2. You will be directed to your account’s Extensions page. Click **Add** below some of our most popular extensions at the top of the page, or click **New Extension** to search for others.
3. Follow the authentication workflow for your extension.
After completing the final step of onboarding, you will be directed to your PagerDuty account. Please refer to the **Post-Onboarding** articles at the end of each of the onboarding steps to continue configuring account objects.
**Post-Onboarding**
Once you are finished with onboarding, we recommend reading the following articles to continue configuring your account:
- [Extensions](/integrations/extensions)
- [Add-Ons](/integrations/add-ons)
## Trial Account Notification Limits
Trial accounts have a limit on phone-based notifications — SMS and voice combined — to prevent misuse. Push, Email, and Slack notifications are not limited.
| Limit | Threshold |
| :--- | :--- |
| Per-user limit | 100 phone-based notifications |
| Per-account limit | 500 phone-based notifications |
PagerDuty emails the account owner when the account reaches 50%, 80%, and 100% of the account limit.
> **Notifications Blocked at 100%:** When a user or account reaches its phone-based notification limit, PagerDuty blocks further SMS and voice notifications for that user or account. This block does not expire automatically. Email notifications continue to work.
> **Notifications Do Not Resume Automatically After Upgrading:** Moving from a trial to a paid account does not automatically remove an existing SMS or voice notification block. If you were blocked during your trial, contact [PagerDuty Support](mailto:support@pagerduty.com) after upgrading to have the block removed.
## Move from a Trial to a Paid Account
> **Required User Permissions:** Only the Account Owner can move from a trial to a paid account.
When you’re ready to move forward from a trial account:
1. In the web app, navigate to **User Icon** → **Subscriptions**.
2. Under Subscription Details, click **Upgrade Plan**.
3. Choose your preferred **plan**. You may use the toggle on the left to change whether this plan will be **Billed Yearly** or **Billed Monthly**. Click **Select Plan**.
> **Enterprise Plan:** If you select the Enterprise for Incident Management plan, you will be directed to [contact the Sales team](https://www.pagerduty.com/contact-us/) rather than completing the steps below.
4. Under Plan Details, select the preferred **Billing Cycle**, any **Add-Ons**, a **Full User Count**, and a **Stakeholder Bundle**. If you have a discount code, enter it in the **Discount Code** field and click **Apply Discount**.
5. In the Billing and Payment section, enter your **credit card information**. You may _optionally_ select **Same bill-to contact as credit card** to set the contact information for billing to be the same as the credit card information and/or **Same sold-to contact as credit card** to set sold-to contact information to be the same as the credit card.
6. Review your transaction details and click **Complete Your Purchase**.